ACTAtek ACTAtek3 ACTA3-1k-FAM-SM-C Manual Download Page 67

ACTA

tek 

Pte Limited


ACTAtek3 Manual 


67 


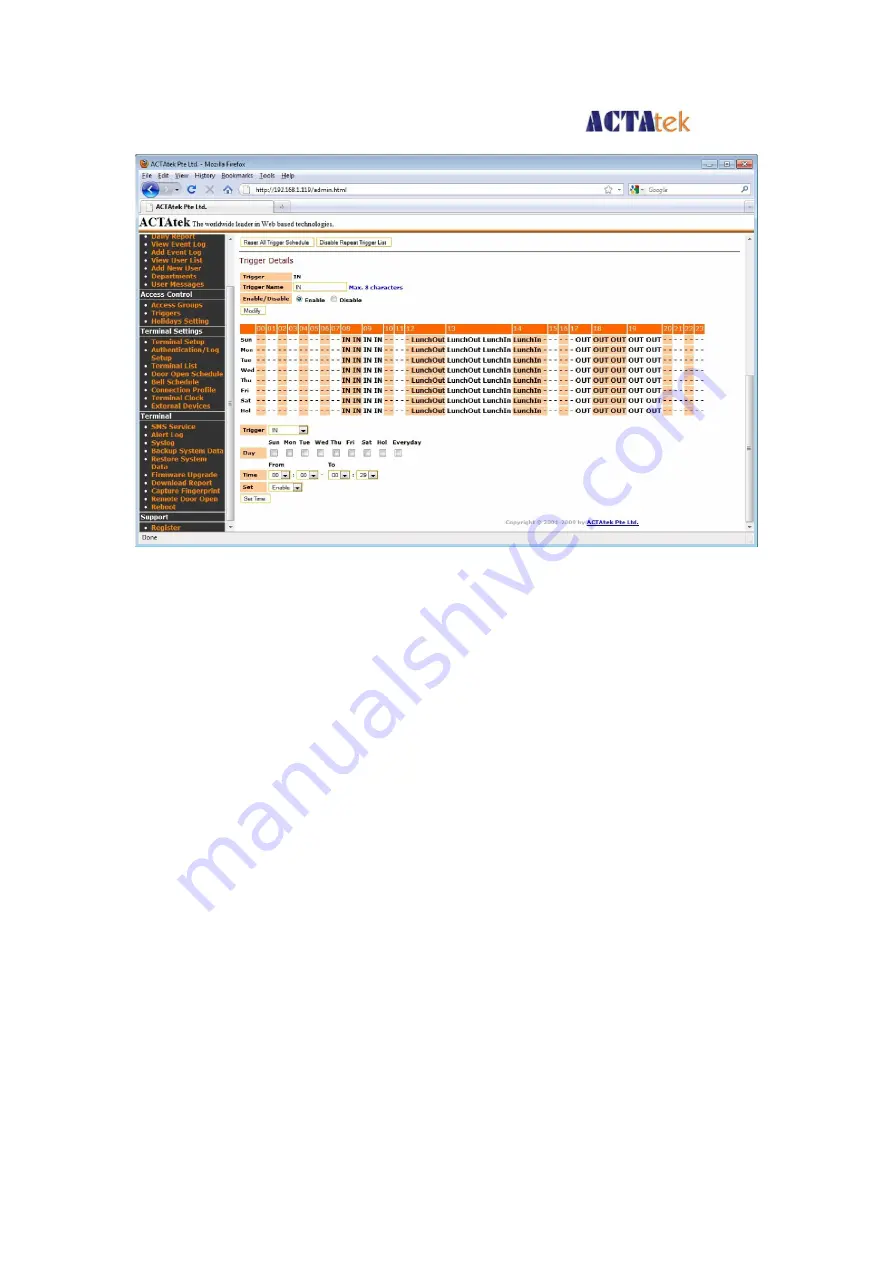
To modify the time settings & other information for the relevant trigger 
displayed,   

The information to be modified includes: 
Trigger Name   

- Display name for the Trigger. 

Day  


- The days for the setting to be adjusted. 

From (Time) 

- Select the onset of this trigger. 

To (Time)   

- Select the end of this trigger. 

Set   


- Set whether to enable or disable it. 

 
To confirm the change, click “Modify” to set the Trigger Name and “Set Time” to 
update the schedule. 


Summary of Contents for ACTAtek3 ACTA3-1k-FAM-SM-C

Page 1: ...ACTAtek3 Manual Version 1 2 Nov 11 2011 ACTAtek Pte Ltd...

Page 2: ...evision History Revision Date Description Author 1 0 2010 03 29 Initial Release Cheong Justin 1 1 2011 05 18 Updated chapter 2 chapter 8 Cheong 1 2 2011 11 21 Correct RS232 back panel ports diagram Up...

Page 3: ...bed stored in a retrieval system or translated into any language in any form or by any means electronic mechanical magnetic optical chemical manual or otherwise without the prior written permission of...

Page 4: ...ctatek com Sales Enquiries Europe Middle East Africa ACTAtek UK Ltd Unit 7 Lightning way West Heath Birmingham B31 3PH U K Phone 44 121 411 2288 Fax 44 121 411 2299 Sales Tel 44 121 288 9923 E mail sa...

Page 5: ...12 2 4 2 Network Interface 12 2 4 3 Power Requirements 12 Chapter 3 ACTAtek3 Structure and Connections 13 3 1 ACTAtek3TM Internal Structure and Connections 13 3 2 Connection Details 14 3 2 1 JP18 14 3...

Page 6: ...on 37 6 7 3 DNS IP Configuration 38 6 7 4 Subnet Mask Configuration 38 6 7 5 DHCP IP Configuration 39 6 7 5 1 To Enable DHCP 39 6 7 5 2 To Disable DHCP 39 6 8 Terminal Settings 40 6 8 1 Terminal Setti...

Page 7: ...Access Groups 62 8 3 1 1 To View Delete Existing Access Groups 62 8 3 1 2 To Add a New Access Group 63 8 3 1 3 To Modify an Access Group 63 8 3 1 4 To Add a New Access Right 64 8 3 1 5 To Delete Modif...

Page 8: ...Atek3 within the shortest time So after read through this training manual user will become more familiar with the functions and features of ACTAtek3 1 2 Document Conventions Input typed in a bold Aria...

Page 9: ...0 000 users 30k Embedded SSL Web Server up to 30 000 users Option Meaning P Pin Model C Camera Model S M L Hp EXBC Smart Card Model Mifare Legic HID Barcode FAM FLI Fingerprint Model FAM S FLI S Finge...

Page 10: ...for 1K 3K 5K model 10K for 10k model 10K for 15k model 10K for 20k model 10K for 30k model 75K for 1K 3K 5K model 10K for 10k model 10K for 15k model 10K for 20k model Maximum Photos stored 500 500 5...

Page 11: ...Smartcard Models 2 3 Warranty Note Warranty Card MUST be mailed or e mailed after you receive your ACTAtek3TM for us to keep your unit s on our warranty program Please keep the left side for your ref...

Page 12: ...raight Network Cable White cable to connect to your corporate network via Hub Switch Crossover Network Cable Black cable to connect directly to your Computer 2 4 3 Power Requirements A 12V DC switchin...

Page 13: ...ACTAtek Pte Limited ACTAtek3 Manual 13 Chapter 3 ACTA3 Structure and Connections 3 1 ACTAtek3TM Internal Structure and Connections ACTAtek3 back panel...

Page 14: ...short circuit 3 2 4 J4 Used as door switch1 3 2 5 JP17 Used for debug or connecting external IO board 3 2 6 JP19 Used for connecting external card readers 3 2 7 J6 Working as a doorbell If doorbell k...

Page 15: ...er on the sensor where the entire core can clearly be seen by the scanner A good image is critical for the overall performance of the fingerprint scanner Any deviation from a good image either by plac...

Page 16: ...within the inner most recurring ridge it is normally located in the MIDDLE of the fingerprint It is therefore critical when enrolling that you place the finger on the scanner where the entire core can...

Page 17: ...ore to be big and clear for a successful enrollment of a clear and good image Make sure the fingerprint image captured is of the core of the finger presented A fingerprint core is a point located with...

Page 18: ...ame finger enrolled in Step 1 slightly aligned to the left Step 3 Place the center of the same finger slightly aligned to the right After each placement wait for the message Template Stored on the LCD...

Page 19: ...le securely attached to the port Once your unit is powered up the following screen should appear the ACTAtek logo the system clock the Trigger should appear in the left corner and the date day of the...

Page 20: ...logo time trigger type date and day displayed when the system is idle and is not currently in use 5 3 Keypad Module The keypad module displayed below has various menu options and alpha numeric keys be...

Page 21: ...base the more users in the system the slower the authentication verification time of the unit since the system has to check its entire database for that 1 specific fingerprint for authentication It is...

Page 22: ...m will prompt for the Password Default 1 Press Enter Return and you will see the Administration Menu Logging in via Fingerprint Press the Admin Menu Button on the keypad of your ACTAtek3TM unit The sy...

Page 23: ...er to Exiting from the system Changing the Default ID Password The first thing to do with the unit is to change the Administrator ID password to do so 1 Log in to the web interface using a web browser...

Page 24: ...enroll more than 3 templates you will be requested to enroll more images of the same finger After each successful enrollment the Template Stored message will be displayed press Enter Return to enroll...

Page 25: ...ter successful enrollment of the third fingerprint the message User Added will be displayed Press Enter Return to add another user or Press the Menu button to go back to the Administrator Menu Screen...

Page 26: ...rt Card is Highlighted Press Enter Return Use the Previous Next buttons to highlight New User Press Enter Return Enter the ID for the new user e g 6 Press Enter Return Place the smart card over the ke...

Page 27: ...rt Card is Highlighted Press Enter Return Use the Previous Next buttons to highlight Delete Smartcard Place the smart card over the keypad If successful the delete progress will be completed and Succe...

Page 28: ...ghted Press Enter Return Enter the ID for the new user e g AB03 Press Enter Return Enter a unique password for the new user e g ABC234 Press Enter Return Once addition is completed the Success message...

Page 29: ...rprint core to capture a good image It is recommended that you do not use the pinky finger for registration and use either one of the other 4 fingers A User Exist warning will be displayed if you add...

Page 30: ...d ID password fingerprint or smart card 2 Unauthorized This message will be displayed when the user tries to login during an unauthorized time period For information on Access groups and time settings...

Page 31: ...tton to go back to the Administrator Menu Screen or hit Back twice to exit from the system 6 4 2 User Management Deactivating A User After enrolling a few users into the system you can manage them wit...

Page 32: ...highlighted Press Enter Return Enter the User ID for deleting Press Enter Return If the user exists and is successfully deleted the above screen will be displayed with the green LED blinking Press En...

Page 33: ...longer than if you input your ID and then fingerprint Authentication methods are discussed in earlier sections please refer to Section 8 on P 18 for more information on authentication verification of...

Page 34: ...isabled e g 8 Press Enter Return If the user exists in the system and has previously enabled their Auto Match function the message Automatch Disabled will be displayed with the blinking Green LED Pres...

Page 35: ...f the screen which is for Date Time Settings Press Enter Return once Date Time is highlighted Press the Previous and Next Button s until the Adjust Date option is highlighted Press Enter Return This s...

Page 36: ...ton to go back to the Administrator Menu Screen or hit Back twice to exit from the system 6 7 IP Settings IP Settings Function ACTAtek3TM is a web based system and works similarly to an Internet Appli...

Page 37: ...t from the system 6 7 2 Default Gateway Configuration Select the icon on the bottom left of the screen which is for IP Settings Use the Previous Next button until the Gateway option is highlighted Pre...

Page 38: ...ddress and vice versa 6 7 4 Subnet Mask Configuration Select the icon on the bottom left of the screen which is for IP Settings Use the Previous Next button until the Subnet Mask option is highlighted...

Page 39: ...tings in the IP Settings option or Press the Menu button to go back to the Administrator Menu Screen or hit Back twice to exit from the system 6 7 5 2 To Disable DHCP Select the icon on the bottom lef...

Page 40: ...ime Attendance purposes or even for those users whose fingerprint are difficult to read 6 8 1 1 Fingerprint Security Level Settings Select the second icon on the bottom left of the screen which is for...

Page 41: ...ess the Menu button to go back to the Administrator Menu Screen or hit Back twice to exit from the system 6 8 3 Unlock Door Select the second icon on the bottom left of the screen which is for Termina...

Page 42: ...to reboot the unit 6 9 Reset Reset Setting Function Resetting the User Database and Event Log can be done from the unit directly This is essential if for some reason the company would like to remove...

Page 43: ...9 2 Resetting the User Database Select the third icon on the bottom left of the screen which is for Reset System Use the Previous or Next button until User Database is selected Press Enter Return If...

Page 44: ...elected Press Enter Return A message Web Port Reset will be displayed once the system has been successfully reset 6 10 Exit Exit Function Once all your settings have been completed you can either exit...

Page 45: ...s a different set of configuration changes that can be made More so to pertain to HR or Payroll requirements The changes can be made to Access levels of different departments addition and monitoring o...

Page 46: ...layed and to go on to login to view the web interface of ACTAtek3 select either Accept this certificate permanently or Accept this certificate temporarily for this session It is recommended to have th...

Page 47: ...ion The Fingerprint Software version installed in the unit Terminal Description A brief description of the terminal IP Address The IP address assigned to the unit Default 192 168 1 100 Primary Seconda...

Page 48: ...system and user configurations The System Administrator is usually the person that takes charge of the whole system which includes the networking and technical side of things as well as the HR and adm...

Page 49: ...r add a new de partment 8 User Messages To send personalized messages to individual users during clock IN OUT 8 1 3 Access Control 1 Access Groups To view or modify existing access groups or add a new...

Page 50: ...previous setting 6 Firmware Upgrade To upgrade the firmware provided by ACTAtek Ltd 7 Download Report To download access log report in Excel or Txt format 8 Capture Fingerprint To capture fingerprint...

Page 51: ...o 10 sets of IN OUT There are 4 different searching options available to view the Attendance Report which include Name User ID Fixed Period or Specific Range of Date and Department The information tha...

Page 52: ...ACTAtek Pte Limited ACTAtek3 Manual 52...

Page 53: ...list click on the column header for instance to sort by Event click on the column header Event which is in blue and the list will be sorted in alphabetical order By default the displayed list is sort...

Page 54: ...to add a remark to this event log entry optional Click Add to append the event to your unit or Reset to cancel any changes made Once Add is successfully completed the confirmation message Add Event L...

Page 55: ...d Feature Description i Active The Status of the User Black Active Grey Inactive ii FP Whether Fingerprint is an available authentication option iii SMC Whether Smart Card is an available authenticati...

Page 56: ...click on Deselect All Once selected click the respective buttons at the bottom of the page as shown below Once deleted the user will no longer be in the system and all their relevant information will...

Page 57: ...er from the left column under User Administration the following page will be displayed Enter the User ID Last Name First Name Other Name Admin Level and enter the password in the following field Check...

Page 58: ...ACTAtek Pte Limited ACTAtek3 Manual 58 Select the status of the user whether they can use Auto Match or Password and click Add to add the new user...

Page 59: ...he department to the existing list 8 2 6 2 To Modify Existing Departments Click on the Department ID which will fill in the blanks above and make any changes after which clicking Modify would confirm...

Page 60: ...n on the left column the following screen should be displayed Enter the User ID of the user this message is for and enter the message in the User Message text box Click Add to send the message to the...

Page 61: ...anual 61 8 2 7 2 To Delete an existing User Message Check the box of the relevant message and if all need to be checked click Select All and hit Delete If the delete does not need to be made click Des...

Page 62: ...giving access rights it can now be done for groups instead of individuals to simplify the process and give it more transparency This option can only be configured by the User Administrator or the Sup...

Page 63: ...eing added and click Add 8 3 1 3 To Modify an Access Group Click on the access group number to view the Access Group There are two parts in this page The top part display the Access Group Name and ass...

Page 64: ...following page On the next page select the days applicable for Day Check Always will apply to all days Then select the From and To time this access right is either enabled or disabled Disabled access...

Page 65: ...Modify Access Right To delete any access right under the Modify Access Group page check the relevant box then click Delete If all access rights are to be removed click Select All then click Delete to...

Page 66: ...description will be synchronized to all primary and secondary terminals It may take a short while to synchronize all primary and secondary terminals status A new secondary terminal joining a primary w...

Page 67: ...tion to be modified includes Trigger Name Display name for the Trigger Day The days for the setting to be adjusted From Time Select the onset of this trigger To Time Select the end of this trigger Set...

Page 68: ...ys Holiday setup can be done from Access Rights Control by clicking on Holidays which will show the following screen To add a new holiday either click on the calendar to find the dates to add Or type...

Page 69: ...lude Network Settings Fingerprint Matching Setting Miscellaneous Setting Terminal Description The Description of the terminal IP Address The IP Address of the terminal Dynamic or Static Subnet Mask If...

Page 70: ...le the Bell schedule option Door Strike 2 Active Alarm Trigger the Alarm connector when door opened more than 30 seconds Network Camera To enable external network camera during Remote Door Open Langua...

Page 71: ...units in connection with this unit including all secondary and primary units connected through the network Also the Camera and Door can be viewed unlocked from this page respectively This link only a...

Page 72: ...ACTAtek Pte Limited ACTAtek3 Manual 72...

Page 73: ...nual 73 8 4 4 Bell Schedule The Bell Schedule option needs to be enabled via Door Strike 2 Option under Terminal Setup page Once enabled ACTAtek3 is able to trigger a bell wired to the door strike 2 c...

Page 74: ...time of the local time server either provided by the government or other authorities in the region If the SNTP is disabled the ACTAtek3TM will either have to follow the time on the PC or a time can b...

Page 75: ...splayed To add an external reader select the Reader Type the reader s Address the trigger type and click Add once all fields are completed Once added the reader will appear in the External Reader List...

Page 76: ...speaking the user information event logs access group and triggers will be saved during the backup In that case it could help the units share the configuration with different devices in the network or...

Page 77: ...kup caused the system to work improperly or malfunction you can always rollback to the previous setup by selecting the Restore System Data option under Tools in the left column Click Browse to locate...

Page 78: ...site Click Open once the file has been located and Upload to upload it to your system You will then be prompted to upgrade your system this should take a couple of minutes Once upgraded please do rebo...

Page 79: ...by various different options as shown below Reports can either be downloaded by User Name User ID Department Period From To Date yy mm dd Event Format CSV or Text Click Download for the report to be d...

Page 80: ...stand the fingerprint issues and what they can do to improve readings This image is captured via the terminal menu under User Management Capture Fingerprint Once the fingerprint is captured it can be...

Page 81: ...d hours For these reasons the Remote Door Open feature comes in handy since visitors do not need to be enrolled in the unit to gain access but the reception or someone near a computer can simply open...

Page 82: ...ACTAtek Pte Limited ACTAtek3 Manual 82 8 5 7 Reboot To reboot the ACTAtek3 remotely the Reboot option can be selected Click on the Reboot button to reboot the unit...

Reviews: