11
2.1.4 CD-RW(or
DVD-RW) Installation
y
Securely fix CD-RW (or DVD-RW) by using bracket and screws provided herewith.
y
Please do not use any different CD-RW (or DVD-RW) cables (data cable and power supply cable) other than the ones we
provide. Otherwise, it may cause damage to the CD-RW (or DVD-RW).
y
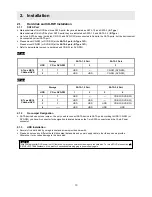
Only one CD-RW (or DVD-RW) can be used. Mount it at the SATA 3 port. (
A Type
DVR)
Only one CD-RW (or DVD-RW) can be used. Mount it at the SATA 4 port. (
B Type
DVR)
2.2 Connector
Wiring
2.2.1 Video-In/Out
Connections
y
Connect a camera to ‘
VIDEO IN
’.
y
If you want to link camera input to another device, please connect the camera to ‘
LOOP OUT
’.
y
Assure the ‘
VIDEO IN
’ and ‘
LOOP OUT
’ are connected properly, not oppositely.
2.2.2
Monitor Connections (Video Out, VGA, SPOT)
y
Use with CCTV monitor, SVHS monitor, and computer monitor. Please connect the CCTV monitor to ‘
VIDEO OUT’
, the
computer monitor to ‘
VGA
’, respectively. If necessary, you may connect another CCTV monitor to ‘
SPOT
’.
2.2.3 Audio
Connections
y
Connect an audio device to ‘
AUDIO IN
’, and a speaker system to ‘
AUDIO OUT
’. Please use a speaker system with volume
adjustable.
2.2.4 TCP/IP(Ethernet)
Connections
y
Connect to ‘
ETHERNET
’ connector with the LAN cable.
y
When connect to Internet, use an ordinary LAN cable (Non-cross cable). However, when connect directly to your PC,
please use only ‘Cross cable’.
2.2.5 Alarm
Connections
y
Connect Alarm Input (Sensor) to ‘
AI 1~AI 4
(
AI 16
)’ connectors, and connect Sensor Common to ‘
G
’ connector.
y
Connect Alarm Output (buzzer, siren, etc.) to ‘
AO 1~AO 4
(
AO 16
)’ connectors, and connect Common to ‘
G
’ connector.
y
Connect Pan/Tilt receiver (or Pan/Tilt camera) to ‘
RS-485/422
’ connector. Please observe proper (+) and (-) polarity.
2.2.6 RS-485/422
Connections
y
PTZ Camera connector
y
Please use TX+, TX-, RX+, and RX- terminals.
(NOTE)
SPOT function use only
B Type
model.
(NOTE)
LOOP OUT function use Only
B Type
model.
CAUTION
Install CD-RW (or DVD-RW) hard disk after DVR power is off. Otherwise, it may cause permanent damage to the hard disk. To
turn off DVR, please click (
) SETUP>SYSTEM>Shutdown. Also, wait for 5 seconds before plugging in power supply again.
CAUTION
y
For installation/addition/replacement/Removal of HDD (CD-RW, DVD-RW), make sure that DVR is turned off. Otherwise, it may
cause permanent damage to the HDD (CD-RW, DVD-RW).
y
Installation/Addition/Moving/Replacement:
You should start ‘HDD initialization’ including formatting. Otherwise, DVR won’t
recognize the hard disk and may begin to function abnormally. Please follow the below procedure for ‘HDD initialization’.
①
(Date/Time setup) Set up the current date and time (SETUP>SYSTEM>Admin>Date/Time)
②
(Initialization of system setup) All values in setup are restored to factory default settings
(SETUP>SYSTEM>Information>Status>Setup>Default).
③
(HDD format) HDD format is done by SETUP>SYSTEM>Admin>Storage>Format. If there are more than two HDDs, each must
be formatted, separately. When the format is completed, DVR will auto-reboot.
y
Removal:
Follow the Remove procedure even when a pre-installed hard disk has been removed. In
SETUP>SYSTEM>Admin>Storage>Format, click (
) ‘Removed’ item under the discrete Format headings of a corresponding
HDD to discard ‘HDD’ item. When the Remove procedure is completed, DVR will auto-reboot.


