background image


Wire Rope Hoist 

PAGE: 20 

Model WR 

WR-0214 

2721 NE 4

th

 Ave Pompano FL, 33064 | (954) 367-6116  


Visit WWW.ACIHOIST.COM for the most current information


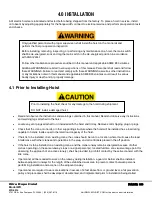
Check power supply that will be furnished to the hoist and trolley. It must be the same as shown on the hoist and 

trolley serial plate. 


Check wire rope for damage and spooling on drum. Be sure rope is properly seated in drum grooves and 

sheaves. Make sure both of rope ends are tightly secured. 


After each rope replacement as well as after repair and reassembling of the electric hoist check the phasing and 

the limit switch adjustment for upper and lower position of the loading hook.  


While carrying maintenance and repair activities for electric repairs/maintenance, make sure that there is no load 

on the hook; the power supply switch is turned off and unauthorized switching on is eliminated. 


Check the loading hook for cracks and deformations as well as the good working order of the fuse for self-

release of the load. 


Check the bearing screw joints to avoid them eventually self-unwind. 


Check the reliable connection of cable protective conductors to the grounding terminals in the electric board as 

well as the transformer and the electric. 


If hoist has a trolley, check that the crane bridge beam or monorail beam is level, straight, and clean. Check that 

trolley stops are installed, or install trolley stops, at the open end or ends of the beam to prevent the trolley from 

traveling off the beam. Trolley stops that engage trolley wheels are not recommended. Check that trolley stops 

will prevent overhanging parts of the hoist and trolley from interfering with other equipment beyond the ends of 
the beam or monorail. 


4.2 Installation  of Hoist 

Fixing the Rope 

Depending on the size of the electric hoist and the conditions of packing, the hook-block may be delivered disassembled 

from the rope. After installing the hook-block, the rope must be tight and shouldn’t be twisted. Fix the rope ends as in the 

following order:  

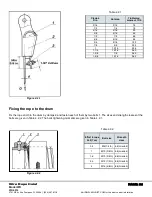
Fixing the rope end to the body (See Figure 4.2.1) 

Fix the rope of diameter “d” in the wedge bush 2, so that its bearing section would lie on the vertical side of the wedge 1. 

To secure the rope ends from falling out, a clamping element 3 is mounted by nuts at the end of the rope.  

The distance between the rope end and the wedge bush 2 shall be at least 3.9 inches the maximum distance is: 


9.8 inches for 0.5 and 1 ton hoist capacity 


13.8 inches for 2, 3, 4 and 5 ton hoist capacity 


17.7 inches for 8 ton hoist capacity 

The distance between the clamp 3 and the rope end shall be 1.97 inches. 


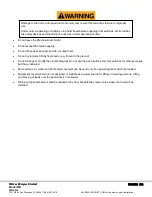
The main switch (disconnect) supplying power to the crane, monorail, or other piece of 

equipment where the hoist is to be installed, shall be de-energized. Lock and tag the main 

switch in the de-energized position in accordance with ANSI 

Z244.1.


Summary of Contents for WR

Page 1: ... website OPERATION MANUAL This operation manual is intended as an instruction manual for trained personnel who are in charge of installation maintenance repair etc Hoist Serial Number __________________________________________ Date Purchased ______________________________________________ Before equipment use please read this operation manual carefully ...

Page 2: ...Wire Rope Hoist PAGE 2 Model WR WR 0214 2721 NE 4th Ave Pompano FL 33064 954 367 6116 Visit WWW ACIHOIST COM for the most current information ...

Page 3: ...Wire Rope Hoist PAGE 3 Model WR WR 0214 2721 NE 4th Ave Pompano FL 33064 954 367 6116 Visit WWW ACIHOIST COM for the most current information ...

Page 4: ...rior to Installing Hoist 19 4 2 Installation of Hoist 20 4 3 Installation of Base Mount Electric Hoists 22 4 4 Monorail Track 24 4 5 Adjusting trolley width and Installing Hoist Trolley on Beam 24 4 6 Low Headroom Hoist Trolley 25 4 7 Connecting Power Supply to Hoist 27 4 8 Before Operating the Hoist 28 4 8 1 Checking the end limit switch function 28 4 8 2 Adjusting the lever system actuating the ...

Page 5: ... Shift 34 6 0 MAINTENANCE AND INSPECTION PROCEDURES 35 6 1 Prior to maintenance or inspection 35 6 2 Inspection 36 6 3 Recommended Inspection and Maintenance Plan 38 6 3 1 Daily inspections by operator 38 6 3 2 Frequent and periodic inspections 40 6 4 Tests 42 6 4 1 Operational Test 42 6 4 2 Load Test 45 6 5 Repair 46 6 6 Lubrication and adjustment 47 6 7 Maintenance and Adjustment of Motor Brake ...

Page 6: ...Wire Rope Hoist PAGE 6 Model WR WR 0214 2721 NE 4th Ave Pompano FL 33064 954 367 6116 Visit WWW ACIHOIST COM for the most current information ...

Page 7: ...ions improper maintenance or excessive heat Problems resulting from repairs modifications or alterations made by people other than factory or ACI representatives If the product has been abused or damaged due to an accident If repair parts or accessories other than ACI equipment are used on the product they are warranted only to the extent that they are warranted by the manufacturer of said parts o...

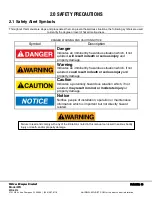
Page 8: ...ently hazardous situation which if not avoided will result in death or serious injury and property damage Warning Indicates an imminently hazardous situation which if not avoided could result in death or serious injury and property damage Caution Indicates a potentially hazardous situation which if not avoided may result in minor or moderate injury or property damage Notice Notifies people of inst...

Page 9: ...16 Safety Standard for Overhead Hoists OSHA Regulations and ANSIINFPA 70 National Electrical Code If the hoist is installed as part of a total lifting system such as an overhead crane or monorail it is also the responsibility of the owner user to comply with the applicable ASME B30 volume that addresses that type of equipment used in the system Further It is the responsibility of the owner user to...

Page 10: ...er crane manufacturer or user is responsible to funish these additional items for compliance Refer to ASME B30 17 Safety Standard for Top Running Single Girder Cranes ASME B30 2 Safety Standard for Top Running Double Girder Cranes and ASME B30 11 Safety Standard for Underhung Cranes and Monorails If a below the hook lifting device or sling is used with a hoist refer to ASME B30 9 Safety Standard f...

Page 11: ...orking order of the fuse for self release of the load Check the bearing screw joints to avoid them eventually self unwind Check the reliable connection of cable protective conductors to the grounding terminals in the electric board as well as the transformer and the electric If hoist has a trolley check that the crane bridge beam or monorail beam is level straight and clean Check that trolley stop...

Page 12: ...ted End positions in vertical and horizontal movement can be used only if an operating limit switch is provided Equipment covered herein is not designed or suitable as a power source for lifting or lowering persons Lifting and moving of loads over the personnel is not allowed Warning signs and barriers shall be utilized on the floor beneath the crane or area where the hoist will be installed Damag...

Page 13: ... BM Base Mount DG Double Girder LH Low Headroom DL Double Girder Low Headroom DN Double Girder Nested MS Motorized Standard Headroom Trolley Generally the electric hoist consists of two modules lifting mechanism and travelling mechanism Trolley The movable hoists are manufactured with an integral trolley while the stationary hoists Base Lug Mount are fixed to a plane and consist only of a lifting ...

Page 14: ... reducer is placed outside the drum Gear wheels are heat treated and are made from high grade steel They are oil lubricated and camped on rolling ball bearings Body The housing is an integral welding structure formed by two steel flanges connected with profiled longitudinal beams Drum A hallow shaft connects planetary reducer to the drum The drum is supported by rolling bearings which prevent groo...

Page 15: ...r brake has only one moving part which is very easily accessible and serviceable Control Box Control box is a separate assembly unit including circuit closers for control of the lifting mechanism and traveling mechanism reducing transformer push button and some other elements concerning special executions main circuit closer rectifier for the auxiliary brake electronic block for the load limiter e...

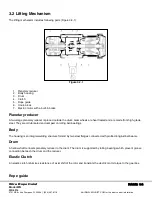
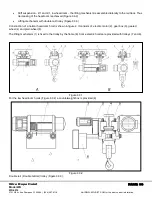
Page 16: ...s achieved Figure 3 3 2 Lifting mechanism with double rail trolley Figure 3 3 3 Construction of a normal headroom hoist is shown in figure 2 It consists of electric motor 2 gear box 3 geared wheel 4 and plain wheel 5 The lifting mechanism 1 is fixed to the trolley by the frame 8 Some electric hoists are provided with trolleys 7 and 9 Figure 3 3 1 For the low headroom hoists Figure 3 3 2 a counterw...

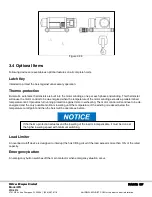
Page 17: ... motor winding exceeds a predetermined temperature limit It provides full running protection against motor overheating The motor control will continue to be de energized and the only possible motion is lowering until the temperature of the winding is reduced below the temperature cutoff point and then the hoist will be operate as before Load Limiter An overload cutoff device is designed to interru...

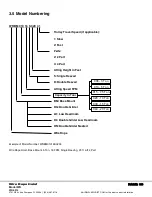
Page 18: ... 20 Ton 3 5 Model Numbering WR BM 010 16 S 020 4 1 Trolley Travel Speed if applicable 1 Slow 2 Fast Parts 2 2 Part 4 4 Part Lifting Height in Feet S Single Reeved D Double Reeved Lifting Speed FPM BM Base Mount DG Double Girder LH Low Headroom DL Double Girder Low Headroom DN Double Girder Nested Wire Rope Example of Model Number WRBM01016S0204 Wire Rope Hoist Base Mount 5 Ton 16 FPM Single Reevin...

Page 19: ...tage point for observing the approach of an active crane s shall be provided to prohibit contact by the active crane s with the idle crane If personnel will be required to work on the runway during installation a guard or barrier shall be installed between adjacent runways for the length of the established work area to prevent contact between persons performing installation and a crane on the adja...

Page 20: ...k that trolley stops are installed or install trolley stops at the open end or ends of the beam to prevent the trolley from traveling off the beam Trolley stops that engage trolley wheels are not recommended Check that trolley stops will prevent overhanging parts of the hoist and trolley from interfering with other equipment beyond the ends of the beam or monorail 4 2 Installation of Hoist Fixing ...

Page 21: ...e bolts are given in Table 4 2 2 The bolts tightening moments are given in Table 4 2 1 Table 4 2 2 Figure 4 2 2 Table 4 2 1 Clamp s Dia Nut size Tightening moment ft Ib 3 16 3 16 7 5 1 4 1 4 15 5 16 5 16 30 3 8 5 16 45 1 2 1 2 65 5 8 9 16 95 3 4 9 16 130 7 8 5 8 225 1 13 16 225 1 1 4 13 16 360 1 3 8 7 8 360 1 5 8 15 16 360 Effort in rope Fall Ton Bolt size Strength class 0 5 M6 1 4 In 8 8 Grade 5 ...

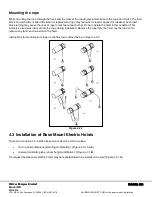
Page 22: ...ther Do not operate the hoist in this condition This indicates a twist was induced into the rope during installation Remove the rope from the hoist lay the rope out to remove any twist and re install on the hoist Instructions for mounting wire rope on the hoist are outlined below in Figure 4 2 3 Figure 4 2 3 4 3 Installation of Base Mount Electric Hoists There are two options to install a base mou...

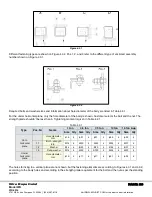
Page 23: ... The strength grade shouldn t be less than 5 Tightening moment is given in Table 4 2 1 Table 4 3 1 Type Pos Nr Name 1 ton 3 5 ton 7 5 ton 10 ton 15 ton up Size Qty Size Qty Size Qty Size Qty Size Qty On to horizontal plane Hole diameter mm ɸ15 4 ɸ21 4 ɸ21 4 ɸ25 4 ɸ25 4 1 1 Bolt strength 8 8 M14 4 M20 4 M20 4 M24 4 M27 4 1 2 Washer B14 4 B20 4 B20 4 B24 4 B27 4 1 3 Fixing washer M14 4 M20 4 AT20 4 ...

Page 24: ...f the travelling mechanism regularly cleanse the railway track from oils greases ice etc During operation be aware of cracks and wear of the monorail track Place trolley hoist in correct position relative to bridge beam or monorail orienting it for proper end approach in accordance with specification requirements Be sure collectors and conductors are properly positioned and aligned Place trolley h...

Page 25: ...ove cotter pin from nut in the end of trolley stud unscrew the nut and slide the stud out of the side plate assembly Slide stack of inner adjusting spacer Washer over the stud The dimension must be at least 1 32 inch 0 7 mm to 5 32 inch 4 mm greater than the beam flange width Rearrange washers if necessary to achieve proper spacing Position wheels of the side plate assembly on the beam flange Repl...

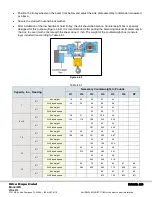
Page 26: ...of the counterweight box concrete layer included is according to Table 4 6 1 Figure 4 6 2 Table 4 6 1 Capacity ton Reeving Necessary Counterweight In Pounds H1 H2 H3 H4 H5 H6 H7 1 2 1 Box weight 18 22 26 33 44 With basic speed 49 55 66 66 66 4 1 Box weight 26 33 44 With basic speed 60 66 77 3 or 5 2 1 Box weight 26 31 33 35 2 44 With basic speed 154 176 188 232 254 4 1 Box weight 33 35 44 With bas...

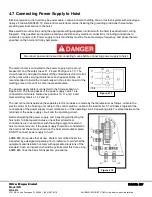
Page 27: ...e hoist as shown on Figure 3 10 The three phases of the power supply cable 1 are connected to terminals marked as positions 10 11 and 12 and marked with symbols L1 L2 and L3 The rest connections between the separate electric modules are made by the manufacturer as follows cable to the electric motor of the hoisting unit cable to the control switch 4 cable to the load limiter 5 Terminals 6 represen...

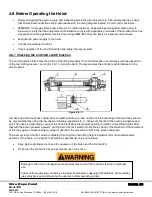
Page 28: ...e bar 2 The bar actuates the end limit switch disposed in the electric panel Figure 4 8 1 1 All checking of limit switches should be accomplished without a load on the hook All checking of limit switches should be accomplished by using the low speed of multiple speed hoists or inched into the limit if the hoist is a single speed unit The check is performed as you put the hook block about its mediu...

Page 29: ...bricated and tested before being shipped from factory Type specifications and quantity of the lubricants are given in Table 6 6 2 Before operating the hoist it s necessary to check the lubrication of the hoist and if needed grease the points shown in the lubrication scheme Table 6 6 1 4 8 4 Hoist Load Test Complete hoists are load tested by ACI in accordance with ASME B30 16 Exceptions to this pro...

Page 30: ...be released for operating purposes o If the hoist braking system does not stop and hold the load the hoist does not operate in accordance with the control devices or any unusual sounds are present during operation the hoist is not ready to be released for operating purposes and corrective action must be taken All personnel that will operate the hoist shall read the OPERATION section of this manual...

Page 31: ... operators shall be required to read to the operation section of this manual the warnings contained in this manual instruction and warning labels on the hoist or lifting system and the operation section of ASME b30 16 and to be familiar with the hoist and hoist controls before being authorized to operate the hoist or lifting system Hoist operators should be trained in proper rigging procedures to ...

Page 32: ... with special attention directed to the wire ropes hooks and breaks DO remove the hoist from service and perform necessary maintenance and repair DO follow recommended maintenance procedures for taking a hoist out of service to inspect and perform maintenance and repair DO use the original hoist manufacture s recommended parts when repairing a hoist and replacing worn or damaged parts DO NOT allow...

Page 33: ...ed and closes the hook throat opening Confirm that the latch of the hoist hook will not support any part of the load Confirm that the load or any part if the load will not be applied to and or not supported by the tip of the hook Confirm that load will be properly balanced when it is lifted Confirm that the hoist wire is not kinked or twisted and that the wire rope parts are not twisted about each...

Page 34: ...l obstacles before lowering the load Block loads before landing if slings or other lifting devices must be removed from under the landed load Exercise care when removing a sling from under a landed and blocked load DO NOT leave a suspended load unattended unless specific precautions to prevent the load from inadvertent lowering have been instituted and are in place Position the hoist load block an...

Page 35: ...ed full time at a visual vantage point for observing the approach of an active hoist s or an active crane s shall be provided to prohibit contact by the active hoist s or crane s with the idle hoist or crane with persons performing maintenance repair or inspection and with equipment used in performing the maintenance repair or inspection A guard or barrier shall be installed between adjacent runwa...

Page 36: ...he degree of exposure is dependent upon hoist activity and severity of hoist service Environmental conditions in which the hoist operates are also important considerations for the user when adjusting hoist inspection and maintenance programs to local conditions Frequency of inspection and maintenance must be increased if hoist is subjected to severe atmospheric environmental conditions such as cor...

Page 37: ...severity of service Definitions of service from ASME B30 16 are as follows Normal service involves operation of the hoist with randomly distributed loads within the rated load limit or uniform loads less than 65 of rated load for not more than 25 of the time for a single work shift Heavy service involves operation of the hoist within the rated load limit that exceeds normal service Severe service ...

Page 38: ... time Table 6 3 1 Item On Initial Putting into Operation Daily First 3 months First year Annually Brakes X X End Limit X X Control Device X X Hook X Hook Latch X Wire Rope X Reeving X Rope Guide X X Roller Block X X Bearing Screw Joints X X Welded Joints X X Bumpers X X Trolley X Electrical Equipment X X Anticorrosion Protection X 6 3 1 Daily inspections by operator Required daily inspection items...

Page 39: ...ot twisted about each other Refer to WIRE ROPE section of this manual Brakes Check that hoist and trolley motions do not have excessive drift If load dragging or increased stopping distance are observed adjust the axial rotor stroke of the electric motor Limit Switches Check that gravity type upper limit switch stops lifting motion of the hoist load block before striking any part of the hoist If s...

Page 40: ...l components such as wire rope hooks and brakes observed during frequent and periodic inspections should be established This record should also record replacement maintenance and repair information Use of this recorded information will allow a preventative maintenance program to be established for replacement of wearing components on a regular basis thereby eliminating or reducing unscheduled down...

Page 41: ...issing parts Wire rope reeving Reeving not in accordance with the WIRE ROPE section of this manual Wire rope Broken wires broken strands wear twist kinks distortion of rope structure end connections deposits of foreign material heat damage and in adequate lubrication WARNING label Missing or illegible Control device markings Missing or illegible Lubricant levels Lubricant must be added or replaced...

Page 42: ...ve not been used within the preceding 12 months SHALL be tested by the owner user before being placed in operational service The operational test is performed without a load on the hook and includes 1 operation of control devices 2 lifting and lowering 3 operation of brakes and 4 operation and setting of limit switch devices Operational test steps are as follows 1 Check hoist travel for correct ho...

Page 43: ...ion or trolley motor phasing MOMENTARILY activate one button or lever of the trolley control device and observe the direction of trolley motion If direction of trolley travel agrees with the direction marking of the trolley control device activated i e trolley direction is EAST when the trolley EAST control device is activated trolley motor is properly phased If the direction of trolley travel doe...

Page 44: ... the gravity type upper limit switch by operating the hoist in the lifting direction While the load block is raising lift the weight of the upper gravity type limit switch manually until motion of the load block stops Lifting the weight higher should cause the load block to lower until the weight is released If raising motion does not stop when the weight is lifted STOP hoist motion as the upper g...

Page 45: ...ck is about 12 inches below the hoist drum If the hoist has more than one speed continue to raise at low speed or if hoist is a single speed unit inch the load block in the raising direction until motion of the load block stops to check upper geared limit switch circuit If the load block will hit the weight of the gravity type upper limit switch before the upper geared limit device stops load bloc...

Page 46: ...maintenance performed as required Repairs include removal of small defects noticed during the inspections such as damages of the cables or light activities as replacement of contactors and relays They don t include harder and more responsible activities that must be coordinated with the producer such as change in the electric diagram or implementation of additional devices The possible failures in...

Page 47: ...section of this manual Hoist and trolley machinery must be stationary when inspecting checking adding or changing lubricants The main switch disconnected of the hoist crane or lifting system must be de energized Lock and tag the main switch in the de energized position According to ANSI Z244 1 The necessary maintenance as regards the lubricants is given in Table 6 6 1 And select lubricant from Tab...

Page 48: ... of the roller for the rope the hook Change grease filling with grease 8 Splines of the clutch Change grease filling with grease 9 Bearings drum lifting electric motor Change grease filling with grease 10 Bearings of the lifting electric motor Change grease filling with grease 11 Axles of the wedge bush and the traverse Clean and grease by brush 12 Bearings of the motor of the travelling mechanism...

Page 49: ...Wire Rope Hoist PAGE 49 Model WR WR 0214 2721 NE 4th Ave Pompano FL 33064 954 367 6116 Visit WWW ACIHOIST COM for the most current information Figure 6 6 1 ...

Page 50: ...t Fuchs Wacker Siliconfett 300 mittel 7 9 16 17 Grease Dripping temperature not lower than 356 F 180 C Penetration 220 430 Operation temperature 13 F 25 C to 176 F 80 C Capacity Quantity oz Pos 7 9 16 17 MOBIL MOBILPLEX 48 BP Energrease HT 3 3 5 7 5 10 15 20 1 8 1 8 1 8 2 1 2 8 2 8 0 9 0 9 0 9 1 4 2 1 2 1 4 2 4 2 4 2 8 5 16 9 16 9 0 7 0 7 1 4 1 4 2 1 2 1 Operation temperature 40 F 40 C to 176 F 80...

Page 51: ...olitation levels as per API not lower then GL 4 Applicable to planetary reducers Mobil Mobilgear 632 Mobil Mobilube GX90 BP Hypogear 90 EP Shell Spirax Heavy Duty 90 EP 220 Klueber Syntheso D220 EP Esso S220 Shell Tivela 82 Capacity Quantity Liter Pos 1 13 3 5 7 5 10 15 20 0 8 0 8 0 8 1 2 2 0 2 0 0 6 0 6 0 6 1 0 1 75 1 75 6 7 Maintenance and Adjustment of Motor Brake To ensure safe brake operation...

Page 52: ...nscrew the adjusting nut 6 until normal axial stroke i e 0 5 1mm The axial stroke of the rotor in this position is L 2n where 2 is the thread pitch and n is the number of revolutions recorded at unwinding the adjusting nut 6 Unscrew the adjusting nut to 1 4 or 1 2 revolutions in order to establish normal axial stroke 7 Screw both fixing bolts pos 7 of the adjusting nut 6 8 Place the grid 5 and fas...

Page 53: ...ings are worn Replace bearings 5 Electric motor drones and does not rotate when loaded Only two of the phases are being activated Check the mains Check the operation of the contactors Change the contact bridges or contactor springs if necessary Check the state of the stator coil Working voltage is lower than minimum required Check the supply voltage with voltmeter 6 Motor overheats Load is exceedi...

Page 54: ...eaning of designations are as follows L1 L2 L3 electric network phases S1 stop button T1 transformer F1 F2 F3 safety fuses Q Main contactor Push buttons S2 control cut out switch button for LOWERING S3 control cut out switch button for LIFTING S4 control cut out switch button for RIGHT movement S5 control cut out switch button for LEFT movement S6 end switch M Electric motor K1 K8 contactors K9 co...

Page 55: ...ed K3 Contactor for LOWER at basic speed K2 Contactor for LOWER at micro speed K4 Contactor for LEFT at basic speed К5 Contactor for LEFT at basic and micro speed K5 Contactor for RIGHT at basic speed K6 Contactor for RIGHT at basic and micro speed K6 Contactor for LEFT and RIGHT at basic speed K7 Contactor for LEFT and RIGHT at micro speed K8 The symbols under the motor designation denote Electri...

Page 56: ...Wire Rope Hoist PAGE 56 Model WR WR 0214 2721 NE 4th Ave Pompano FL 33064 954 367 6116 Visit WWW ACIHOIST COM for the most current information ...

Page 57: ...Wire Rope Hoist PAGE 57 Model WR WR 0214 2721 NE 4th Ave Pompano FL 33064 954 367 6116 Visit WWW ACIHOIST COM for the most current information ...

Page 58: ...Wire Rope Hoist PAGE 58 Model WR WR 0214 2721 NE 4th Ave Pompano FL 33064 954 367 6116 Visit WWW ACIHOIST COM for the most current information ...

Page 59: ...Wire Rope Hoist PAGE 59 Model WR WR 0214 2721 NE 4th Ave Pompano FL 33064 954 367 6116 Visit WWW ACIHOIST COM for the most current information ...

Page 60: ...Wire Rope Hoist PAGE 60 Model WR WR 0214 2721 NE 4th Ave Pompano FL 33064 954 367 6116 Visit WWW ACIHOIST COM for the most current information ...

Page 61: ...Wire Rope Hoist PAGE 61 Model WR WR 0214 2721 NE 4th Ave Pompano FL 33064 954 367 6116 Visit WWW ACIHOIST COM for the most current information ...

Reviews: