Appendix A: Acer Altos R910 rack installation guide
166
5
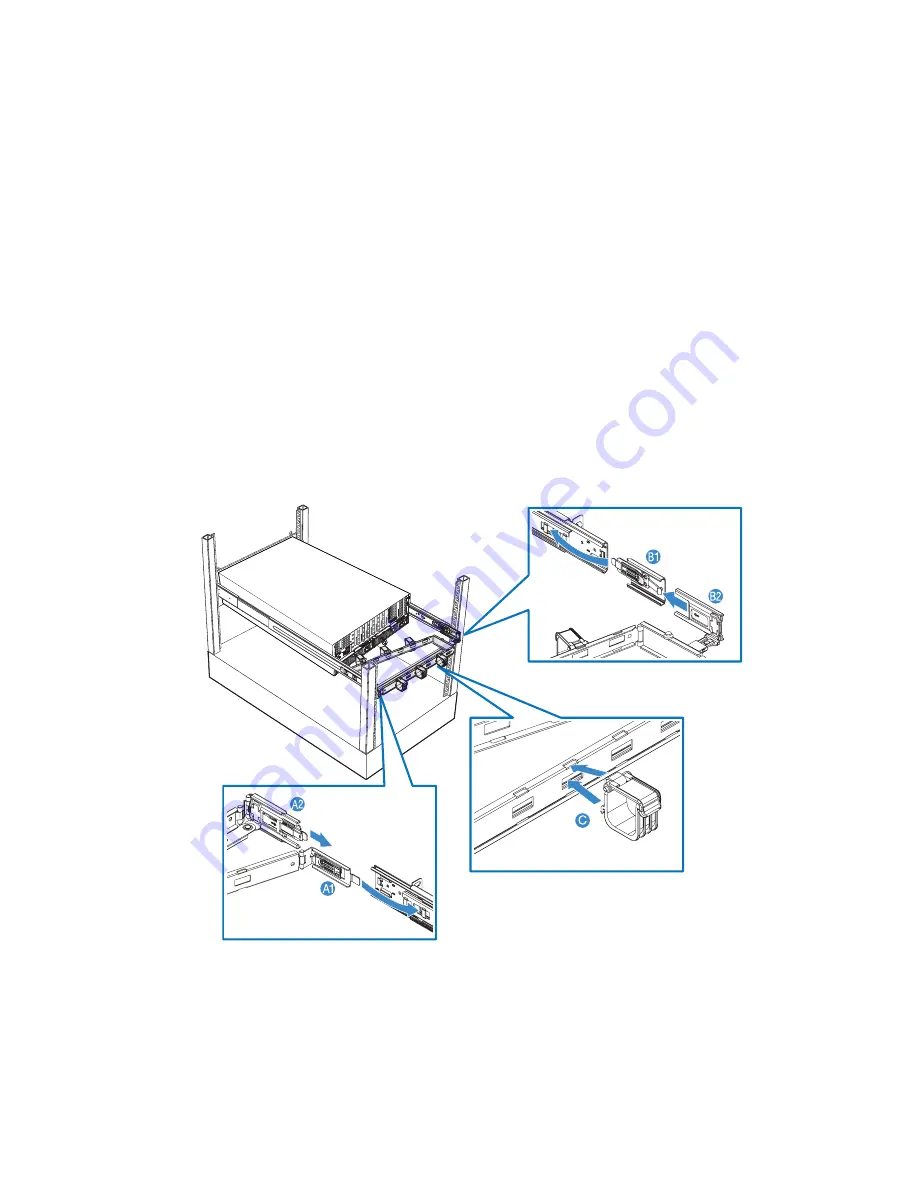
Attach the CMA (cable management arm) to the rear of the server.
The CMA allows you to tie-wrap all cables to and from the system.
As you slide the system in and out of the rack, the CMA collapses
and extends, keeping the cables untangled and attached to the
system.
(1) Insert the smaller CMA extension into the rear of the left inner
rail
(A1)
.
(2) Insert the larger CMA extension into the rear of left mounting
rail
(A2)
.
(3) Insert the CMA extension connector into the rear of the right
mounting rail
(B1)
.
(4) Insert the CMA arm connector into the blue plastic cutout on
the CMA extension connector
(B2)
.
(5) Attach the cable clips into the appropriate mounting holes in
the CMA
(C)
.
Summary of Contents for ALTOS R910 Series
Page 1: ...Acer Altos R910 Series User s Guide ...
Page 10: ...x ...
Page 11: ...1 System tour ...
Page 36: ...1 System tour 26 ...
Page 37: ...2 System setup ...
Page 45: ...3 System upgrade ...
Page 111: ...4 BIOS setup ...
Page 119: ...109 Error Manager Error Manager lets you view POST errors detected by the system ...
Page 137: ...127 Video The Video submenu allows you to enable or disable the onboard video controller ...
Page 150: ...4 BIOS setup 140 ...
Page 151: ...5 Troubleshooting ...
Page 164: ...5 Troubleshooting 154 ...
Page 165: ...Appendix A Acer Altos R910 rack installation guide ...
Page 166: ...This appendix shows you how to set up the Altos R910 server in a rack mount configuration ...
Page 178: ...Appendix A Acer Altos R910 rack installation guide 168 ...
Page 179: ...Appendix B Memory configuration options ...
Page 198: ...Appendix B Memory configuration options 188 ...
Page 199: ...Appendix C RAID configuration utilities ...
Page 206: ...Appendix C RAID configuration utilities 196 ...
Page 210: ...200 U upgrading the BIOS 139 ...


