background image

6-8

AcerRouter 700  Series  User Guide

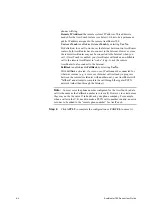
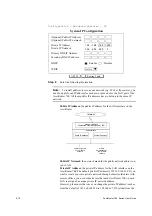
Step 5

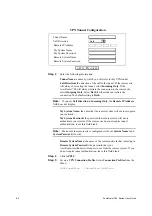
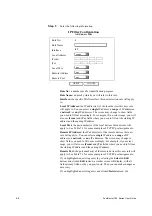
Enter the following information:

Rule No.: a number used for identification purposes.

Rule Name: a name by which you will refer to this rule.

Interface: the specific WAN interface this new selection rule will apply 
to.

Local IP Address: the IP address(es) of the local devices this new rule 
will apply to. You can select a single IP address, a range of IP addresses, 
network, or any IP addresses. The screen may change to show fields 
you need to fill out accordingly. For example, if you select range, you will 
also see (From) and (To) fields where you need to fill out the starting IP 
address and the ending IP address.

Local Port: the port number(s) of the local devices this new rule will 
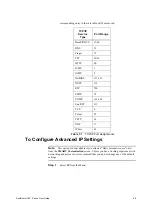
apply to. See Table 7-1 for some examples of TCP/IP port assignments.

Remote IP Address: the IP address(es) of the remote devices this new 
rule will apply to. You can select a single IP address, a range of IP 
addresses, a network, or any IP addresses. The screen may change to 
show fields you need to fill out accordingly. For example, if you select 
range, you will also see (From) and (To) fields where you need to fill out 
the starting IP address and the ending IP address.

Remote Port: the port number(s) of the remote devices this new rule will 
apply to. See Table 7-1 for some examples of TCP/IP port assignments.

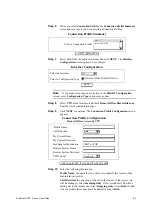
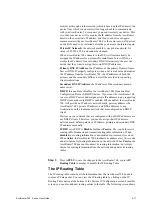
If you highlighted an existing entry (by selecting the Select to Edit 
button) and clicked Edit instead, a similar screen will display, with all 
fields already filled out by you previously. Then you can make changes as 
necessary.

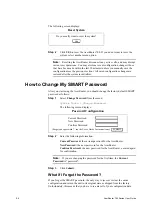
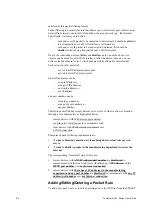
If you highlighted an existing entry and clicked Delete instead, the 

IP Filter Configuration

Add a new rule

Rule No.

Local Address

CANCEL

Rule Name

Interface

(From)

(To)

Local Port

.

.

.

Remote Address

Remote Port

APPLY

4

ISP

range

.

.

.

any

any

any

Summary of Contents for 700 Series

Page 1: ...AcerRouter 700 Series Multifunction Router User Guide ...

Page 2: ...in is supplied without representation or warranty of any kind Acer Netxus Inc therefore assumes no responsibility and shall have no liability of any kind arising from the supply or use of this document or the material contained herein 1999 Acer Netxus Inc This manual copyright 1999 by Acer Netxus Inc All rights reserved No part of this document may be copied or re used without prior written consen...

Page 3: ...ced features in the web browser based Simple Multifunction Access configuRation Tool SMART However we hope that the basic capabilities we provide are suitable for most new users of the AcerRouter 700 This manual consists of nine chapters and three appendixes Chapter One Introduction explains the features and capabilities of the AcerRouter 700 Chapter Two Installing the AcerRouter 700 gives the sim...

Page 4: ...ed information about other Acer Netxus products please email acernetxus acer com tw If you d like to talk to us please call Telephone 886 3 563 1000 Fax 886 3 579 0958 Our mailing address is Acer Netxus Inc 3F 2 Prosperity Road II Science based Industrial Park Hsinchu 300 Taiwan R O C Our Web site URL is http www acernetxus com tw ...

Page 5: ...s on the front 1 8 Chapter 2 Installing the AcerRouter Setting Up a Windows PC for Configuring the AcerRouter 700 2 2 Connecting more Devices through a Hub to the 2 4 Chapter 3 Configuring the AcerRouter Internet Access in Five Minutes 3 1 Using Different Browsers for AcerRouter Configuration 3 1 Logging On 3 1 To Enable More Features 3 2 Customizing the SMART for Your Specific Needs 3 3 Overview ...

Page 6: ...w to Save or Clear Configuration Changes 5 3 How to Reset the AcerRouter 700 5 3 How to Change My SMART Password 5 4 What if I Forget the Password 5 4 How to Customize the SMART Interface 5 5 How to Configure General System Settings 5 5 Chapter 6 Advanced Configuration Creating Virtual Private Networking Connections 6 1 Configuring VPN Remote Office Access Profiles 6 1 Advanced Options for VPN Pro...

Page 7: ...AcerRouter 700 Series User Guide vii Appendix A AcerRouter Specifications Appendix B Glossary Appendix C Warranty Copyrights FCC Notice Warranty C 1 Licenses and Trademarks C 2 FCC Part 15 Notice C 3 ...

Page 8: ...viii AcerRouter 700 Series User Guide ...

Page 9: ...d an auxiliary port for a directly connected management console Data comes in to the AcerRouter from the local LAN and then is routed to the remote network and vice versa In addition to its capability to route IP IPX traffic the AcerRouter 700 also acts as a bridge for other network protocols such as Appletalk or SNA ISDN ISDN or Integrated Services Digital Network is a high speed digital communic...

Page 10: ...he Internet Accessing the Internet The most common use for the AcerRouter 700 is to provide Internet access so that everyone on your LAN can surf the web send receive e mail or files The AcerRouters utilize the single IP address technology that the company pioneered in 1996 to greatly simplify the configuration the AcerRouter 700 automatically acquires the necessary IP address when the connection ...

Page 11: ...ter 700 s built in configuration program makes the necessary setup a snap As a security feature after a user calls in the AcerRouter can hang up and call that user back at a pre configured telephone number Figure 1 2 Dial in Access Creating Your Own Private Wide Area Network You can create your own private wide area network with AcerRouter 700 multifunction routers and allow two or more remote net...

Page 12: ...ng distance voice calls to other similarly equipped AcerRouter 700 telephones through the Internet This type of call is termed a AcerVoIp call which is triggered when the user dials a number that had been configured in the AcerRouter 700 as a AcerVoIp number The AcerRouter 700 also uses Acer Netxus proprietary StarTouch feature to signal the remote site to connect to the Internet Figure 1 5 VoIP A...

Page 13: ...Dial table can be configured to make a standard PSTN call in case the called part cannot be reached through the Internet This called Fallback This is so that the caller s dialing habits are not changed making the feature easy and familiar to the user Creating a Virtual Private Network VPN Virtual Private Networking VPN provides a means to connect remote LANs over public networks such as the Intern...

Page 14: ... to export control regulations A Configuration Example Figure 1 7 Connecting Two Private Networks with Internet Access In Figure 1 7 two AcerRouter 700s are installed in two different locations Both of them are connected to the Internet allowing users to surf the Web They are also connected to each other through the ISDN network forming a private company company network This example also illustrat...

Page 15: ...ces on your LAN from access by users from the Internet Console Telnet and SMART support password protection DES encryption is supported for inter office non VPN connections DES encryption with PPP ECP negotiation is supported for VPN connections IP packet filtering may be used to futher enhance security requirements A Physical Look at the AcerRouter 700 The connectors on the back The following ill...

Page 16: ...traffic passing through Note that LED 11 is dual colored LED 1 LED 2 LED 3 LED 4 LED 5 LED 6 LED 7 LED 8 LED 9 LED 10 LED 11 ISDN B2 ISDN B1 Voice C Voice B Voice A LAN 4 LAN 3 LAN 2 LAN 1 Collision Power Gree n U ST Red ON Call Call Call Call Call No Data No Data No Data No Data Collision On No Line NA OFF No Call No Call No Call No Call No Call No Line No Line No Line No Line No Collision No Pow...

Page 17: ... wall jack and the ISDN port on the AcerRouter 700 Step 2 Connect PCs Workstations or a hub to the AcerRouter s Ethernet ports If you are connecting a hub see Connecting more devices through a Hub to the AcerRouter 700 later in this chapter Step 3 Connect the power supply pack to an electrical outlet and the AcerRouter 700 When everything is connected turn on the power switch Figure 2 1 AcerRouter...

Page 18: ... steps below for its installation Note Any TCP IP capable workstation can be used to communicate with or through the AcerRouter 700 To configure other types of workstations please consult the manufacturer s documentation Step 1 Connect your PC to one of the AcerRouter 700 Ethernet ports If you connect to LAN port 1 make sure the Uplink switch is set to the Normal position See Figure 2 2 Step 2 Fro...

Page 19: ...P in the list of Network Components Step 9 Click Properties and check the settings in each of the TCP IP Properties window Bindings Tab both Client for Microsoft Networks and File and printer sharing for Microsoft Networks should be selected Gateway Tab All fields should be blank DNS Configuration Tab Disable DNS should be selected IP Address Tab Obtain IP address automatically should be selected ...

Page 20: ...1 as an uplink port To set the uplink switch Step 1 Plug one end of a 10Base T LAN cable into Port 1 of the AcerRouter 700 and the other end of the 10Base T cable into any 10Base T LAN port on a hub Step 2 Turn the AcerRouter 700 over and locate a small rectangular hole in the bottom of the case Set the switch to the Uplink position See Figure 2 2 Figure 2 2 Uplink Switch Bottom of AcerRouter 700 ...

Page 21: ...ternet access in less than five minutes using the web browser based Simple M ultifunction Access configuRation Tool SMART Using Different Browsers for AcerRouter Configu ration To configure your AcerRouter 700 you can use popular browsers such as Netscape 4 x and Internet Explorer 4 x and 5 x The following describes after each browser is brought up how to use it to start the SMART interface Netsca...

Page 22: ... a basic feature set installed If you have purchased additional features from your distributor you will also be given a feature key In this case you will need to check the box below the Log On button that says Check here to install additional features before you click the Log On button To Enable More Features If you check the Check here to install additional features box the following scre en appe...

Page 23: ...s with Advanced Configuration Select this option if you want to configure advanced options such as changing the private IP address e g when you intend to create your own private WAN between multiple AcerRouter 700 routers or adding a public IP address e g when you want to install servers on the LAN which are accessible from the Internet Access to from Remote Site e g Branch Office Select this opti...

Page 24: ... you have selected the options you want Overview of The SMART Browser Screen Before you begin the configuration take a moment to look at the SMART screen Look for these areas System Information SMART Menu Configuration Window Message Window Status Window ...

Page 25: ...this window you can always re start it by clicking Monitoring System Status from the SMART Menu It does not contain any toolbars or browser menu buttons Although the main SMART screen will timeout this screen will not and will continue to be operational as long as it is active The following statistics are reported for each interface Device lists all interfaces including both the physical interface...

Page 26: ...guring A Basic Internet Access Profile You will find that the AcerRouter 700 is optimized for Basic Internet Access You don t need to understand apply for or assign any IP addresses in your entire network the AcerRouter 700 does these things for you automatically You need to configure each device on your LAN in a uniform way as described in Chapter 2 What is Basic Internet Access It means accessin...

Page 27: ...sful users on your LAN can now start to access the In ternet However it is required that these devices have also been configured to obtain IP addresses automatically similar to setting up a PC for configuring the AcerRouter as described in Chapter 2 Users may need to re boot their computers in order to obtain the DNS information obtained during the APPLY and TEST operation The procedure you just f...

Page 28: ...light New in the list and then click NEXT which will le ad you through the configuration as in the above Deleting Internet Access Profiles To delete or modify a Connection Profile Step 1 Select Connection Profiles from the SMART menu Configuration Connection Profiles The following screen will appear Step 2 Highlight the entry in the list and click DELETE to delete the profile or click NEXT to modi...

Page 29: ...be able to communicate with the AcerRouter again Rebooting each device will cause them to acquire a new private IP address from the AcerRouter so that they are on the same network Previously we indicated that the AcerRouter can support servers for access by the Inte rnet It means we need to create a public network on our LAN which can be achie ved by acquiring public IP addresses from your ISP ass...

Page 30: ...ther B channel for other use Two B Channels Only When Needed The 700 will initiate a conne ction with one B channel and bring up the other B channel only if the traffic increases to a point when more bandwidth is needed Always two B Channels The 700 will always establish both B channels to access the Internet Note Link Usage options do not appear if the ISDN switch type your selected is Permanent ...

Page 31: ...et should configure their PCs or workstations as described in Chapter 2 The n they must reboot their workstations in order to update them with information the A cerRouter 700 learned from the ISP during the APPLY and TEST operation Advanced Setup Options for Internet Access Using Advanced Setup options you can assign a public IP address to the AcerRoute r 700 modify the private IP address of the A...

Page 32: ...rivate network Its valu e is 255 255 255 0 and cannot be changed When a AcerRouter connects to the ISP it will automatically be assigned the IP address for a primary Domain Name Server DNS as well as the IP address for a secondary DNS Alternatively the user can decide that the y want to assign their own DNS IP addresses Primary DNS IP Address the IP address of the primary Domain Name S erver DNS I...

Page 33: ...ed with public IP addresses are not DHCP clients Therefore you need to assign their IP addresses ne twork mask default gateway s IP address primary and secondary DNS IP addresses manually Step 3 Click APPLY to confirm the configuration and return to the main configu ration screen ...

Page 34: ...invoke the SMART tool To return to this screen select Customize User Interface from the SMART menu Step 2 If you have already configured your ISDN interface skip to Step 7 Othe rwise configure your ISDN interface now Select ISDN from the menu Configuration WAN Interfaces ISDN Step 3 The following screen appears Step 4 Select your ISDN Switch Type from the pull down list Your ISDN se rvice provider...

Page 35: ...ll Step 7 Set the following parameters Ignore Sub Address if any For an incoming data call if you want to ign ore the called party sub address Require Sub Address for Data Calls If you require and incoming data call to contain the called party sub address party or extension number to accept an incoming call Step 8 Click OK to save the apply the ISDN Port Configuration to the AcerRou ter 700 s data...

Page 36: ... Profile Configuration screen appears Step 5 Enter the following information Profile Name a name associated with this profile Select a Connection Profile DELETE Connection Profile Summary NEXT New Internet access ISP Select an interface NEXT Interface Configuration ISDN Select a Configuration Type Internet Access Remote Office Dial in Dial out Remote Phone Number My System Name My System Password ...

Page 37: ...d is case sensitive My System Password the password the remote system will use to authen ticate your system This field is case sensitive Note Make sure the remote site is configured with the same values you spe cify in My System Name and My System Password Remote System Name the name of the remote network that is dialing in This field is case sensitive This field is case sensitive Remote System Pa...

Page 38: ...efore accepting the call This service may require a special agre ement with your ISDN service provider Caller ID Number if you enabled Caller ID Authentication enter the expe cted Caller ID Number in this field STAC Compression allows outgoing data to be compressed to achieve Connection Profile Configuration CANCEL OK Idle Timeout 0 3600 seconds 120 Optional Remote IP Address Remote IP Netmask Rem...

Page 39: ...e fou nd in the routing table Remote IPX Network Number the IPX network number of a network re achable through this connection If you set this connection as the default IPX route an entry in this field is not required Enable Bridging select Enable to bridge other protocols for example S NA Appletalk and NetBEUI Used for Internet Access as well select Yes if you want users on your local LAN to get ...

Page 40: ...els Make sure the ISDN subscription specifies a hunt group for the two ISDN B channels Depending on the selection of the ISDN link usage the following options may be offered Two B channels only when needed Upper utilization threshold determines when the AcerRouter will activate the second B channel Lower utilization threshold determines when the AcerRouter will drop the second B channel call Optio...

Page 41: ...ion Profile Step 1 Select Connection Profiles from the SMART menu Configuration Connection Profiles The following screen appears Step 2 Highlight the entry in the list you want to delete and click DELETE Select a Connection Profile DELETE Connection Profile Summary NEXT New Remote dial in out tofu ...

Page 42: ...faces ISDN The Port Configuration screen displays Step 3 Select your ISDN Switch Type from the pull down list Your ISDN se rvice provider will tell you what switch type you have Step 4 After you select your ISDN Switch Type you may be required to enter Directory Phone Number 1 and Directory Phone Number 2 or S PID1 and SPID2 If your switch type is Auto detect available in North America only ente r...

Page 43: ... ore the called party sub address Require Sub Address for Data Calls If you require and incoming data call to contain the called party sub address party or extension number to accept an incoming call Sub Address Enter the sub address for the call to be accepted Step 7 Click OK Note For the sub address to operate correctly all entries for any type of conn ection profile Single dial in user and offi...

Page 44: ... if you select No the Call Back Phone Number box will not be displayed If you select Yes enter the Call Back Phone Number If call back is selected the AcerRouter 700 will disconnect after authen ticating the dial in user and dial the remote user s call back number to re connect Select a Connection Profile DELETE Connection Profile Summary NEXT New Internet access ISP Select an interface Interface ...

Page 45: ...ected Share Ne tWare IPX Resource on the SMART Configuration screen Step 1 Enter the following information Caller ID Authen select Yes if you want the AcerRouter 700 to check the caller ID before accepting the call This service may require a special agre ement with your ISDN service provider Caller ID Number if you enabled Caller ID Authentication enter the expe cted Caller ID Number in this field...

Page 46: ...nal cost The same phone number will be used for both channels Make sure the ISDN subscription specifies a hunt group for the two ISDN B channels Enable IP select Yes to enable IP routing over a connection using this profile Enable IPX select Yes to enable IPX routing over a connection using this profile Remote IPX Network Number sets the IPX network number on the re mote workstation Leave this fie...

Page 47: ...r both channels Make sure the ISDN subscription specifies a hunt group for the two ISDN B channels Depending on the selection of the ISDN link usage the following options may be offered Two B channels only when needed Upper utilization threshold determines when the AcerRouter will activate the second B channel Lower utilization threshold determines when the AcerRouter will drop the second B channe...

Page 48: ... User Guide The Connection Profile Summary screen appears Step 2 Highlight the entry in the list you want to delete and click DELETE Select a Connection Profile DELETE Connection Profile Summary NEXT New Remote Dial in out yabu ...

Page 49: ... be shown if only Basic Internet A ccess was selected in the SMART Configuration screen To view or change the system time settings select System Time from the menu Configuration Advanced System Time The following screen displays Step 1 Select the Time Zone of the router location from the selections in the drop down list if needed Step 2 Check the Daylight Savings Time box if appropriate Note that ...

Page 50: ...rnet access is allowed Select Day Range if you want to specify a range of days If you select All Intern et access will be allowed every day Step 2 Set the time during which Internet access will be allowed Not that this se tting is based upon a 24 hour clock Select Time Range to enter a consecu tive period of time between which Internet access is allowed If you select All Internet access will be al...

Page 51: ...ng some configured combination of phones attached for example port A only or port B and C or all phones simultaneously the first phone picked up will receive the call leaving the others to operate independently Each port is assigned an extension number which is used for dialing between extensions or for directing calls received from the outside You can also assign abbreviated speed dial number for...

Page 52: ... phone numbers your ISDN service provider i e your phone company assigns to you If your ISDN service provider offers a third ISDN Directory number this can be configured from the Command Line Interface A call will ring you can select any combination of phones to ring when a call is received Voice Port A B or C extension Number this is a 1 8 digit number In the example shown below extension 11 22 a...

Page 53: ...peedDial Name a name for the speed dialing number The speed dial number will be identified in the directory with this name SpeedDial Type AcerVoIP or Standard ISDN select whether this speed dial number is for Voice over IP VoIP or standard ISDN calls Note The AcerVoIP options are displayed only when the voice compression hardware module has been installed in the unit Remote Phone Number the phone ...

Page 54: ...cerRouter to also connect to the Internet FallBack enable disable FallBack by selecting Yes No With FallBack activated if a voice over IP call cannot be connected for whatever reasons e g a voice over Internet call is already in progress between the remote AcerRouter with another one your AcerRouter will fallback and attempt to complete the call through the regular PSTN network rather than through...

Page 55: ... your telephone costs and trigger messages are useful in determining which applications and tasks trigger a connection These messages contain the IP address of the PC which caused the connection to be established as well as the port number or application name To view the Connection Log select Connection Log from the menu Monitoring Connection Log The Connection Log displays in the Main window Ther...

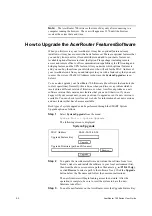
Page 56: ...when you discover a problem which is resolved in a different version of firmware or when Acer Nexus produces a new software version that contains new features that you need Otherwise if you are happy with your current unit you may not want to upgrade even if a new version is available You can check Acer Nexus s web site for information about new versions and new features that have become available...

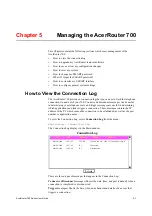
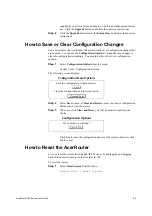
Page 57: ...Options from the menu System Tools Configuration Options The following screen displays Step 2 Select Save to save or Clear and Reset to erase your entire configuration database and reset the system Step 3 When you click Clear and Reset you will be asked to confirm your choice Click Yes to clear the configuration and reset the system otherwise click No to cancel How to Reset the AcerRouter You can ...

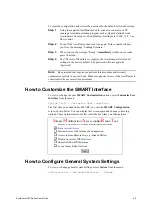
Page 58: ...word from the menu System Tools Change Password The following screen displays Step 2 Enter the following information Current Password the current password for the AcerRouter New Password the new password for the AcerRouter Confirm Password the new password for the AcerRouter entered again for confirmation Note If you are changing the password for the first time the Current Password is password Ste...

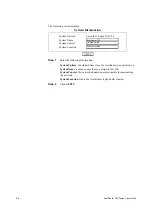
Page 59: ...y in your network Make sure physical access to the AcerRouter is consistent with your security requirements How to Customize the SMART Interface To view or change the your SMART Customization options select Customize User Interface from the menu System Tools Customize User Interface The first time you connected to SMART you saw the SMART Configuration screen shown below You can display this screen...

Page 60: ...d on System Name a unique name that you assign to this 700 System Contact the network administrator responsible for maintaining the network System Location where the AcerRouter is physically located Step 2 Click APPLY System Uptime System Name System Contact System Information 0 months 18 days 10 02 26 System Location APPLY AcerRouter 700 Sunnyvale office James Leigh ...

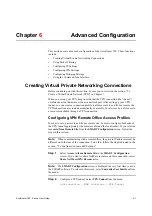
Page 61: ...e by a LAN user to a resource reachable through a VPN connection Configuring VPN Remote Office Access Profiles In order to set up access to and from a remote site be sure to configure both ends of the VPN tunnel appropriately the remote router and the local router If you selected Access to from Remote Site from the SMART Configuration screen follow the steps in this section Note When communicating...

Page 62: ...ur network My System Password the password the remote system will use to authenticate your system If the remote site does not require tunnel authentication leave this field blank Note Make sure the remote site is configured with your System Name and System Password if used Remote System Name the name of the remote network that is dialing in Remote System Password the password that your AcerRouterA...

Page 63: ...on Profile Name the name that you will use to identify this remote office dial in dial out profile Call Direction the direction of the call in the tunnel If the remote site will be dialing in select Incoming Only If the AcerRouter 700 will be dialing out to the remote site select Outgoing Only Select Both if either side can initiate the connection The default setting is Both Select a Connection Pr...

Page 64: ... password that your AcerRouter 700 will expect to see from the remote system VPN Tunnel the VPN Tunnel set up earlier you will use for this profile This is one of the tunnel configurations set up earlier Step 11 Click APPLY and TEST when you are done or select Advanced to enter advanced options Advanced Options for VPN Profiles Note The IPX options shown in this screen only appear if you selected ...

Page 65: ...ontact with your system This must be a hexadecimal number 0 9 a f with up to 14 digits depending upon the strength of encryption licensed for your site Confirm Encryption key re enter the DES encryption key to confirm its correct entry Note For security reasons encryption options only appear if you are connected to the AcerRouter 700 over a local LAN and if encryption is enabled on your system Ste...

Page 66: ... address or any IP address and port numbers can be a single port number a range of port numbers or any port number Therefore packet filtering simply defines sets of rules of what to allow or disallow through a set of parameters as highlighted below remote devices with IP addresses port numbers are allowed or disallowed to communicate with local devices with IP addresses port numbers over a WAN con...

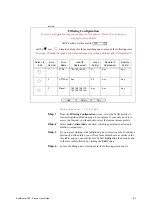
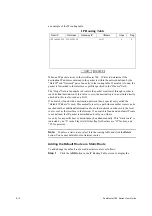
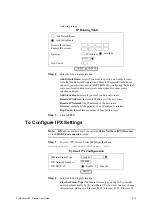
Page 67: ...an edit the rule by first highlighting the desired entry in the rule table followed by clicking the Edit button Step 4 In case of adding a new selection rule the following screen shows Filtering Configuration ISP Incorrect configuration may cause undesireable behavior Please refer to the user manual for more details All IP packets for this profile will be discarded except for those matching one or...

Page 68: ...emote IP Address the IP address es of the remote devices this new rule will apply to You can select a single IP address a range of IP addresses a network or any IP addresses The screen may change to show fields you need to fill out accordingly For example if you select range you will also see From and To fields where you need to fill out the starting IP address and the ending IP address Remote Por...

Page 69: ... Customization screen Unless you have working experience with networking and protocols we recommend that you do not change any of the default settings Step 1 Select IP from the Menu TCP IP Service Type Port Range BootP DHCP 67 68 DNS 53 Finger 79 FTP 20 21 HTTP 80 ICMP 1 IGMP 2 NetBIOS 137 139 NNTP 119 RIP 520 SMTP 25 SNMP 161 162 Sun RPC 111 TCP 6 Telnet 23 TFTP 69 UDP 17 Whois 43 Table 7 1 TCP I...

Page 70: ... address is 192 168 168 230 If you want to create your own private network through other AcerRouters with remote offices you need to make sure that each AcerRouter 700 on each LAN is assigned a unique private IP network address However please note that once you change the private IP address such as from the default of 192 168 168 230 to 192 168 167 230 either from the APPLY System IP Configuration...

Page 71: ... want the AcerRouter 700 to act as a DHCP server and assigns private IP addresses to any requesting DHCP client make sure DHCP is enabled When enabled the AcerRouter 700 will provide an IP address network mask gateway address the AcerRouter 700 s private IP address and DNS addresses to any workstations on the local area network that are configured as a DHCP client Devices on your network that are ...

Page 72: ...is used This normally is set to a path where another router can be reached that has additional information about other networks not known to the local router such as the interface to the Internet If no match is found and a default IP route is not defined the IP packet is discarded and will go no where An entry for a specific host or network may be added manually This static route is indicated by a...

Page 73: ...terface Hop Count the maximum number of hops for this route Step 3 Click APPLY To Configure IPX Settings Note IPX options appear only if you selected Share NetWare IPX Resource on the SMART Customization screen Step 1 To select IPX Protocol select IPX from the Menu Configuration Advanced Features IPX Step 2 Enter the following information Ethernet Frame Type the Ethernet frame type on the LAN norm...

Page 74: ... addresses and network interfaces so that the system knows which device is reachable through which network interface Note Enabling the learning protocol does not enable bridging on any connection on the AcerRouter 700 You must enable bridging in the Connection Profile for a specific WAN connection Step 3 Click APPLY Using the Command Line Interface If you prefer you can configure the AcerRouter 70...

Page 75: ... console port Connect to the CLI with a terminal program such as Hypercritical or Proclaim Set your COM port parameters to 19200 N 8 1 with hardware flow control disabled If your program does not allow you to set flow control options set it in the Device Manager area of the Windows System settings accessible from the Control Panel Note that after configuring these settings some programs require th...

Page 76: ...6 16 AcerRouter 700 Series User Guide ...

Page 77: ...led Please try again A transient error occurred during the communication between the browser PC and the router Re try the operation Call operation in progress Request ignored An Apply and Test or Connect is pressed when a call is already connected or the modem is in use Cannot perform operation Port or profile is currently disabled An outgoing call was attempted on a port or profile that is disabl...

Page 78: ...mber A duplicate extension number or a duplicate SpeedDial number is entered Encryption key is a hex number up to 16 digits A valid encrytion key may only contain hexadecimal numbers 0 9 a f and may be up to 16 digits in length depending upon the strength of encryption licensed for the router site Embedded HTTP server has been disabled Only console can configure the system The message is displayed...

Page 79: ...ion An IP address should be a set of four three digit numbers Each three digit number should be between 0 and 255 inclusive Invalid tunnel remote system name Each tunnel configuration requires a remote system name for authentication If a remote system name is not provided or is invalid this message will be displayed Invalid tunnel parameters This message is displayed if one or more tunnel profile ...

Page 80: ...g the remote site Problem detect with physical ISDN line connection The ISDN line is either not ativated or not synchronized You should check your ISDN line for proper connection or contact your ISDN Service Provider if the ISDN connection to the router is correct Remote phone number is unspecified This message is displayed when no remote phone number is provided in a profile where it is required ...

Page 81: ...stics operation on the link selected in the System Status Monitoring Window Syntax error IP address should be xxx xxx xxx xxx An invalid IP address is entered A valid IP address should consist of a set of four three digit numbers Each three digit number should be a number between 0 and 255 inclusive Test successful The Apply and Test operation is successful The extension number shouldn t be all ze...

Page 82: ... number cannot start with a zero 0 The system is disconnecting A disconnect button is pressed while the system is in the process of disconnecting an active modem link The system time has been configured successfully The AcerRouter time has been configured successfully The user name already exists Please change the user name A duplicate user name is entered Dial In user names must be unique Tunnel ...

Page 83: ...ssages These are messages which the HTTP Browser will generate should problems occur during configuration Their appearance may differ from browser to browser HTTP 1 0 404 File Not Found The server has not found anything matching the Request URI No indication is given of whether the condition is temporary or permanent HTTP 1 0 500 Internal Server Error The server encountered an unexpected condition...

Page 84: ...7 8 AcerRouter 700 Series User Guide ...

Page 85: ...RFC 1058 RIP2 RFC 1722 IPX RIP IPX SAP Point to Point Protocols PPP RFC 1144 1332 1334 1471 1552 1618 1638 1661 1877 1962 1973 1974 1990 PPP Multilink RFC 1990 Multimedia IP Multicasting RFC 1112 Security VPN L2TP Layer 2 Tunneling Protocol VPN DES PPP PAP CHAP ECP Others ISDN Q 931 921 supporting major switch types including 5ESS multi point and Point to Point National ISDN 1 DMS 100 ETSI Euro IS...

Page 86: ...at the S T interface Operating Environment Temperature 32 104 F 0 40 C Altitude 0 14 500 ft 0 4 400 m Relative Humidity 0 90 Electrical Specifications External power supply Power Consumption 15 Watts Weight 2 lbs 0 9 Kg Dimensions Height 1 5 in 4 0 cm Width 9 8 in 25 0 cm Depth 6 2 in 15 8 cm ...

Page 87: ...s and to make sure that the other end is who it claims to be Once this feature is enabled every packet will contain the encrypted authentication key and any packet that fails the authentication will be dropped Bootp Relay Agent A router that will forward bootp requests to bootp servers that do not reside in the same network the router can also be called a bootp proxy server for that reason A route...

Page 88: ...a from being pirated over the WAN These routers implement such a feature which can be enabled or disabled on a per serial interface basis i e a frame relay DLCI or a point to point leased line connection Because of lack of a standard encryption negotiation scheme this feature requires the use of the same type of router on the other end of the encrypted link s and the use of the same encryption alg...

Page 89: ...n be an async modem connection a PPP leased line a frame relay DLCI or an ISDN B channel connection Most common multilink applications are as follows 1 back up when the primary PPP connection such as based on frame relay or leased line is down a secondary back up ISDN or modem connection will be set up automatically to take over the communication 2 load sharing over the 2 ISDN B channels to allow ...

Page 90: ...to date If a router fails any of the networks reachable only through this router will become unreachable The routing table will reflect such failure either by 1 a router detecting the failure and broadcasting the failure to everyone else or 2 when the corresponding routing entries in the routing table age out no update from other routers for a long time RSVP The ReSerVation Protocol a protocol tha...

Page 91: ...ge or add to this Warranty This Warranty does not apply to any failure of the Product which results from accident abuse misapplication alteration or failure due to attached equipment and Acer Netxus Networking assumes no liability as a consequence of such events under the terms of this Warranty While Acer Netxus Networking has made every effort to provide clear and accurate technical information a...

Page 92: ...dance with the terms of this Warranty except that you shall be responsible for all costs of repair replacement and shipping and handling 5 SHIPPING AND HANDLING For equipment covered by warranty Customers are responsible for shipping of products requiring repair or replacement to and from the Acer Netxus Networking Service Center and for all shipping and handling charges incurred Licenses and Trad...

Page 93: ... for a Class A digital device pursuant to Part 15 of the FCC rules These limits are designed to provide reasonable protection against harmful interference when the equipment is operated in a commercial environment This equipment generates uses and can radiate radio frequency energy and if not installed and used in accordance with the instruction manual may cause harmful interference to radio commu...

Page 94: ...C 4 AcerRouter 700 Series User Guide ...

Reviews: