2106026MNAA | XSERIES
G 5
|
133
IMPORTANT NOTE:
For illustrative purposes, the AI 1 is calibrated for an external device
with a measurement range value of 100.
To calibrate the analog input:
Make sure the AI is set to voltage mode.
Restore power to the XSeries
G5
.
Make sure that the calibrator is set to the voltage signal type.
Connect the PC or laptop running PCCU32 to the XSeries
G5
and connect using Entry mode.
Turn the calibrator on to supply the signal.
Click the
Calibrate
icon on the PCCU toolbar to display the Calibration screen.
Click the
Onboard I/O
folder on the navigation tree to expand it. Then, click
Analog
Inputs
. The Analog Input 1-tab displays.
Click another
AI
tab, if necessary, to calibrate. This example displays AI 1 (the Analog
Input 1 tab is the default displayed).
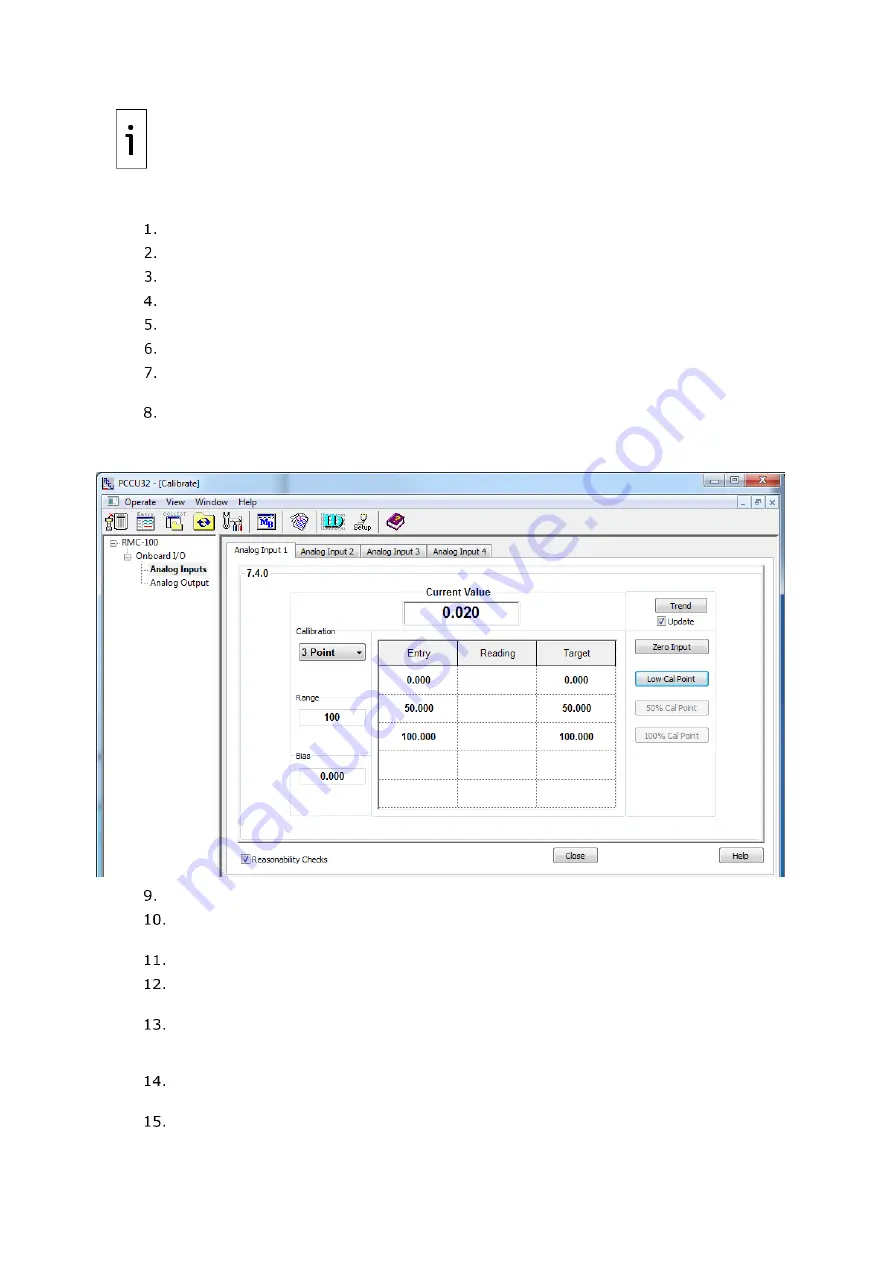
Figure 11-6: AI voltage default calibration values
Select either the
3 Point
or
5 Point
calibration from the
Calibration
drop-down list.
Verify that only the
Zero Input
and
Low-Cal Point
buttons are enabled and highlighted.
The system enables the buttons in the order required for the calibration.
Click the
Range
field. The Analog Input Range dialog box displays.
Type the external device measurement range into the entry field and click
OK
. The values
in the Target column of the table update to reflect this range.
Click
Low Cal Point
. The Enter Low Calibration Value dialog box displays with the target
low value automatically calculated. For example, for the range value of 100, the value is
0.000.
Adjust the calibrator to apply the low value of the signal range. For example, if the signal
range of the external device is 1 to 5 Vdc, apply 1 Vdc.
Observe the value in the Current Reading field. When the value stabilizes, click
OK.
Summary of Contents for XRC G5
Page 25: ...2106026MNAA XSERIESG5 25 ...


