


22
1ZSE 5492-118 en, Rev. 4
3 Installation in the transformer
NOTE: Do not mount the studs for the upper flange now, they will be mounted ac
-
cording to point 10.
3.
Place the upper flange over the opening of the transformer cover.
NOTE: Check that the flange is positioned in the right way in rotational relation to the
lower flange.
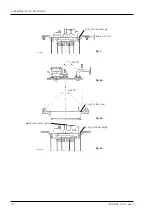
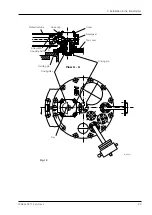
4.
Mount the lifting bar on the upper flange with the four long bolts through the clearens
holes in the upper flange and in the tapped holes in the lower flange, see Fig. 11.
NOTE: The on-load tap-changer is provided with a suction pipe, see Fig. 6, the seal-
ing may not be damaged when mounting the lifting bar.
5. Couple a lifting block or crane to the lifting bar.
6.
Check when lifting that the guiding pin in the lower flange clear the hole in the upper
flange.
CAUTION
Lift very carefully to avoid damages onto the on-load tap-changer.
7.
Lift the on-load tap-changer until it touches the upper flange. Mount a washer and a
screw in each of the free holes.
8.
If the holes in the upper flange do not match the holes in the transformer cover, the po
-
sition of the on-load tap-changer must be adjusted, which may require a careful lifting.
Mount two studs (diametrical positions) in the transformer cover.
9. Remove the lifting bar and mount a washer and a screw in each of the free holes.
10. (An alternative method, if the lifting bar is not available, is to use 4 studbolts M8x70 for
lifting the cylinder: Place the studs at opposite directions through the clearance holes
in the upper flange and threaded into the lower flange. Mount washers and nuts on the
studs. Then lift the cylinder by tightening of the nuts. Check when lifting that the guiding
pin in the lower flange enters the hole in the upper flange. Mount screws and washers in
each of the 8 free holes in the upper flange. Remove the lifting studs and mount screws
and washers also in those holes.)
11.
Mount the studs in the transformer cover through the holes in the upper flange. Fit
washer and nuts.
12.
Mount the O-ring in the groove in the upper flange and mount the sealing for the suc
-
tion pipe, see Fig. 6.
13. Before mounting of the top cover check that the position of the driving disc, on the
lower side of the cover, is according to Fig. 12.
CAUTION
Before mounting of the top cover make sure that no foreign objects are in the on-load tap-
changer.
14.
Lower the top cover straight down against the upper flange, the guiding pin in the
flange shall clear the hole in the lower side of the cover.
CAUTION
The position of the driving disc must be according to that in Fig. 12 and the guiding pin must
clear the hole at mounting of the top cover.
15. Mount the washer and M12-bolts for the top cover.