I.L. 40-386.3
5-14
(10/94)
Pressing the RAISE push-button, scroll to “Rx1” display. Pressing the ENTER
push-button simulates the receipt of the blocking signal. While depressing the EN-
TER push-button, again apply an AG fault. The REL 302 should
not
trip.
b.
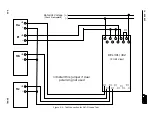
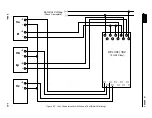
Permissive Overreach and Underreach Transfer Trip (POTT, PUTT) System Test
Change the following setting using the procedure in Step 3.
“SystType”
=
“POTT” (Pilot system selection setting)
Apply an AG fault as described in Step 6. The REL 302 should
not
trip.
Applying rated dc voltage to terminals TB4-11(+) and TB4-12(-) simulates the re-
ceipt of a permissive signal.
Again apply an AG fault as described in Step 6.
The
REL 302
should
trip. When the relay trips, remove the fault current. PILOT and
AG LEDs will light. The LCD display will switch to the L-FLT mode and fault dis-
tance will be displayed. Using the RAISE and LOWER push-buttons the complete
fault record can be reviewed.
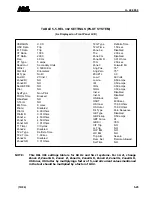
See Table 4-3 for a description of the displayed fault
data quantities.
The significant quantities to review are”
Fault Type
— “FLT Type” “AG”
Targets
— “Pilot G” “YES”
Fault Voltages (VA, VB, VC, 3V0) and Currents (IA, IB, IC, IP)
Pressing the front panel RESET push-button will cause the LCD display to switch
to the METER display and the LEDs will stop flashing.
Receipt of the pilot signal can be simulated from the front panel as in Part a above.
Using the procedure outlined in Step 5, press the SELECT push-button until the
“TEST” mode is selected. Displayed is the result of the self-test routine which
should show a normal status, “Status” “0”.
Pressing the RAISE push-button, scroll to “Rx1” display. Pressing the ENTER
push-button simulates the receipt of the permissive signal. While depressing the
ENTER push-button, again apply an AG fault. The REL 302
should
trip as in the
test above as though voltage is applied to the Receiver 1 input.
c.
Repeat the tests in Part b. Above except using the Receiver 2 input by applying rated dc
voltage to terminals TB4-13(+) and TB4-14(-). In the front panel test substitute “Rx2”.
This completes the REL 302 Pilot Acceptance Test.
5. 3.
MAINTENANCE PROCEDURES
NOTE:
It is NOT recommended to perform any type of invasive periodic main-
tenance test (requiring relay disassembly).
5.3.1
Periodic Maintenance Tests
5.3.1.1
Using Remote or Local Data Communication
• Read Metering Values
• Read Diagnostic Information
Summary of Contents for REL 301
Page 1: ......
Page 8: ......
Page 17: ...I L 40 386 3 1 10 10 94 2682F39 Sheet 1 of 2 Sub 2 Figure 1 2 REL 301 302 Layout Vertical...
Page 18: ...I L 40 386 3 10 94 1 11 2682F39 Sheet 2 of 2 Sub 2 Figure 1 3 REL 301 302 Layout Horizontal...
Page 19: ......
Page 20: ......
Page 44: ......
Page 46: ......
Page 48: ......
Page 49: ......
Page 51: ......
Page 53: ......
Page 54: ......
Page 55: ......
Page 56: ......
Page 57: ......
Page 60: ......
Page 62: ...I L 40 386 3 10 94 2 41 Figure 2 32 CO 2 Curve Characteristics 619596 Sub 2...
Page 63: ...I L 40 386 3 2 42 10 94 Figure 2 33 CO 5 Curve Characteristic 619597 Sub 2...
Page 64: ...I L 40 386 3 10 94 2 43 Figure 2 34 CO 6 Curve Characteristic 619598 Sub 2...
Page 65: ...I L 40 386 3 2 44 10 94 Figure 2 35 CO 7 Curve Characteristic 619599 Sub 2...
Page 66: ...I L 40 386 3 10 94 2 45 Figure 2 36 CO 8 Curve Characteristic 619600 Sub 2...
Page 67: ...I L 40 386 3 2 46 10 94 Figure 2 37 CO 9 Curve Characteristic 619601 Sub 2...
Page 68: ...I L 40 386 3 10 94 2 47 Figure 2 38 CO 11 Curve Characteristic 619602 Sub 2...


