background image

Fault tracing

Contents of this chapter

This chapter describes the fault tracing possibilities and maintenance instructions of the
brake units.

Fault indications

A fault in the resistor brake circuit prevents fast motor deceleration, and may cause the drive
to trip on a fault.

If a fault is detected by the chopper control unit, the brake chopper disconnects the brake
resistor from the intermediate circuit, and the chopper fault indication relay output is
de-energized.

Depending on the application, the relay output either opens the drive main contactor/breaker
or gives a fault indication to the overriding control system. See the circuit diagrams delivered
with the unit.

What to do

Cause

Fault indication/Fault

Let equipment cool.

Chopper or resistor overheated.

Fault indication relay output
switches off the main power
or gives a fault indication to
an overriding control system.

Check temperature sensor connections
both at the brake control unit end, and
at the temperature sensor end.

Digital input for the temperature fault
is at value 0 = overtemperature, al-
though there is no overtemperature.

Check sensor. Replace faulty sensor.

Check power cables and resistor.

Short circuit in resistor or power cables.

Contact local ABB representative.

Chopper control board failure. Chopper
damaged; it is not able to disconnect
resistor from intermediate circuit.

Check voltage setting.

Chopper voltage setting too high.

Chopper does not function.

Check parameters of all inverters.

Inverter overvoltage control is on.

9

Fault tracing 59

Summary of Contents for ACS880-607 Series

Page 1: ... ABB INDUSTRIAL DRIVES ACS880 607 3 phase brake units Hardware manual ...

Page 2: ......

Page 3: ...S880 607 3 phase brake units Hardware manual Table of contents 3 Mechanical installation 5 Electrical installation 8 Start up 2019 ABB Oy All Rights Reserved 3AXD50000022034 Rev D EN EFFECTIVE 2019 04 29 ...

Page 4: ......

Page 5: ... and control connections 21 Brake unit control devices 22 Overview of the control connections of the BCU control unit 22 The control panel 23 Control by PC tools 23 Fieldbus control 23 DC switch and charging switch 23 Type designation labels 24 Brake unit type designation label 24 Brake chopper module type designation label 25 Brake unit type designation key 28 Brake chopper module type designatio...

Page 6: ...1 Connection procedure of the thermal switch cable 43 Connecting a PC 6 Control units of the drive 45 Contents of this chapter 45 General 46 BCU x2 control unit layout and connections 48 Default I O diagram of the brake control unit 49 External power supply for the control unit XPOW 49 The XD2D connector 50 Safe torque off XSTO XSTO OUT 50 FSO xx safety functions module connection X12 50 SDHC memo...

Page 7: ...uivalence table 72 Typical resistor cable sizes 73 Maximum cable length 73 Fuses 74 Dimensions weights and free space requirements 75 Losses cooling data and noise 76 Resistor connection 76 Efficiency 76 Protection classes 76 Ambient conditions 78 Materials 78 Standards 78 Markings 79 Tightening torques 79 Electrical connections 79 Mechanical connections 79 Insulation supports 79 Cable lugs 79 Dis...

Page 8: ...8 ...

Page 9: ...ftware function specific warnings and notes before changing the default settings of a function For each function the warnings and notes are given in the section describing the related user adjustable parameters Read the task specific safety instructions before starting the task See the section describing the task Target audience This manual is intended for people who plan the installation install ...

Page 10: ...it manuals 3AUA0000102559 ACS880 607 1 phase brake units hardware manual 3AXD50000022034 ACS880 607 3 phase brake units hardware manual 3AXD50000020967 ACS880 3 phase brake control program firmware manual 3AXD50000023644 ACS880 1607 DC DC converter units hardware manual 3AXD50000024671 ACS880 DC DC converter control program firmware manual Option manuals 3AUA0000085685 ACS AP x assistant control p...

Page 11: ...ended for cabinet installa tion Brake chopper module Dissipates the drive surplus braking energy conducted by the brake chopper to heat Brake resistor Brake chopper modules under control of one control board and related accessories Brake unit Circuit board in which the control program runs Control board Control board built in a housing often rail mountable Control unit One section of a cabinet ins...

Page 12: ...12 ...

Page 13: ...energy increase the DC link voltage The chopper connects the brake resistor to the DC link of the drive whenever the voltage exceeds an activation limit The energy consumption by the resistor losses lowers the voltage until the resistor can again be disconnected Typically a drive system is equipped with a brake chopper or brake choppers if high capacity braking is needed and the drive cannot be eq...

Page 14: ...ector part of option F286 12 Charging circuit switch with fuses part of option F286 13 Charging resistors part of option F286 14 The supply unit connects to the AC supply network The supply unit converts the AC voltage into DC The DC voltage is distributed through the DC bus to all inverter and brake units The inverter unit consisting of one or more inverter modules converts the DC back to AC that...

Page 15: ...es for brake resistor and control cables 6 Control panel option J400 1 Terminals for brake resistor cable connection 7 Drive monitoring display option J401 2 Brake resistor fuses 8 Brake chopper fuses 3 BCU x2 control unit 9 Brake chopper module 4 Cabinet heater option G300 10 Brake chopper cooling fan 5 Operation principle and hardware description 15 ...

Page 16: ...ol unit 9 DC switch disconnector handle part of option F286 2 Terminals for brake resistor cable connection 10 Charging circuit switch fuse handle part of op tion F286 3 Cable entries for brake resistor and control cables 11 Drive monitoring display option J401 4 Brake chopper fuses 12 Charging circuit fuses 5 Cabinet heater option G300 13 Brake chopper module 6 Brake chopper cooling fan 7 16 Oper...

Page 17: ... cable connection 7 Control panel option J400 1 Brake resistor fuses 8 Drive monitoring display option J401 2 Cabinet fans 9 Brake chopper fuses 3 BCU x2 control unit 10 Brake chopper module 4 Cabinet heater option G300 11 Brake chopper cooling fan 5 Cable entries for brake resistor and control cables 6 Operation principle and hardware description 17 ...

Page 18: ...le as option C188 4 Quick connector three phases The counterpart is fastened to the cabinet behind the module 5 Wheels 6 Type designation label 7 Terminal block X50 power supply for internal boards and module heating element option C183 DOL fan supply option C188 8 Connectors X51 X52 X53 9 The unpainted grounding point PE between module frame and cabinet frame 10 Lifting eyes 11 Circuit board comp...

Page 19: ... in use STO OUT X51 STO OUT X51 FE GND 24V GND 24V STO connectors of the mod ule Must be connected to 24 V DC for the module to start STO IN X52 STO IN X52 FE GND 24V GND 24V 24 V DC for BCU and for STO IN to enable the mod ule operation 24V OUT X53 24V OUT X53 FE 24V GND 24V GND Note The Safe torque off STO safety function is only implemented in inverter units Therefore the STO function cannot be...

Page 20: ...ntrol connections The diagram below shows the power and control connections of the brake unit consisting of one 3 phase brake chopper module For parallel connected brake chopper modules the brake resistors are connected to each brake chopper module also as shown below Each parallel connected brake chopper module has a dedicated control unit 9 8 3 t t t 5 5 5 9 9 7 9 5 9 9 5 5 5 20 Operation princi...

Page 21: ...Brake resistors user defined or option D151 5 Brake unit control devices Each brake chopper module employs a dedicated control unit BCU that contains the BCON board with basic I Os and slots for optional modules A fiber optic link connects the BCU to the brake chopper module Operation principle and hardware description 21 ...

Page 22: ...or converter 8 Memory unit 4 Ethernet port Not in use 9 Slot 4 for RDCO 0x 5 Safety option interface Only in use for the invert er units 10 Terminal blocks 6 The control panel The control panel option J400 is the user interface of the brake unit providing the essential controls such as reset and the parameter settings for the control program The control panel is mounted on a platform on the brake ...

Page 23: ...ake chopper modules from the DC bus When a brake chopper module is reconnected to the DC bus its DC capacitors are automatically charged through a charging circuit The status of the DC switch disconnector is connected to the DIIL input on the brake control unit By default the run enable signal is removed when the DC switch disconnector is open WARNING Do not open the DC switch disconnector under l...

Page 24: ...spectively yyww The remaining digits complete the serial number so that there are no two units with the same number 9 Brake chopper module type designation label Each module has a type designation label attached to it The type designation stated on the label contains information on the specifications and configuration of the module The first digits express the basic construction for example ACS880...

Page 25: ... first digits form the basic code It describes the basic construction of the unit The fields in the basic code are separated by hyphens The plus codes follow the basic code Each plus code starts with an identifying letter common for the whole product series followed by descriptive digits The plus codes are separated by plus signs The subcodes are described below DESCRIPTION CODE Basic codes Produc...

Page 26: ...ction IP22 UL type 1 B053 IP42 UL Type 1 B054 IP54 UL Type 12 B055 Construction Marine construction C121 Cooling air through bottom C128 UL approved C129 Channeled air outlet C130 CSA approved C134 Plinth height 100 mm C164 Plinth height 200 mm C179 Seismic design C180 Direct on line cooling fan C188 Resistor braking Brake chopper D150 Brake resistors D151 Filters EMC filter for second environment...

Page 27: ...tions Control panel max 4 per door J400 Drive monitoring display J401 Control panel mounting platform max 4 per door J410 Common control panel J412 I O extension and feedback interface modules FIO 11 analog I O extension module L500 FIO 01 digital I O extension module L501 RDCO 04 DDCS communication module L509 FAIO 01 analog I O extension module L525 FDIO 01 digital I O extension module L526 Ring...

Page 28: ...The first digits form the basic code It describes the basic construction of the module The fields in the basic code are separated by hyphens The plus codes follow the basic code Each plus code starts with an identifying letter common for the whole product series followed by descriptive digits The plus codes are separated by plus signs The subcodes are described below DESCRIPTION CODE Basic codes P...

Page 29: ...ine type approval C132 Module heater C183 Direct on line cooling fan C188 Filter Internal du dt filtering Standard with 690 V modules E205 Auxiliary power supply 115 V AC auxiliary voltage supply G304 Specialities Extended warranty 24 30 P904 Extended warranty 36 42 P909 Retrofit version mechanically compatible with ACS800 R8i P942 Operation principle and hardware description 29 ...

Page 30: ...30 ...

Page 31: ...its Brake units The ACS880 multidrive the brake unit as one part of the complete drive is transported in sections See ACS880 multidrive cabinets mechanical installation instructions 3AUA0000101764 English User defined brake resistors Obey the brake resistor manufacturer s instructions 3 Mechanical installation 31 10 ...

Page 32: ...32 ...

Page 33: ...by ABB are not followed the drive may experience problems that the warranty does not cover Generic guidelines See ACS880 multidrive cabinets and modules electrical planning instructions 3AUA0000102324 English for the generic guidelines for planning the electrical installation selecting cables routing cables etc Selecting the brake resistors WARNING ABB is not responsible for user resistor selectio...

Page 34: ... the resistor cables Shield the braking power line completely either by using shielded cable or a metallic enclosure Unshielded single core cable can only be used if it is routed inside a cabinet that efficiently suppresses radiated emissions Install the cables away from other cable routes Avoid long parallel runs with other cables The minimum parallel cabling separation distance should be 0 3 met...

Page 35: ...mal protection function which can be tuned by the user The brake chopper protects itself and the resistor cables against thermal overload Make sure that the following conditions are met The resistor assembly is equipped with a thermal switch which is connected to chopper control unit input The cables are dimensioned according to the nominal current of the drive Operation principle If the resistor ...

Page 36: ...36 ...

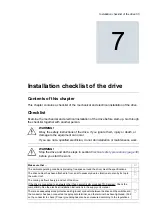
Page 37: ...nstructions on wiring the brake units WARNING Obey the safety instructions of the drive If you ignore them injury or death or damage to the equipment can occur If you are not a qualified electrician do not do installation or maintenance work 5 Electrical installation 37 11 ...

Page 38: ... from the drive with a safety switch or by other means Make sure that re connection is not possible Lock the disconnectors to open position and attach a warning notice to them Disconnect any external power sources from the control circuits After you disconnect the drive always wait 5 minutes to let the intermediate circuit capacitors discharge before you continue 4 Protect any other energized part...

Page 39: ... radius is 35 mm 1 4 Checking the insulation of brake resistor and resistor cable WARNING Obey the safety instructions of the drive If you ignore them injury or death or damage to the equipment can occur If you are not a qualified electrician do not do installation or maintenance work 1 Stop the drive and do the steps in section Electrical safety precautions page 38 before you start the work 2 Che...

Page 40: ...s and an example connection of the thermal switches The diagram also shows the internal connections of the brake unit done by ABB 9 8 3 t t t 5 5 5 9 9 7 9 5 9 9 5 5 5 Brake chopper cubicle 1 DC switch disconnector including charging circuit F286 2 Control unit 3 Brake chopper module 4 Brake resistors 5 40 Electrical installation ...

Page 41: ...hase order For minimum radio freque interference ground the cable shield 360 degrees at the lead through of the moto terminal box or ground the cable by twisting the shield so that the flattened shield wider than 1 5 of its length Connecting an external brake resistor assembly See section Electrical installation of custom brake resistors page 267 a b b 1 5 a Grommet 4 Cut the cables to suitable le...

Page 42: ...ther so that they press on the exposed cable shields Tighten the locking screws 5 Run the cables to their eventual connection points using existing trunking wherever possible Protect the cables against any sharp edges or hot surfaces 6 Strip the ends of the conductors Try to keep the unshielded portion of the conductors as short as possible Use tape or shrink tubing to contain any stray strands Co...

Page 43: ...lay Connecting a PC A PC with eg the Drive composer PC tool can be connected as follows 1 Connect an ACx AP x control panel to the unit either by inserting the control panel into the panel holder or platform if present or by using an Ethernet eg Cat 5e networking cable 2 Remove the USB connector cover on the front of the control panel 3 Connect an USB cable Type A to Type Mini B between the USB co...

Page 44: ...44 ...

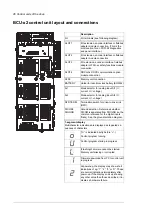
Page 45: ...control unit The BCU x2 consists of a BCON 12 control board and a BIOC 01 I O connector board and power supply board built in a metal housing The control unit is connected to the brake module s by fiber optic cables In this manual the name BCU x2 represents the control unit types BCU 02 and BCU 12 These have a different number of power module connections 2 and 7 respectively but are otherwise simi...

Page 46: ... for analog input AI2 I current U voltage AI2 Termination switch for drive to drive link D2D D2D TERM Ground selection Determines whether DICOM is separated from DIOGND ie the common reference for the digital inputs floats See the ground isolation diagram DICOM DIOGND 7 segment display Multicharacter indications are displayed as repeated se quences of characters U is indicated briefly before o Con...

Page 47: ...to modules 1 and 2 VxT transmitter VxR receiver V1T V1R V2T V2R Fiber optic connection to modules 3 7 BCU 12 22 only VxT transmitter VxR receiver V3T V3R V7T V7R Fiber optic connection to modules 8 12 BCU 22 only VxT transmitter VxR receiver V8T V8R V12T V12R Data logger memory card for inverter module communication SD CARD Real time clock battery voltage is higher than 2 8 V If the LED is off whe...

Page 48: ...o OUT 6 2 SGND 3 IN1 4 IN2 5 IN1 Not in use 6 SGND 7 IN2 8 SGND XDI Digital inputs 1 DI1 Temp fault 1 0 overtemperature 2 DI2 Not in use by default 3 DI3 Not in use by default 4 DI4 Not in use by default 5 DI5 Not in use by default 6 DI6 Reset 1 0ĺ1 fault reset 7 DIIL Not in use by default XDIO Digital input outputs 1 DIO1 Not in use by default 2 DIO2 Not in use by default 3 DIOGND Digital input o...

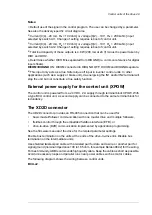
Page 49: ...y for the control unit XPOW The control unit is powered from a 24 V DC 2 A supply through terminal block XPOW With a type BCU control unit a second supply can be connected to the same terminal block for redundancy The XD2D connector The XD2D connector provides an RS 485 connection that can be used for basic master follower communication with one master drive and multiple followers fieldbus control...

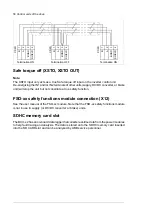
Page 50: ... will stop the unit but not constitute a true safety function FSO xx safety functions module connection X12 See the user manual of the FSO xx module Note that the FSO xx safety functions module is not in use in supply or DC DC converter or brake units SDHC memory card slot The BCU x2 has an on board data logger that collects real time data from the power modules to help fault tracing and analysis ...

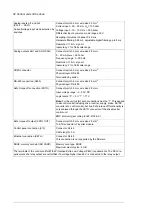
Page 51: ... 4 Connector pitch 5 mm wire size 2 5 mm2 Total load capacity of these outputs is 4 8 W 200 mA 24 V m the power taken by DIO1 and DIO2 Digital inputs DI1 DI6 XDI 1 XDI 6 Connector pitch 5 mm wire size 2 5 mm2 24 V logic levels 0 5 V 1 15 V Rin 2 0 kohm Input type NPN PNP DI1 DI5 NPN DI6 Hardware filtering 0 04 ms digital filtering up to 8 ms DI6 XDI 6 can alternatively be used as an input for a PT...

Page 52: ... 2 5 mm2 Safe torque off connection XSTO Input voltage range 3 30 V DC Logic levels 0 5 V 1 17 V Note For the unit to start both connections must be 1 This applies to all control units including drive inverter supply brake DC DC converter etc control units but true Safe torque off functionality is only achieved through the XSTO connector of the drive inverter control unit EMC immunity according to...

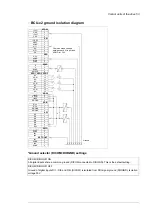
Page 53: ...OGND 8 XDIO DIO1 1 DIO2 2 DIOGND 3 DIOGND 4 XDI DI1 1 DI2 2 DI3 3 DI4 4 DI5 5 DI6 6 DIIL 7 XSTO OUT 1 SGND 2 IN1 3 IN2 4 XSTO OUT IN1 5 SGND 6 IN2 7 SGND 8 Common mode voltage between each AI input and AGND is 30 V Ground Ground selector DICOM DIOGND settings DICOM DIOGND ON All digital inputs share a common ground DICOM connected to DIOGND This is the default setting DICOM DIOGND OFF Ground of di...

Page 54: ...54 ...

Page 55: ...t the work Make sure that The ambient operating conditions including free space around the drive meet the specifications The drive cabinet has been attached to floor and if necessary due to vibration etc also by its top to the wall or roof The cooling air flows freely in and out of the drive If the drive is connected to a network other than a symetrically grounded TN S system Check the compatibili...

Page 56: ...lations If an external brake resistor has been connected to the drive The brake resistor has been connected to the appropriate terminals and the terminals have been tightened Pull on the conductors to check If an external brake resistor has been connected to the drive The brake resistor cable has been routed away from other cables The control cables have been connected to the appropriate terminals...

Page 57: ...rcuit diagrams when proceeding with the start up Start up procedure Start up procedure Tasks Safety WARNING Obey the safety instructions of the drive If you ignore them injury or death or damage to the equipment can occur If you are not a qualified electrician do not do installation or maintenance work Note Some brake resistors are coated with oil film for protection The protective oil will burn o...

Page 58: ...y for it by the supply unit Constant braking will overload brake choppers and resistors and cause overheating Close the disconnector of the supply transformer Close the drive auxiliary voltage switch Q21 to power up the control unit of the unit Start the supply unit See the supply unit hardware manual When started the supply unit charges the capacitors of all inverters and brake units connected to...

Page 59: ...with the unit What to do Cause Fault indication Fault Let equipment cool Chopper or resistor overheated Fault indication relay output switches off the main power or gives a fault indication to an overriding control system Check temperature sensor connections both at the brake control unit end and at the temperature sensor end Digital input for the temperature fault is at value 0 overtemperature al...

Page 60: ...rning in the unit Blinking green There is an active fault in the unit Continuous red There is a fault that requires the stopping and restarting of the drive converter inverter Blinking red The Bluetooth interface is enabled in discoverable mode and ready for pairing Blinking blue ACS AP W only Data is being transferred through the Bluetooth interface of the control panel Flickering blue ACS AP W o...

Page 61: ...or use ENABLE STO continuous green XSTO connectors are de energized ENABLE STO continuous yellow Supply voltage of the internal circuit boards is OK 21 V POWER OK continuous green Warning and fault messages See the firmware manual for the descriptions causes and remedies of the control program warning and fault messages 7 segment display of the brake control unit See the control unit description F...

Page 62: ...62 ...

Page 63: ... the brake unit Reference to maintenance instructions See the ACS880 107 inverter units hardware manual 3AUA0000102519 English for preventive maintenance intervals of cooling fans and converter modules instructions on how to replace the cooling fans and converter modules 10 Maintenance 63 ...

Page 64: ...in section Electrical safety precautions page 38 before you start the work WARNING Do not open the DC switch disconnector under load 2 Brake units without option F286 Open the cubicle door Remove the shroud in front of the fuses Replace the fuses as shown below Brake units with DC switch disconnector option F286 Open the DC switch Open the cubicle door Remove the shroud in front of the fuses Remov...

Page 65: ...the drive and do the steps in section Electrical safety precautions page 38 before you start the work WARNING Do not open the DC switch disconnector under load 2 Brake units without option F286 Open the cubicle door Remove the shrouds in front of the fuses Replace the fuses as shown below Brake units with DC switch disconnector option F286 Open the DC switch Open the cubicle door Remove the shroud...

Page 66: ...66 Maintenance ...

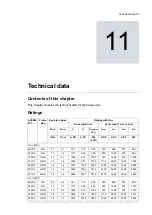
Page 67: ...4 1 2 R8i 0750 3 1290 702 1998 740 1000 621 1562 2 1 1 7 2 R8i 1000 3 1930 1053 2997 1110 1510 931 2342 1 4 1 2 2 R8i 1510 3 2890 1580 4496 1665 2260 1396 3514 1 4 1 2 3 R8i 2260 3 3860 2106 5994 2220 3010 1862 4685 1 4 1 2 4 R8i 3010 3 4820 2633 7493 2775 3770 2327 5856 1 4 1 2 5 R8i 3770 3 UN 500 V 800 351 999 370 630 310 781 2 6 2 2 R8i 0630 5 1210 527 1499 555 940 465 1171 1 7 1 4 R8i 0940 5 1...

Page 68: ... DC A DC A DC kW kVA A DC A DC Ohm Ohm UN 400 V 530 291 827 312 500 282 781 2 1 1 7 R8i 0500 3 800 436 1241 468 750 424 1171 1 4 1 2 R8i 0750 3 1060 581 1655 625 1000 565 1562 2 1 1 7 2 R8i 1000 3 1600 872 2482 937 1510 847 2342 1 4 1 2 2 R8i 1510 3 2400 1308 3723 1405 2260 1271 3514 1 4 1 2 3 R8i 2260 3 3190 1744 4964 1874 3010 1694 4685 1 4 1 2 4 R8i 3010 3 3990 2180 6205 2342 3770 2118 5856 1 4...

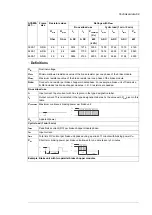
Page 69: ...ule phase For example a brake unit of frame size 2 R8i includes two brake chopper modules 2 3 resistors are needed Note No overload use Input current Input current with Rmin is given in the type designation label I1 Output current This is indicated in the type designation label as 3x the value with Rmin given in this table I2 Maximum continuous braking power per brake unit Pcont max PEUFRQW IPD IU...

Page 70: ...ated by multiplying the current given in the rating table by the derating factor k T k Altitude derating At altitudes from 1000 to 2000 m 3300 to 6561 ft above sea level the continuous output currents given above must be derated 1 for every 100 m 328 ft For a more accurate derating use the DriveSize PC tool Input and output voltages Typical input and output voltages are listed below 70 Technical d...

Page 71: ...e table Frame size Basic module type Brake module type ACS880 607 UN 400 V R8i ACS880 104 0640A 3 ACS880 104 0640A 3 0500 3 R8i ACS880 104 0900A 3 ACS880 104 0900A 3 0750 3 2 R8i ACS880 104 0640A 3 ACS880 104 1250A 3 1000 3 2 R8i ACS880 104 0900A 3 ACS880 104 1760A 3 1510 3 3 R8i ACS880 104 0900A 3 ACS880 104 2610A 3 2260 3 4 R8i ACS880 104 0900A 3 ACS880 104 3450A 3 3010 3 5 R8i ACS880 104 0900A ...

Page 72: ...e and the load current of the drive Irms dim is the dimensioning current Cable data Irms dim Frame size ACS880 607 Cable T 90 C Cable T 70 C mm2 mm2 A UN 400 V 3 3 240 120 3 2 3 120 70 372 R8i 0500 3 3 2 3 150 70 3 2 3 240 120 559 R8i 0750 3 2 3 3 240 120 2 3 2 3 120 70 745 2 R8i 1000 3 2 3 2 3 150 70 2 3 2 3 240 120 1117 2 R8i 1510 3 3 3 2 3 150 70 3 3 2 3 240 120 1676 3 R8i 2260 3 4 3 2 3 150 70...

Page 73: ...d UL DC fuses IEC and UL ACS880 607 Qty Data Type Qty Data Type UN 400 V 3 500 A 690 V 170M6408 2 630 A 690 V 170M6410 0500 3 3 800 A 690 V 170M6412 2 1000 A 690 V 170M6414 0750 3 6 500 A 690 V 170M6408 4 630 A 690 V 170M6410 1000 3 6 800 A 690 V 170M6412 4 1000 A 690 V 170M6414 1510 3 9 800 A 690 V 170M6412 6 1000 A 690 V 170M6414 2260 3 12 800 A 690 V 170M6412 8 1000 A 690 V 170M6414 3010 3 15 8...

Page 74: ...1000 400 2315 2145 1510 3 1500 1200 756 636 2100 1500 400 2315 2145 2260 3 2000 1600 756 636 2800 2000 400 2315 2145 3010 3 2500 2000 756 636 3500 2500 400 2315 2145 3770 3 UN 500 V 500 400 756 636 700 500 400 2145 2145 0630 5 500 400 756 636 700 500 400 2145 2145 0940 5 1000 800 756 636 1400 1000 400 2145 2145 1260 5 1000 800 756 636 1400 1000 400 2145 2145 1880 5 1500 1200 756 636 2100 1500 400 ...

Page 75: ...sses Noise level ACS880 607 ft3 min m3 h kW dB A UN 400 V 765 1300 3 1 72 0500 3 765 1300 4 8 72 0750 3 1530 2600 6 3 74 1000 3 1530 2600 9 7 74 1510 3 2295 3900 14 5 76 2260 3 3060 5200 19 3 76 3010 3 3825 6500 24 1 77 3770 3 UN 500 V 765 1300 3 3 72 0630 5 765 1300 5 0 72 0940 5 1530 2600 6 6 74 1260 5 1530 2600 10 0 74 1880 5 2295 3900 15 0 76 2830 5 3060 5200 20 0 76 3770 5 3825 6500 25 1 77 4...

Page 76: ...lasses IP22 standard IP42 option B054 IP54 option B055 Degrees of protection IEC EN 60529 UL Type 1 standard UL Type 1 option B054 UL Type 12 option B055 For indoor use only Enclosure types UL50 III except for auxiliary power connections fan control heating lighting cooling unit pump etc which are category II Overvoltage category IEC EN 60664 1 I Protective class IEC EN 61800 5 1 Ambient condition...

Page 77: ...packing must support this otherwise 1S2 Chemical gases Class 3C2 Solid particles Class 3S2 3S1 with IP20 No con ductive dust allowed IEC EN 60721 3 2 1997 IEC EN 60721 3 1 1997 IEC EN 60721 3 3 2002 Vibration 2 9 Hz max 3 5 mm amplitude 10 57 Hz max 0 075 mm amplitude 10 57 Hz max 0 075 mm amplitude IEC EN 61800 5 1 IEC 60068 2 6 2007 EN 60068 2 6 2008 Envir onmental testing Part 2 Tests Test Fc V...

Page 78: ...CI stretch film PE thickness 0 04 mm VCI emitter bags PP tape PET strap sheet metal steel for sea transport with or without containerization for long storage periods in environments where roofed and humidity controlled storage cannot be arranged Cabinets are fastened to the pallet with screws and braced from the top end to the package walls to prevent swaying inside the package Package elements ar...

Page 79: ... 8 10 N m 7 4 lbf ft M6 Strength class 8 8 24 N m 17 7 lbf ft M8 Insulation supports Note Max torque Size Strength class 8 8 5 N m 44 lbf in M6 Strength class 8 8 9 N m 6 6 lbf ft M8 Strength class 8 8 18 N m 13 3 lbf ft M10 Strength class 8 8 31 N m 23 lbf ft M12 Cable lugs Note Max torque Size Strength class 8 8 15 N m 11 lbf ft M8 Strength class 8 8 32 N m 23 5 lbf ft M10 Strength class 8 8 50 ...

Page 80: ...e measures such as but not limited to the installation of firewalls application of authentication measures encryption of data installation of anti virus programs etc to protect the product the network its system and the interface against any kind of security breaches unauthorized access interference intrusion leakage and or theft of data or information ABB and its affiliates are not liable for dam...

Page 81: ...Dimension drawings Contents of this chapter This chapter contains example dimension drawings for the brake units 12 Dimension drawings 81 ...

Page 82: ...Dimension drawing bottom exit 82 Dimension drawings ...

Page 83: ...Dimension drawings 83 ...

Page 84: ...Dimension drawing top exit 84 Dimension drawings ...

Page 85: ... Dimension drawings 85 ...

Page 86: ......

Page 87: ... by navigating to www abb com searchchannels Product training For information on ABB product training navigate to new abb com service training Providing feedback on ABB manuals Your comments on our manuals are welcome Navigate to new abb com drives manuals feedback form Document library on the Internet You can find manuals and other product documents in PDF format on the Internet at www abb com dr...

Page 88: ...www abb com drives 3AXD50000022034D 2019 ABB Oy All Rights Reserved Specifications subject to change without notice 3AXD50000022034 Rev D EN EFFECTIVE 2019 04 29 ...

Reviews: