


102 Electrical installation
External power supply for the control unit (XPOW)
Ex24 V (2 A) power supply for the control unit can be connected to terminal
block XPOW. Using an external supply is recommended if
• the control board needs to be kept operational during input power breaks, for
example, due to continuous fieldbus communication
• immediate restart is needed after power breaks (that is, no control board power
up delay is allowed).
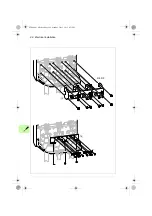
AI1 and AI2 as Pt100 and KTY84 sensor inputs (XAI, XAO)
Three Pt100 sensors or one KTY84 sensor for motor temperature measurement can
be connected between an analog input and output as shown below. (Alternatively,
you can connect the KTY to FEN-11 analog /I/O extension module or FEN-xx encoder
interface module.) Do not connect both ends of the cable shields directly to ground. If
a capacitor cannot be used at one end, leave that end of the shield unconnected.
WARNING!
As the inputs pictured above are not insulated according to
IEC 60664, the connection of the motor temperature sensor requires double or
reinforced insulation between motor live parts and the sensor. If the assembly does
not fulfill the requirement, the I/O board terminals must be protected against contact
and must not be connected to other equipment or the temperature sensor must be
isolated from the I/O terminals.
1) Set the input type to voltage with switch J1 for analog input AI1or with J2 for analog input
AI2. Set the appropriate analog input unit to V (volt) in parameter group
12 Standard AI
.
2) Select the excitation mode in parameter group
13 Standard AO
.
1…3 × Pt100 or 1 × KTY
3.3 nF
> 630 V AC
XAI
XAO
AIn+
AIn-
AOn
AGND
1)
2)
T
T
T
ACS880-01 HW.book Page 102 Monday, July 1, 2013 4:51 PM
Summary of Contents for ACS880-01 Series
Page 4: ...ACS880 01 HW book Page 4 Monday July 1 2013 4 51 PM...
Page 12: ...12 ACS880 01 HW book Page 12 Monday July 1 2013 4 51 PM...
Page 20: ...20 Safety instructions ACS880 01 HW book Page 20 Monday July 1 2013 4 51 PM...
Page 26: ...26 Introduction to the manual ACS880 01 HW book Page 26 Monday July 1 2013 4 51 PM...
Page 80: ...80 Planning the electrical installation ACS880 01 HW book Page 80 Monday July 1 2013 4 51 PM...
Page 96: ...96 Electrical installation 8b R8 R9 ACS880 01 HW book Page 96 Monday July 1 2013 4 51 PM...
Page 98: ...98 Electrical installation 16 13 R8 R9 ACS880 01 HW book Page 98 Monday July 1 2013 4 51 PM...
Page 118: ...118 Start up ACS880 01 HW book Page 118 Monday July 1 2013 4 51 PM...
Page 120: ...120 Fault tracing ACS880 01 HW book Page 120 Monday July 1 2013 4 51 PM...
Page 131: ...Maintenance 131 3 4 5 3 ACS880 01 HW book Page 131 Monday July 1 2013 4 51 PM...
Page 172: ...172 Technical data ACS880 01 HW book Page 172 Monday July 1 2013 4 51 PM...
Page 196: ...196 Dimension drawings ACS880 01 HW book Page 196 Monday July 1 2013 4 51 PM...
Page 209: ...Safe Torque off function 209 Certificate ACS880 01 HW book Page 209 Monday July 1 2013 4 51 PM...
Page 210: ...210 Safe Torque off function ACS880 01 HW book Page 210 Monday July 1 2013 4 51 PM...
Page 220: ...220 Resistor braking ACS880 01 HW book Page 220 Monday July 1 2013 4 51 PM...


