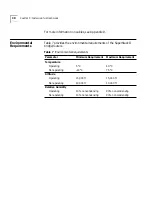


44
C
HAPTER
4: I
NSTALLING
OR
R
EMOVING
AN
I
NTERFACE
M
ODULE
3
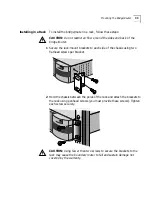
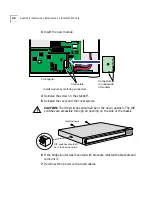
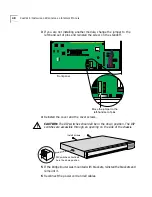
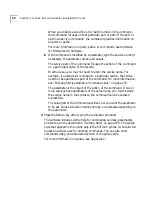
If you are not installing another module, change the jumper to the
left-hand set of pins and reinstall the screw on the standoff.
4
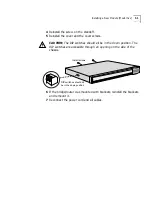
Reinstall the cover and the cover screws.
CAUTION:
The DIP switches should all be in the down position. The DIP
switches are accessible through an opening on the side of the chassis.
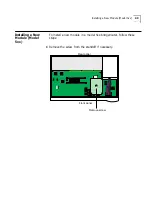
5
If the bridge/router was mounted with brackets, reinstall the brackets and
remount it.
6
Reconnect the power cord and all cables.
Front panel
Move the jumper to the
left-hand set of pins
DIP switches should all
be in the down position
Install screws
Summary of Contents for NETBuilder SI
Page 6: ......
Page 22: ...22 CHAPTER 1 FEATURES AND SPECIFICATIONS...
Page 28: ...28 CHAPTER 2 USING THE BRIDGE ROUTER IN YOUR NETWORK...
Page 40: ...40 CHAPTER 3 INSTALLING THE HARDWARE...
Page 52: ...52 CHAPTER 4 INSTALLING OR REMOVING AN INTERFACE MODULE...
Page 78: ...78 CHAPTER 6 BASIC CONFIGURATION OF PORTS AND PATHS...
Page 100: ...100 CHAPTER 7 ADVANCED CONFIGURATION OF PORTS AND PATHS...
Page 120: ...120 CHAPTER 9 CUSTOMIZING YOUR SOFTWARE...
Page 150: ...150 APPENDIX A TROUBLESHOOTING...
Page 162: ...162 APPENDIX C SYNTAX CONVENTIONS...
Page 196: ...196 APPENDIX E PROVISIONING YOUR ISDN LINE...
Page 202: ......
Page 210: ...210 INDEX...
Page 212: ......


