


102
C
HAPTER
8: C
ONFIGURING
B
RIDGING
AND
R
OUTING
To enable bridging, enter:
SETDefault -BRidge CONTrol = Bridge
To customize your bridge, see
Using Enterprise OS Software
.
Managing the
Bridge/Router
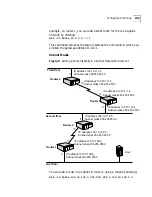
If you want to access the bridge/router remotely using Telnet or FTP,
assign an IP address to port 0 using:
SETDefault !0 -IP NETaddr = <IP address>
CAUTION:
Do not set an IP address for port 0 if you are using IP routing
on the bridge/router.
Per-Port Transparent
Bridging
After enabling transparent bridging on all ports, you can enable or
disable transparent bridging on specified ports using:
SETDefault
!<port>
-BRidge
TransparentBRidge
=
TransparentBRidge
|
NoTransparentBRidge
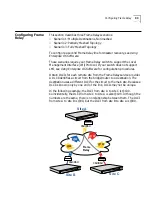
Configuring IP
Routing
This section contains the following information:
■
Assigning Addresses and Enabling IP Routing
■
Configuring Static Routes
■
Learning Routes with OSPF
■
Configuring Route Redundancy
■
Assigning Addresses Automatically from BOOTP Servers
To fine-tune your IP router, including configuring an Internet firewall or
network address translation, see
Using Enterprise OS Software
.
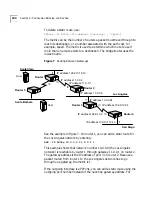
To use IP, each device on the network must have a unique IP address. To
route IP, the bridge/router must have an IP addess assigned to each LAN,
WAN, or virtual port.
After assigning IP addresses and enabling IP routing, the bridge/router
must use a routing table to identify other routers on the network to send
data to. You can create the routing table manually by entering the IP
address of each connected router, or you can use a dynamic routing
protocol, such as OSPF, that builds the routing table automatically.
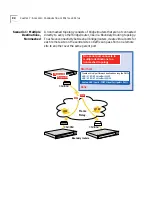
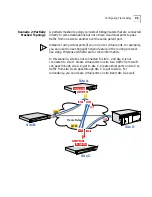
Summary of Contents for NETBuilder SI
Page 6: ......
Page 22: ...22 CHAPTER 1 FEATURES AND SPECIFICATIONS...
Page 28: ...28 CHAPTER 2 USING THE BRIDGE ROUTER IN YOUR NETWORK...
Page 40: ...40 CHAPTER 3 INSTALLING THE HARDWARE...
Page 52: ...52 CHAPTER 4 INSTALLING OR REMOVING AN INTERFACE MODULE...
Page 78: ...78 CHAPTER 6 BASIC CONFIGURATION OF PORTS AND PATHS...
Page 100: ...100 CHAPTER 7 ADVANCED CONFIGURATION OF PORTS AND PATHS...
Page 120: ...120 CHAPTER 9 CUSTOMIZING YOUR SOFTWARE...
Page 150: ...150 APPENDIX A TROUBLESHOOTING...
Page 162: ...162 APPENDIX C SYNTAX CONVENTIONS...
Page 196: ...196 APPENDIX E PROVISIONING YOUR ISDN LINE...
Page 202: ......
Page 210: ...210 INDEX...
Page 212: ......


