3-12
Chapter 3: C o n fig u rin g th e A dapter
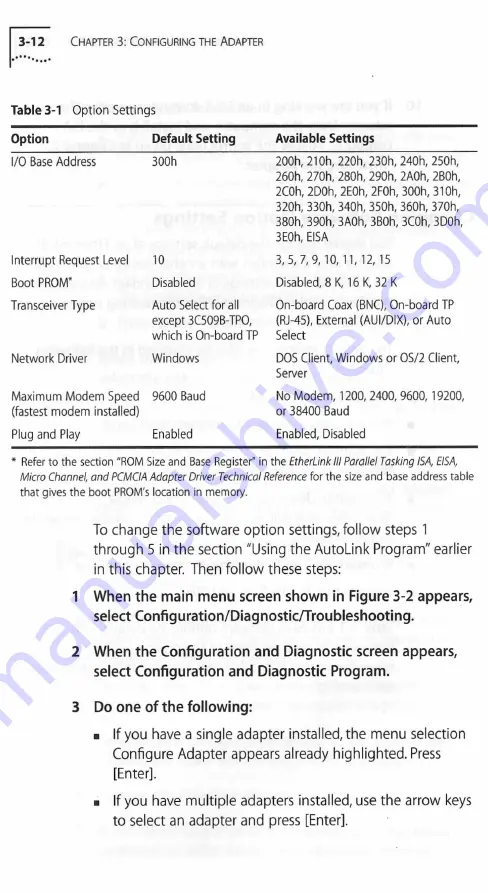
Table 3-1
Option Settings
Option
Default Setting
Available Settings
I/O Base Address
300h
200h, 21 Oh, 220h, 230h, 240h, 250h,
260h, 270h, 280h, 290h, 2A0h, 2B0h,
2C0h, 2D0h, 2E0h, 2F0h, 300h, 31 Oh,
320h, 330h, 340h, 350h, 360h, 370h,
380h, 390h, 3A0h, 3B0h, 3C0h, 3D0h,
3E0h, EISA
Interrupt Request Level
10
3, 5, 7,9,10,11,12,15
Boot PROM"
Disabled
Disabled, 8 K, 16 K, 32 K
Transceiver Type
Auto Select for all
except 3C509B-TPO,
which is On-board TP
On-board Coax (BNC), On-board TP
(RJ-45), External (AUI/DIX), or Auto
Select
Network Driver
Windows
DOS Client, Windows or OS/2 Client,
Server
Maximum Modem Speed
(fastest modem installed)
9600 Baud
No Modem, 1200, 2400, 9600,19200,
or 38400 Baud
Plug and Play
Enabled
Enabled, Disabled
* Refer to the section "ROM Size and Base Register" in the
EtherLink III Parallel Tasking ISA, EISA,
Micro Channel, and PCMCIA Adapter Driver Technical Reference
for the size and base address table
that gives the boot PROM's location in memory.
To change the software option settings, follow steps 1
through 5 in the section "Using the AutoLink Program" earlier
in this chapter. Then follow these steps:
1 When the main menu screen shown in Figure 3-2 appears,
select Configuration/Diagnostic/Troubleshooting.
2 When the Configuration and Diagnostic screen appears,
select Configuration and Diagnostic Program.
3
Do one of the following:
■ If you have a single adapter installed, the menu selection
Configure Adapter appears already highlighted. Press
[Enter],
■ If you have multiple adapters installed, use the arrow keys
to select an adapter and press [Enter],


