background image


24


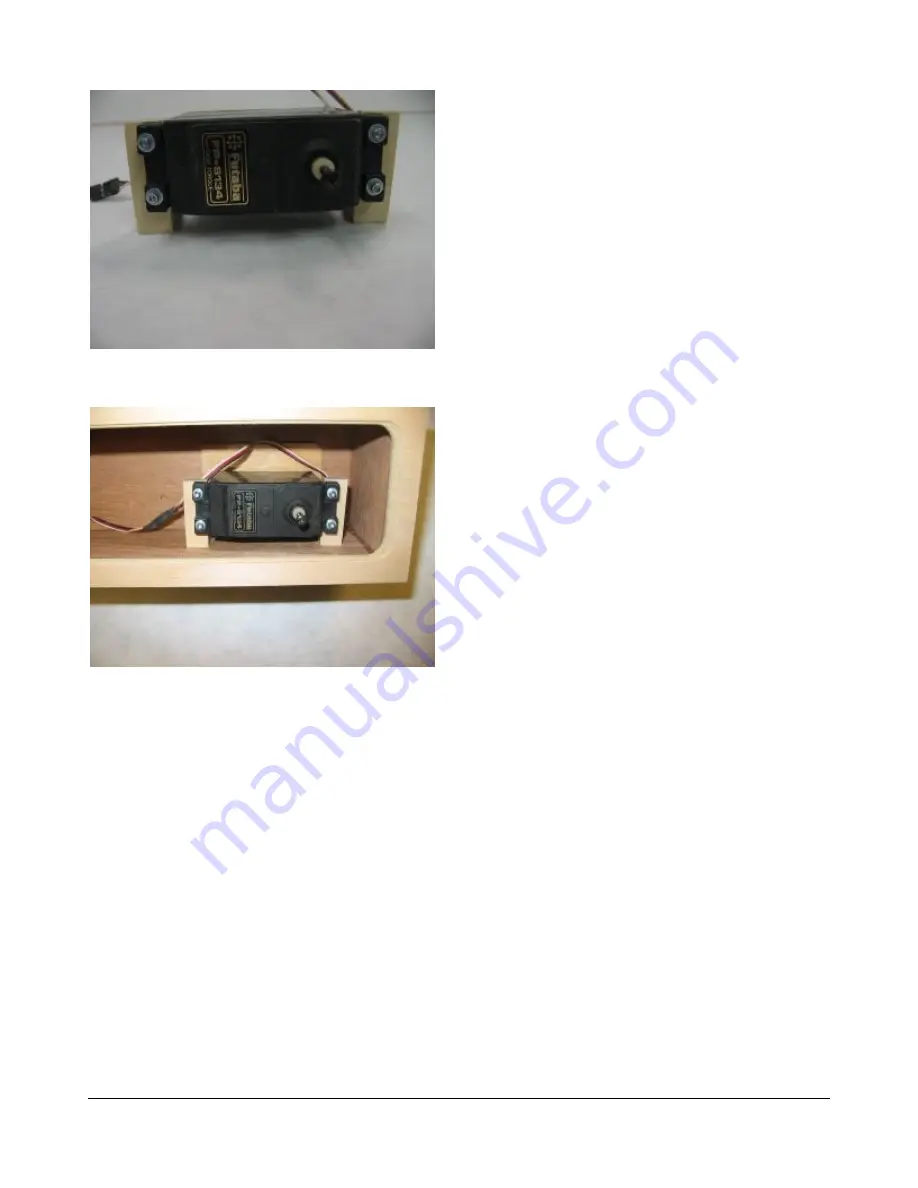
Rudder servo on mounts. 


Rudder servo mounted in radio box. 


Radio: 

Find the 4 pieces of ¼x1-1/2 ply, and the 4 pieces 
of tri stock. 
These are the servo mounts. 
Using CA, glue one piece of tri stock to each piece 
of ply. 
Make sure the two pieces are flush with each other 
by holding them flat against the bench while the 
glue dries. Use a piece of waxed paper or cling 
wrap on the bench, so the part doesn’t become a 
permanent part of your bench… 
When dry, sand each mount smooth with 80. 
Get your servos. 
 
Hold the servo at the end of the mount, mark the 
hole locations in the ply. Be sure to leave a 1/16 
gap between the servo case and the mount. Drill on 
the marks with a 1/16 bit. 
Repeat for the other side. 
Repeat for the other servo. 
 
Assemble the grommets and bushings on the 
servos. Note that the brass bushings go in from the 
bottom of the servo. 
 
Screw the servos to the mounts, making sure the 
case does not touch the mount. 
Lay each mounted servo on the bench.  
 
Check to see that it sits flat on the mounts. If not, 
find out why and correct it. 
Lay the servo box on its side, opening towards you. 
Make a pencil mark ½ inch from the right side, 
inside the box. This is where the rudder servo will 
mount. 
Get a piece of scrap 1/8 wood from the kit, and 
place this on the floor of the radio box, where the 
rudder servo will be. 
With the radio box still on its side, glue the rudder 
servo mounts in with CA, aligning to your pencil 
mark. Make sure the 1/8 scrap is under the servo, 
to space it up from the radio box bottom. Do not 
glue any part of the servo to the radio box! Check 
the servo wire! 
Hold firmly until dry. 


Your engine will determine where you mount the 
throttle servo. 
Mount it the same way as you did the rudder servo. 
 
Drill 3/8 holes where the pushrods will exit. 


Содержание I-BOX

Страница 1: ...N B O X I B O X Z I P P M A N U FA C T U R I N G A Zippkits R C Boat BUILDINGINSTRUCTIONS 2006 Zipp Manufacturing 750 Ball Road Frankfort New York 13340 www zippkits com...

Страница 2: ...N G Side Sheeting 11 Transom 13 Bottom Sheeting 12 Sealing interior 17 Deck Sheeting 19 Hatch 22 S E C T I O N 3 E Q U I P M E N T Radio Box 15 Fuel Tank 31 Running Hardware 26 Balancing 30 Engine Mou...

Страница 3: ...ren without close adult supervision Here are a few safety tips Never operate your boat alone If you get hurt you may not be able to drive for help Never ever operate your boat in an area where there a...

Страница 4: ...it does make it easier to have them available when you build You can use any gasoline engine check the rules as long as it has mounts for 5 inch rails If you use a Zenoah or similar you will generally...

Страница 5: ...ll or attachment Square 12x48 FLAT plywood the thicker the better Medium CA glue and accelerator Good quality 30 minute epoxy Epoxy finishing resin 2 feet of 6 ounce fiberglass cloth 3 inches wide 3 i...

Страница 6: ...ine Tuned pipe or canister muffler check the rules 2 channel surface radio with 1 standard and 1 heavy duty servo 100 in oz minimum Throttle pushrod Rudder pushrod at least 4 40 size 2 pushrod seals Z...

Страница 7: ...and shim the corners to make it steady Or if you are really pressed for space you can set it on a couple of saw horses The Build We are ready to start the build Remember The boat is being built upsid...

Страница 8: ...I B O X N B O X 6...

Страница 9: ...7 We like the Great Planes 11 inch bar sanders Use good quality epoxy and finishing resin Your life will be much easier with one of these Acid brush trimmed for fast epoxy application...

Страница 10: ...re that the tabs don t protrude under the jig Use CA and accelerator Don t glue the spines at this time We will glue them after we flip the hull over When dry and square glue bulkheads 2 and 3 the sam...

Страница 11: ...bulkheads they should be flush with the sides Most of the time the stringers are not exactly square so if they are not flush with the sides try turning them They usually measure 250x 260 or so Having...

Страница 12: ...imply hold the stringer in place and cut it with the razor saw against the keel Don t glue it to the keel yet Glue the other top stringer onto the bulkheads exactly the same way as before Trim the fro...

Страница 13: ...ers are flat Do this with your sanding block and fresh 80 grit paper Sand the stringers using your sanding block to blend them at the front Check to see if your sanding block sits flat on the stringer...

Страница 14: ...the other side You may have to trim the front tip of the first side so the second side fits Allow to cure at least 1 hour Bottom Sheeting When the glue is fully cured on the side sheeting plane and sa...

Страница 15: ...nter of bulkheads 4 and 5 Make this mark on the edge so that you know how far to glue the sheeting Test fit the bottom sheeting in place It should cover exactly half of the keel Also sand a gradually...

Страница 16: ...t the other bottom sheet and make any adjustments before you glue Make sure that both bottom sheets meet as perfectly as possible Take your time here Start from the rear Put the sheet in place and not...

Страница 17: ...inutes so that the radio box glue joints can cure Using 80 grit sand the overhang on the top and bottom so that it s flush with the sides Sand the top with 180 or 220 grit paper on a block Carefully r...

Страница 18: ...l plane to get close Finish with an 80 grit sanding block Don t spend too much time where the side sheeting meets the top as we will come back to this area later Also glue in the two spines that you f...

Страница 19: ...ny resin in the bolt holes for the skeg Try not to get too much resin on the top edges of the bulkheads and stringers as it will make it more difficult to sand later Be sure to get the bottom edges of...

Страница 20: ...front of the deck joiner It should go from nothing at the front to full thickness about 4 inches from the front Take your time and make a smooth progression Use your plane to shave the top stringers a...

Страница 21: ...You can use white pink or blue foam pool noodles plastic bottles almost anything that floats Stay away from spray in foam it has too many disadvantages for this use If you use blocks of foam make them...

Страница 22: ...em together Place the two top sheets on the bench Arrange them so that the good sides are facing up Using wide tape tightly tape them together in 4 or 5 places Run a piece of tape down the entire cent...

Страница 23: ...lign and tape the center of the deck at bulkhead 3 Then align and tape at the nose then center of the transom Start taping the sides Tape tightly Check all around to make sure that the deck it tight a...

Страница 24: ...e the hatch halves together making sure they are aligned properly Glue the cockpit front former to the front of the hatch front of hatch is wider than the rear Glue it flush with the cockpit cutout an...

Страница 25: ...g Be sure to leave a 1 16 gap all around to account for your finish paint clear coat etc When satisfied with the fit of the hatch glue two hatch tongues in place on the front of the hatch two tongues...

Страница 26: ...Note that the brass bushings go in from the bottom of the servo Screw the servos to the mounts making sure the case does not touch the mount Lay each mounted servo on the bench Check to see that it si...

Страница 27: ...ttom of the hull Assemble the strut to the brackets and tighten the bolt until you can just move the strut in the bracket but it won t move on its own Push the strut all the way up into the bracket un...

Страница 28: ...e epoxy about ounce Coat the edges of the skeg slot and the bottom of the skeg lip with epoxy Push the skeg into the slot piercing the tape as you do so Put epoxy all around the edges of the skeg insi...

Страница 29: ...ir up from the bottom Also mount them so that they are 1 2inch from the outside of the hull Turn fin The turn fin should be mounted on the extreme right side of the transom above the trim tabs Make su...

Страница 30: ...rs the first 2 or 3 threads on the stub shaft Tighten the drive dog set screw Mark the stub shaft at the front of the drive dog Remove the dog and prop Measure 3 16 inch back from your line and file a...

Страница 31: ...dog Slide the stub shaft into the strut until the thrust bearing touches the back of the strut Make a mark on the front of the stub shaft where it enters the strut Remove the stub shaft and make anot...

Страница 32: ...is pointing to the center of the boat and at least an inch in front of bulkhead 5 Also use it to determine the exact location of the hole for the stuffing tube in the hull bottom If using a square dri...

Страница 33: ...y wetted Don t get any resin in the stuffing tube Let sit at least 2 hours Epoxy the four 1 2x1 2 plywood pieces in place to hold the fuel tank Sand the sealed bottom before gluing When dry drill pilo...

Страница 34: ...rom the hobby shop which is threaded on one end We attach the rudder end with a 4 40 ball link and the servo end with a solder clevis Shaft tube and cable Slide the 5 16 shaft tube into the 11 32 stuf...

Страница 35: ...end of the shaft tube It should easily bolt to the transom If not find out why and correct it When satisfied with the shaft tube mark the front and cut it to the same distance from the collet as the s...

Страница 36: ...ile any burrs Slide your squared shaft into the shaft tube and into the engine Be sure it is all the way in the engine or clutch While holding the cable in this position mark the cable at the front of...

Страница 37: ...the cable Use your propane torch to heat the base of the ferrule slowly until the solder melts and flows Remove the heat and don t touch until cooled Finishing Sand the entire hull with 80 Fill any d...

Страница 38: ...d coat has cured sand with 220 wet Sand with a bucket of water a dribbling hose or in your bathtub Use one of those rubber sanding blocks Don t worry about the hull it s waterproof now Sand the inside...

Страница 39: ...water Install the engine Install the servos Install the shaft tube Install the strut pushing the end of the shaft tube all the way in Leave the strut loose in the brackets Install the rudder assembly...

Страница 40: ...the rudder servo arm on It should be parallel with the servo and 90 degrees to the pushrod Use the sub trim function if your radio has it If not get it as close as you can Attach the rudder to the pu...

Страница 41: ...in the strut bushings At the pond Make sure your transmitter and receiver batteries are fresh or fully charged Do a range check with your transmitter antenna down and note the distance You should do a...

Страница 42: ...you have a stream of cooling water If you don t see any bring it in pronto If all looks good hit it Notice how the boat rides in the straights Does it lean or pull to one side Is the deck about 3 deg...

Страница 43: ...Kicking the bottom of the rudder Forward will cause the nose to rise in the turns Kicking the bottom back will cause the nose to drop in the turns It only takes a little 5 degrees either way would be...

Страница 44: ...y light and unstable Strut too deep Inner tabs too high Boat needs left trim to go straight Prop walk Prop walk Prop walk Rudder not aligned correctly Prop walk Boat slides too much in turns CG too fa...

Страница 45: ...Look at how the boat turns Does it hop and roll in the turns If so drop the right outer tab turn and try again What you want to see is the entire right side of the hull in the water when it turns This...

Отзывы: