background image

15

14

Stockez votre four de préférence en intérieur à l’abri du soleil et des intempéries 

telles que la neige, les fortes pluies et vents violents.

Attendez que votre four refroidisse complètement avant de le déplacer (il faut 

compter environ 2 heures).

La couleur de la coque extérieure de votre four peut s’altérer avec le temps et au 

fil de l’utilisation, mais cela n’affectera pas ses performances.

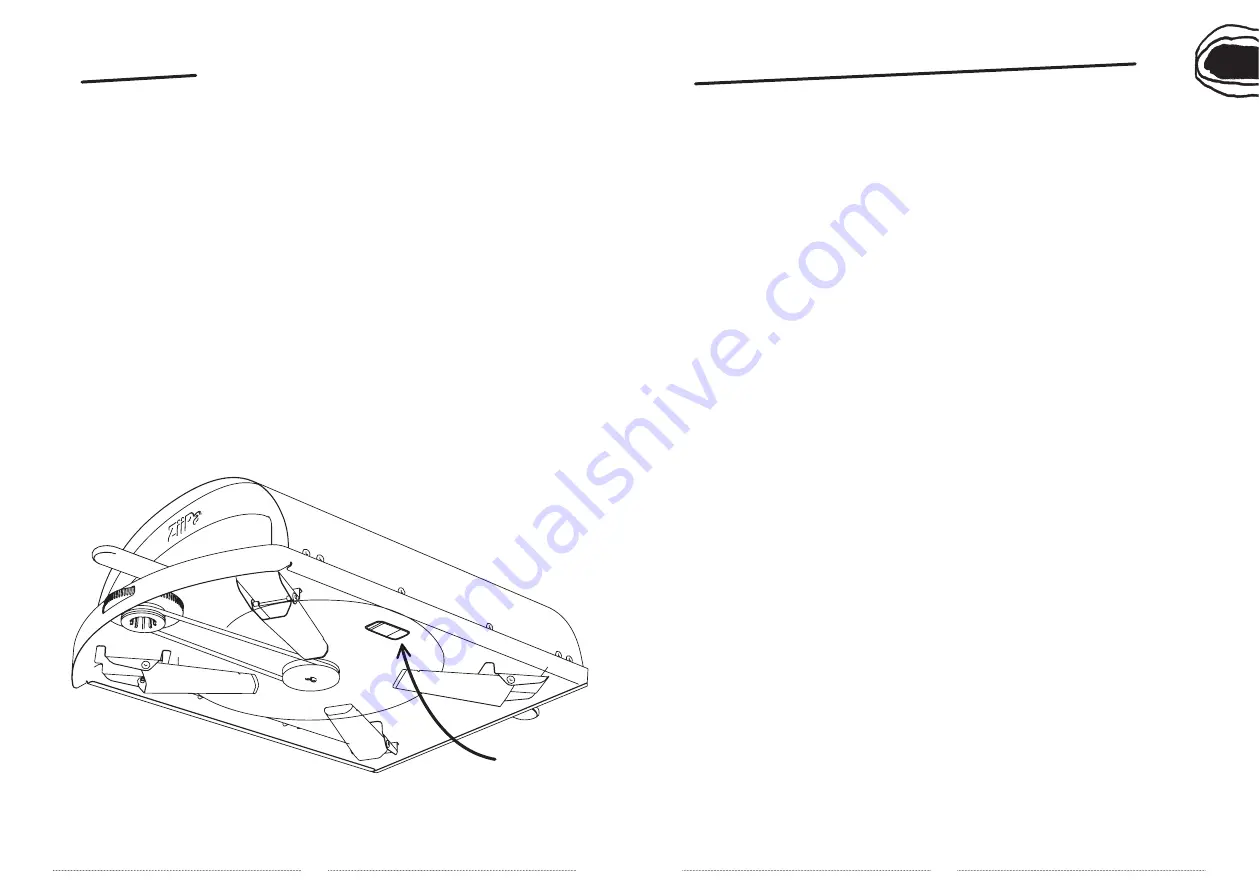
Pour retirer la pierre du four, utilisez le trou qui se trouve en dessous du four pour 

la soulever et l’attraper facilement (a).

Entretien

Entretien

V.

(a)

LEGAL SAFETY NOTICES AND LIMITATION OF LIABILITY : MUST BE READ IN ITS ENTIRETY 

BEFORE USE.

Legal notices and safety instructions

Legal notices and safety instructions

I.

Please read this legal disclaimer carefully before assembling, installing and using or maintaining your 

Piana pizza oven. Failure to comply with the provisions of this legal disclaimer could result in property 

damage, serious bodily injury. 


• The Piana pizza oven is designed for outdoor use only. Your oven should always be placed outdoors, 

away from other structures and never inside a building or garage, or near a closed space. Place your 

Piana pizza oven on a solid, stable, level and non-flammable surface and keep it away from any flammable 

material or fuel, gasoline and other flammable gases and liquids. 

The legs of your oven must be completely unfolded before switching it on. 

• Find out about local laws and regulations regarding the distance required between 

outdoor cooking appliances and buildings, or which may limit their use during periods of drought or fire 

risk. 

• Don’t use your Piana pizza oven in strong winds. 

• Your oven is not designed to be used as a means of heating and should never be used as such. 

• Toxic fumes can accumulate and can cause suffocation. 

• Flames can escape from the metal enclosure: 

a. At the back, where the fire is 

b. from the front of the oven when you open the door 

c. through the openings of the fireplace

• Please keep a safe distance from the openings of your oven and notify the others around you. 

• Improper installation, adjustment, modification or maintenance of your Piana pizza oven may cause 

injury or property damage. It is therefore imperative not to use your pizza oven before it is completely 

assembled and all parts are securely fastened and tightened. 

• Your Piana pizza oven should be inspected regularly. 

• If using the charcoal / wood burner: add kindling gradually until the oven reaches an optimum 

temperature. Adding too much wood increases the firepower and may injure you or your Piana pizza 

Oven. 

• When using your Piana pizza oven, there is a risk of burning your hands. Hot objects should never 

be placed on or near combustible surfaces. 

Don’t touch metal parts or the top of the oven when 

functioning

. If you want to open the door or open the hatch, only hold them by the their handles.

• It is essential to wear heat-resistant gloves to handle the handles of the hatch and the drawer at the 

rear of the oven.

• Never leave your pizza oven unattended when it is on. Take into account the potential danger factors 

that may be found near your pizza oven during operation (including dry leaves, objects or materials 

combustible, ...), as they may catch fire if they come into contact with sparks and present a fire hazard. 

• 

Once the oven is on, it is forbidden to remove or manipulate the pellet drawer at the back until the 

oven cools down. 

• ALWAYS keep electrical cables away from your pizza oven. 

• The pizza oven must only be used by adults and responsible persons. 

• Always keep children, pets and any combustible items away from your pizza oven. 

• 

Don’t attempt to remove parts or move your Piana Pizza Oven while it is hot or during cooking.

• Don’t leave dangerous objects such as lighters or barbecue lighter fluid near your Piana pizza oven. In 

fact, the oven emits heat in all directions.

EN

Содержание Piana

Страница 1: ...User manual Istruzioni per l uso Manual de usuario Benutzerhandbuch Gebruiksaanwijzing Manuel Manuel d utilisation d utilisation FOUR PIZZA PIANA...

Страница 2: ...I Mentions l gales et consignes de s curit II Contenu de la bo te III Montage du four IV Mode d emploi V Entretien du four 15 26 37 48 59 4 4 6 7 13 14 IT EN SP DE FR NL www ziipa fr...

Страница 3: ...ance lorsqu il est allum Tenez compte des facteurs de dangers potentiels qui peuvent se trouver proximit de votre four pizza lors de son fonctionnement notamment des feuilles s ches objets ou mat riau...

Страница 4: ...r pizza Piana Tiroir combustible Thermom tre int gr Pierre ronde en cordi rite Porte du four Coupe flamme 4 vis Chemin e Contenudelaboite Contenudelaboite II D PLIEZ LES QUATRE PIEDS DU FOUR Etape1 Et...

Страница 5: ...es ouvertures de la partie sup rieure de la chemin e doivent tre dirig es vers l arri re du four INS REZ LA CHEMIN E DANS LE FOUR Etape2 Etape2 A V rifiez que la grille dans le tiroir combustible a es...

Страница 6: ...petite poign e sur la trappe l arri re du four l aide d un tournevis cruciforme A Ouvrez la trappe Si le coupe flamme n est pas install veillez le positionner dans les guides m talliques comme indiqu...

Страница 7: ...tre ferm e 5 Utilisez la trappe l arri re pour ajouter des pellets si n cessaire jusqu obtenir une temp rature de 380 C PENDANT LA CUISSON PENDANT LA CUISSON 6 cette temp rature vous pouvez ouvrir la...

Страница 8: ...enclosure a At the back where the fire is b from the front of the oven when you open the door c through the openings of the fireplace Please keep a safe distance from the openings of your oven and not...

Страница 9: ...r at least 2 hours Don t cover your pizza oven immediately after use and make sure all fire and glowing embers are gone from the burner before putting it away The approximate temperature of your pizza...

Страница 10: ...nassembly III INSERT THE CHIMNEY INTO THE OVEN Step2 Step2 Insert the chimney in the location provided for this purpose Caution take care to position the chimney correctly the openings in the upper pa...

Страница 11: ...p4 B Screw the small handle onto the hatch at the back of the oven with a Phillips screwdriver A Open the hatch EN x2 A Check that the grid in the fuel drawer a is in the right direction B Insert the...

Страница 12: ...TONE INSIDE THE OVEN PLACE YOUR OVEN ON A SURFACE Step6 Step6 Step7 Step7 The surface on which you lay your Piana pizza oven must be stable and preferably resistant in the heat EN 1 2 If the flamebrea...

Страница 13: ...rt the pizza using a pizza peel The rear hatch must always be kept closed 7 Close the door and regularly turn the knob on the front of the oven 8 After 60 seconds check the doneness of your pizza If i...

Страница 14: ...posteriore del forno Non lasciare mai incustodito il forno per pizza quando acceso Prendi in considerazione i potenziali fattori di pericolo che possono essere trovati vicino al tuo forno pizza durant...

Страница 15: ...Termometro integrato Pietra tonda cordierite Porta del forno Rompifiamma 4 viti Camino Cosac enellascatola Cosac enellascatola II APRIRE LE QUATTRO GAMBE DEL FORNO Passo1 Passo1 Montaggiodelforno Mon...

Страница 16: ...enzione a posizionare correttamente il camino le aperture nella parte superiore del camino devono essere rivolte verso il retro del forno IT A Controllare che la griglia nel cas setto del combustibile...

Страница 17: ...maniglia su la botola sul retro del forno con un cacciavite a croce A Apri il portello POSIZIONARE IL ROMPIFIAMMA ALL INTERNO DEL FORNO Passo5 Passo5 x2 IT 1 2 Se il rompifiamma non installato assicur...

Страница 18: ...ccendifuoco standard EN 1860 3 4 Attendere che il pellet di avviamento si accenda completamente in questa fase la porta d ingresso deve essere sempre chiusa 5 Utilizzare il portello sul retro per aggi...

Страница 19: ...nto incorrectos de su horno para pizza Piana puede causar lesiones o da os a la propiedad Por tanto es imperativo no use su horno de pizza antes de que est completamente ensamblado y todas las piezas...

Страница 20: ...se usa seg n lo previsto y de acuerdo con las instrucciones de seguridad es seguro y puede usarse durante a os sin ning n problema Es responsabilidad de los usuarios utilizar correctamente el Horno p...

Страница 21: ...horno III INSERTA LA CHIMENEA EN EL HORNO Etapa2 Etapa2 Introducir la chimenea en el lugar previsto para ello Atenci n tenga cuidado de colocar la chimenea correctamente las aberturas en la parte supe...

Страница 22: ...que o en la trampilla en la parte trasera del horno con un destornillador Phillips A Abra la trampilla Etapa4 Etapa4 SP x2 A Compruebe que la rejilla del caj n de combustible a est en la direcci n cor...

Страница 23: ...HORNO SOBRE UNA SUPERFICIE ESTABLE Etapa7 Etapa7 La superficie sobre la que te acuestas su horno de pizza Piana debe ser estable y preferiblemente resistente en el calor Etapa6 Etapa6 SP SP SP 1 2 Si...

Страница 24: ...rta de entrada e insertar la pizza con una pala para pizza La trampilla trasera debe mantenerse siempre cerrada 7 Cierre la puerta y gire regularmente la perilla en la parte frontal del horno 8 Despu...

Страница 25: ...Klappe und der Schublade an der R ckseite des Ofens anfassen Lassen Sie Ihren Pizzaofen niemals unbeaufsichtigt wenn er eingeschaltet ist Ber cksichtigen Sie m gliche Gefahrenfaktoren die sich w hrend...

Страница 26: ...Integriertes Thermometer Runder Stein aus Cordierit Ofent r Flammensperre 4 Schrauben Kamin WasistinderBox WasistinderBox II DIE VIER BEINE DES OFENS AUSKLAPPEN Schritt1 Schritt1 Ofenmontage Ofenmonta...

Страница 27: ...Stelle ein Achtung achten Sie auf die richtige Positionierung des Schornsteins Die ffnungen im oberen Teil des Schornsteins m ssen zur R ckseite des Ofens zeigen DE A berpr fen Sie ob das Gitter in d...

Страница 28: ...r R ckseite des Ofens mit einem Kreuzschlitzschraubendreher A ffnen Sie die Luke Wenn der Flammenf nger nicht installiert ist achten Sie darauf ihn wie unten gezeigt in den Metallf hrungen zu position...

Страница 29: ...itpunkt muss die Haust r immer geschlossen sein 5 Verwenden Sie die Luke auf der R ckseite um bei Bedarf Pellets hinzuzuf gen bis die Temperatur 380 C betr gt W HREND DES KOCHENS W HREND DES KOCHENS 6...

Страница 30: ...eningen van uw oven en waarschuw de anderen om je heen Onjuiste installatie afstelling wijziging of onderhoud van uw Piana pizzaoven kan letsel of materi le schade veroorzaken Het is daarom absoluut n...

Страница 31: ...onderhoud en gebruik Op de Piana pizzaoven zit 1 jaar garantie vanaf de aankoopdatum op vertoon van aankoopbewijs en foto s van de defecte onderdelen Deze oven wordt erg heet Verplaats het niet tijden...

Страница 32: ...gevandeoven III Plaats de schoorsteen op de daarvoor bestemde plaats Let op zorg ervoor dat u de schoorsteen correct plaatst de openingen in het bovenste deel van de schoorsteen moeten naar de achterk...

Страница 33: ...ap4 B Schroef het kleine handvat op het luik aan de achterkant van de oven met een kruiskopschroevendraaier A Open het luik x2 A Controleer of het rooster in de brandstoflade a in de juiste richting s...

Страница 34: ...t geplaatst zoals hieronder is aangegeven PLAATS DE VLAMDOVER IN DE OVEN Stap5 Stap5 1 2 PLAATS DE PIZZASTEEN IN DE OVEN PLAATS UW OVEN OP EEN STABIELE ONDERGROND Stap6 Stap6 Stap7 Stap7 Het oppervlak...

Страница 35: ...steken de pizza met behulp van een pizzaschil De achterklep moet altijd gesloten blijven 7 Sluit de deur en draai regelmatig aan de knop aan de voorkant uit de oven 8 Controleer na 60 seconden de gaar...

Страница 36: ...71 Partagezvosinstants dedolcevitaavecnous www ziipa fr...

Страница 37: ...ZiiPa distribu par C coa Diffusion 87 voie de Ch tenay 91370 Verri res le Buisson FRANCE...

Отзывы: