4.8
Installation in an exhaust air stack, design T
4.8.1
Mounting with plastic brackets
•
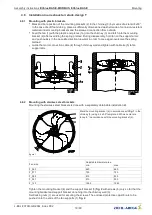
Mark and bore position of the mounting brackets (2) in the chimney (3) by means of a stencil 4x90
°
.
In the case of soft foam tubing, place a suf
fi
ciently dimensioned washer made of corrosion-resistant
material under mounting brackets and the screwed connection from outside.
•
Feed the fan (1) with the plastic end-pieces (1a) into the chimney (3) and latch into the mounting
bracket (2) after overriding the spring preload. During disassembly, hold fan on the support arms
and push quickly in the opposite direction (upward) in order to once again overcome the spring
preload.
•
Guide the motor connection cable (4) through chimney wall and tighten with cable tie (5) to fan
support arm.
4.8.2
Mounting with stainless steel brackets
Mounting the stainless steel brackets is done with a separately obtainable installation kit.
fi
gure 1
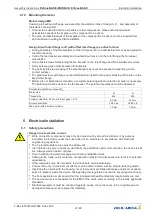
Mark the mounting bracket (4) in accordance with
fi
g. 1
in the
chimney (3) using a 4 x 90
°
template, drill hole center dis-
tance
“
a
”
in accordance with the mounting bracket (4).
Fan size
Adjustable diameter area
min.
max.
F_063
640
660
F_071
725
745
F_080
815
835
F_091
915
935
F_125
1265
1285
Tighten the mounting bracket (4) and the support bracket (5)
fi
g. 2
with screws (6) only so far that the
mounting bracket and support bracket do not dig into the chimney wall (3).
Self-locking nuts (7) are used for securing the screws. The enclosed protective caps (8) are to be
pushed onto the ends of the fan supports (1),
fi
g. 2
.
Assembly instructions
ECblue BASIC-MODBUS, ECblue BASIC
Mounting
L-BAL-F079D-GB 2044 Index 002
Part.-No.
19/80


