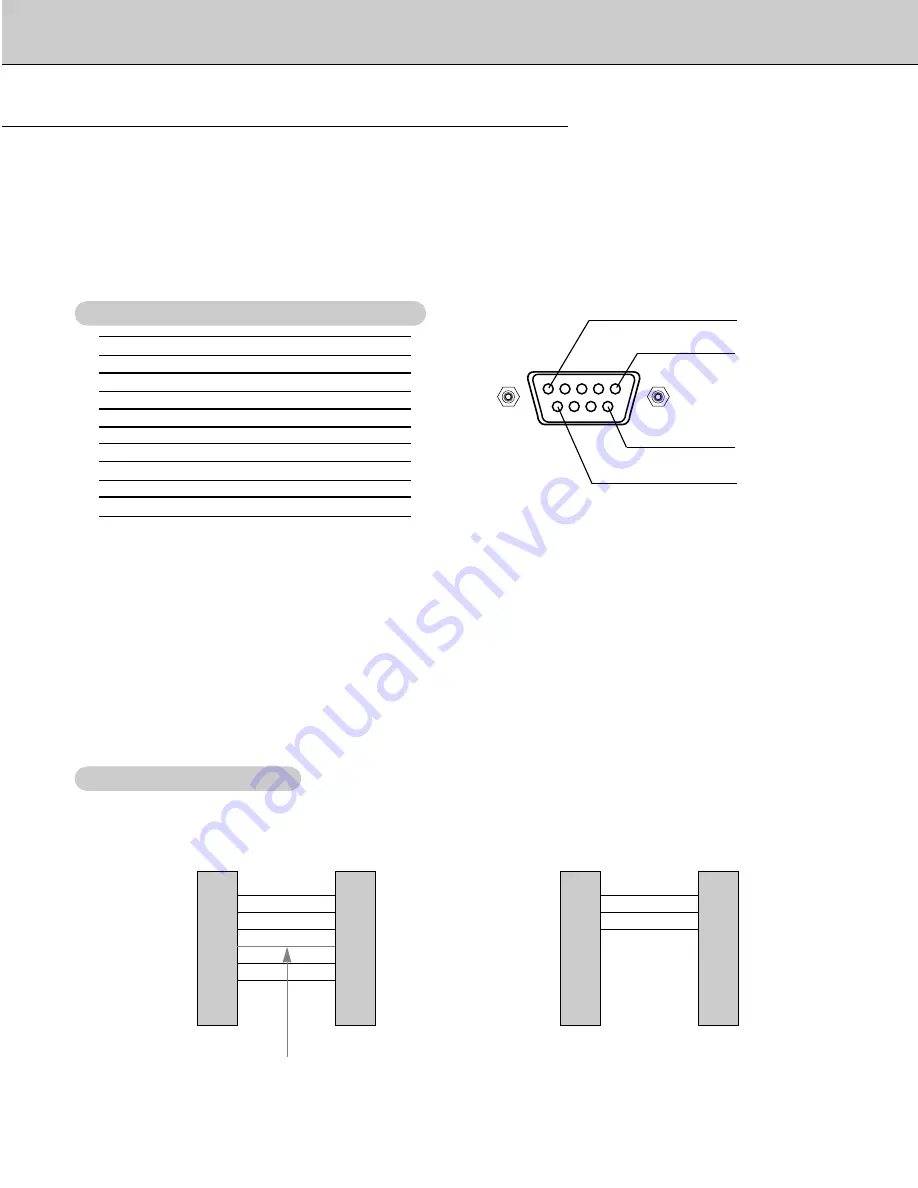
Zenith P40V24 Скачать руководство пользователя страница 19

19

No. Pin 

name

1 No 

connection

2

RXD (Receive data)

3

TXD (Transmit data)

4

DTR (DTE side ready)

5

GND

6

DSR (DCE side ready)

7

RTS (Ready to send)

8

CTS (Clear to send)

9

No Connection

1

5

6

9

2

3

5

4

6

7

8

RXD

TXD

GND

DTR

DSR

RTS

CTS

TXD

RXD

GND

DSR

DTR

CTS

RTS

PC

7-Wire Configuration

(Standard RS-232C cable)

DB 9 

Control line

3

2

5

6

4

8

7

PDP

DB 9 

2

3

5

4

6

7

8

RXD

TXD

GND

DTR

DSR

RTS

CTS

TXD

RXD

GND

DTR

DSR

RTS

CTS

PC

3-Wire Configuration

(Not standard)

DB 9 

3

2

5

4

6

7

8

PDP

DB 9 

*  Use a null modem cable.

Wire the 7-Wire cable so that each pair of data lines cross between the two devices. These data line pairs are RXD (Receive
data) and TXD (Transmit data), DTR (DTE side ready) and DSR (DCE side ready), and RTS (Ready to send) and CTS
(Clear to send). 
When using the 3-Wire cable connected to RXD, TXD and GND; Pin No. 4 (DTR) and Pin No. 6 (DSR) must be connected
to the monitor. (The cable must be disconnected from the Monitor to be able to use the remote control and Monitor front
panel controls.)

*  With the RS-232 input connected, the Monitor cannot be controlled by both an external control device and the remote con-

trol at the same time. The Monitor can only be controlled by either the remote control or the external control device.

External Control Device Setup

- Connect the RS-232C input jack to an external control device (such as a computer or an A/V control system) and control

the Monitor’s functions externally.

- Connect the serial port of the control device to the RS-232C jack on the Monitor back panel.
- RS-232C connection cables are not supplied with the Monitor.
- The Monitor remote control and front panel controls (except main power) will not be functional if the Monitor is controlled

by a PC computer or other external device.

- When you connect a control (RS-232C) cable to this monitor, use a control cable equipped with a ferrite core attachment.

If you do not do this, this monitor will not conform to mandatory CISPR22 (EN55022) standards.

T

T

ype of Connector: D-Sub 9-Pin Male

ype of Connector: D-Sub 9-Pin Male

RS-232C Configurations

RS-232C Configurations

Содержание P40V24

Страница 1: ...Copyright 2002 Zenith Electronics Corporation Installation and Operating Guide Model Number P40V24 PLASMA DISPLAY PANEL...

Страница 2: ...tions may cause harmful interference to radio communications However there is no guarantee that interference will not occur in a particular instal lation If this equipment does cause harmful interfere...

Страница 3: ...he cabinet are provided for ventilation and to ensure reliable operation of the product and to protect it from overheating and these openings must not be blocked or covered The openings should never b...

Страница 4: ...hat are covered by the operating instructions as an improper adjust ment of other controls may result in damage and will often require extensive work by a qualified technician to restore the product t...

Страница 5: ...djustments 15 Adjusting Horizontal Vertical Position 16 Adjusting Phase 16 Initializing 16 Orbiter 16 White Wash 17 Adjusting OSD Transparency 17 Sleep Timer 17 PIP Picture In Picture Feature Watching...

Страница 6: ...ECT ON OFF INPUT VOLUME SELECT Main Power Button Input Select Button Remote Control Sensor Power Standby Indicator Illuminates red in standby Illuminates green when the Monitor is turned on Power Butt...

Страница 7: ...rom external equipment to these jacks S VIDEO JACKS Connect video out from an S VIDEO VCR or other S Video device to the S VIDEO input COMPONENT 480i 480p 720p 1080i DVD DTV INPUT JACKS 3 AUDIO INPUT...

Страница 8: ...ee external equipment operating guide After subscribing to a cable TV service from a local provider and installing a converter you can watch cable TV program ming This monitor cannot display TV progra...

Страница 9: ...because of contrast or brightness settings in PC mode In this case adjust contrast or bright ness level s to get better picture quality PC Setup 1 Turn on the PC and apply power to the Monitor 2 Turn...

Страница 10: ...on F F G G button Volume button Increases decreases sound level Adjusts menu settings system off button freeze button Freezes sub picture motion easy sound button To select the sound appropriate to yo...

Страница 11: ...f less than 6562 feet 2000 m to get the best quality picture and sound 4 inches 4 inches 2 36 inches 4 inches 1 18 inches 4 inches 4 inches 4 inches 4 inches 1 18 inches Wall Mount Installation Wall m...

Страница 12: ...by mode Press the INPUT SELECT button on the Monitor or press the power on or video pc button on the remote control to switch the Monitor on 1 If the Monitor is turned off with the ON OFF button on th...

Страница 13: ...st colour temperature for PC mode again if color temperature is adjusted for another input source To initialize adjusted value select 0 in Red Green and Blue 1 Press the menu button and then use D E b...

Страница 14: ...any special adjustment because the Monitor automatically selects the appropriate sound option based on the program content AVL maintains an equal volume level even if you change channels 1 Press the m...

Страница 15: ...select the menu 2 Press the G button and then use D E button to select Screen adj 3 Press the G button and then use D E button to to select TV or VCR Select the VCR option if watching a VCR Select th...

Страница 16: ...e screen the screen will move every 2 minutes The Orbiter feature may help prevent ghost images However it is best not to allow any fixed image to remain on the screen 1 Press the menu button and then...

Страница 17: ...button Language G ARC G Screen Adj G Orbiter G White Wash G PIP G Transparency G Set ID G On Off White Wash White W White Wash ash Sleep Sleep T Timer imer a To check the remaining sleep time press th...

Страница 18: ...ut select button you toggle between Video S Video and Component Component source only works in 480i mode Select RGB input source before pressing PIP To use this function connect PC video port to RGB P...

Страница 19: ...use the remote control and Monitor front panel controls With the RS 232 input connected the Monitor cannot be controlled by both an external control device and the remote con trol at the same time The...

Страница 20: ...PIP position k q 00 03 17 Treble k r 00 64 18 Bass k s 00 64 19 Balance k t 00 64 20 Color temperature k u 00 03 21 R adjustment k v 00 64 22 Green adjustment k w 00 64 23 Blue adjustment k 00 64 24 P...

Страница 21: ...Select Command b Main Picture Input G To select input source for the Monitor You can also select an input source using the video pc button on the Monitor s remote control Transmission Data 0 RGB 1 Co...

Страница 22: ...ata Mapping 2 0 10 5 9 A 8 2D 1 32 0 37 1 5F 9 64 10 09 Color Command i G To adjust the screen color You can also adjust color in the Video menu Transmission Data Min 00 Max 64 Refer to Real Data Mapp...

Страница 23: ...Warm 3 User k u Set ID Data Cr Acknowledgement u Set ID OK Data x 16 PIP Position Command q G To select sub picture position for PIP You can also adjust the sub picture position using the position on...

Страница 24: ...to Real Data Mapping2 See page 22 Data Min 00 Max 64 k v Set ID Data Cr Acknowledgement v Set ID OK Data x 22 Green Adjustment Command w G To adjust green in green temperature Transmission Data Min 00...

Страница 25: ...de G Lead Code 1st Frame Low custom code Lead code High custom code Data code Data code TC Tf T1 C0 Carrier frequency FCAR 1 TC fOSC 12 Duty ratio T1 TC 1 3 Repeat Frame C1 C2 C3 C4 C5 C6 C7 C0 C1 C2...

Страница 26: ...ower On Off Discrete Only Power On Discrete Only System Off R C Button R C Button Discrete Input RGB Power On Discrete Input VIDEO Power On Discrete Input S VIDEO Power On Discrete Input COMPONENT Pow...

Страница 27: ...with a soft dry lint free cloth Please be sure not to use a wet cloth If you leave your Monitor dormant for a long time such as a vacation it s a good idea to unplug the power cord to protect against...

Страница 28: ...or poor picture Select Colour in the VIDEO menu and press the VOLUME G but ton Refer to p 13 Keep a certain distance between the Monitor and the VCR Activate any function to restore the brightness of...

Страница 29: ...29 Notes...

Страница 30: ...30 Notes...

Страница 31: ...Height inches Depth inches Weight pounds Power Requirements Resolution Color 36 6 28 3 1 71 8 AC 120V 60Hz 640 x 480 Dot 16 770 000 256 steps of each R G and B The specifications above may be changed...

Страница 32: ...P N 3828VA0355C NP00KC 206 3832...

Отзывы: