


13 | 15
EN
Auto Off
The ZEISS DTI 3/4 switches off automatically after a time of inactivity in order to save
battery power. The switch-off duration can be adjusted in the menu item “System”
under “Auto Off”.
Smart Standby
Smart Standby automatically activates
the standby mode when the system is
tilted more than 70° up, 52.5° down
or more than 45° to the left or to
the right.
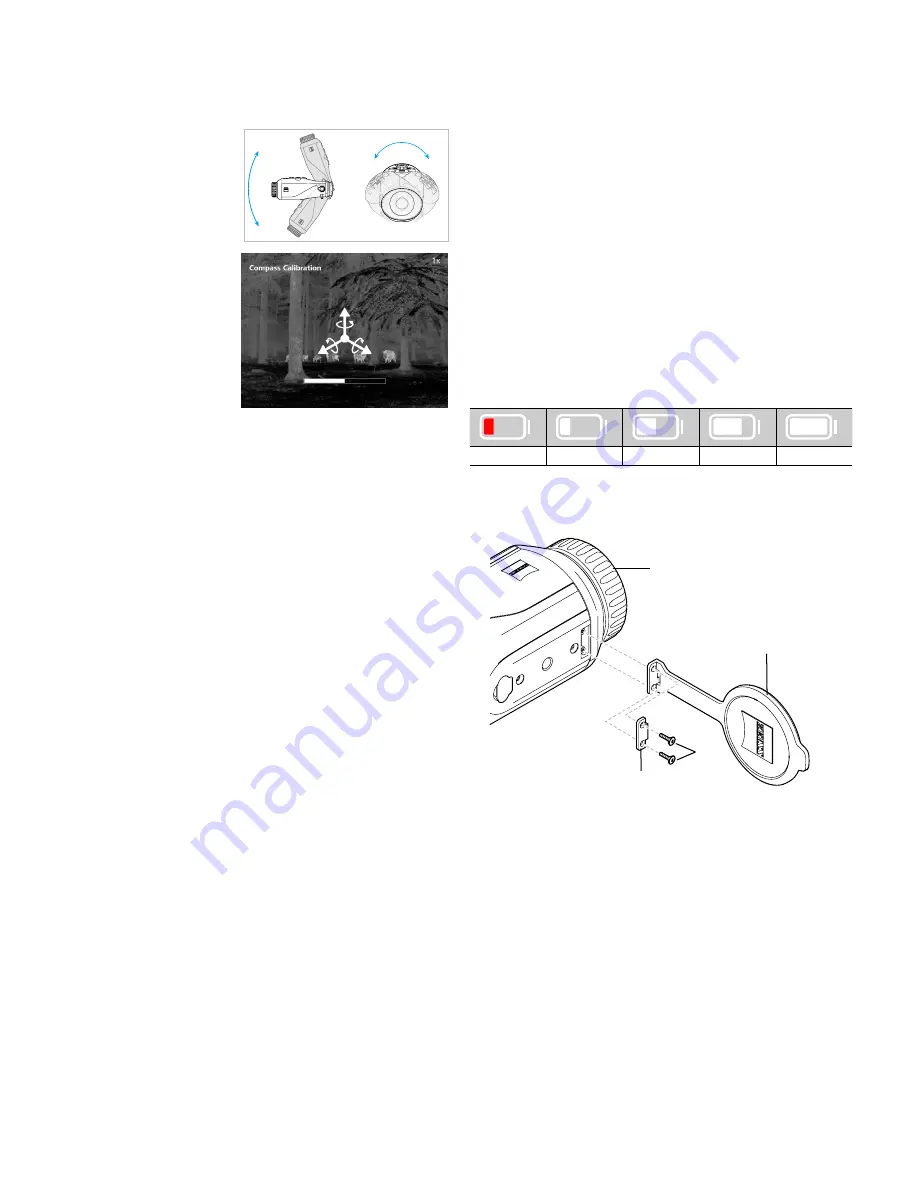
Compass Calibration
The compass calibration should be
performed before using the compass
function for the first time. The system
must be rotated around all three axes
for 40 seconds. You achieve this by
holding the system in front of you
and doing a horizontal figure eight.
A progress bar is displayed on the
screen which disappears after
40 seconds.
Firmware update
A firmware update can be carried out using the ZEISS Hunting App. Follow the
instructions for this in the ZEISS Hunting App.
Note:
Make sure that the device is fully charged before updating the firmware. Do not
switch off the device during the update, otherwise it may be damaged.
Note:
If you initiate an update via the ZEISS Hunting App, you must confirm this again
on the device for security reasons.
WLAN
This device is equipped with a WLAN function. Go to the menu and switch on the
WLAN function. When activated, WLAN is indicated by a WLAN symbol in the lower
right corner of the display. You can now connect your smartphone to the device via
WLAN.
Note:
When first used, the preset password for the WLAN connection to the device
needs to be changed to prevent unauthorized access by third parties. The ZEISS Hunting
App is required to change the password.
Default password: 12345678
To increase user comfort, the ZEISS Hunting App synchronizes your password on all
logged-in devices.
To increase the security of the connection, we recommend that you change your
password.
To extend battery life, we recommend that you only switch on the WLAN function in
the device when the device needs to establish a data connection to the ZEISS Hunting
App.
ZEISS Hunting App
Install the ZEISS Hunting App on your smartphone and open the app. Follow the steps
shown there to connect to the ZEISS DTI 3/4.
The ZEISS Hunting App allows you to transfer images and videos to your smartphone,
view the live image, make settings and use other functions. A more detailed description
can be found in the help function of the app.
Note:
To use the ZEISS Hunting App and its functions, ensure that your smartphone is
connected to the ZEISS DTI 3/4 WLAN network.
Note:
Every time you connect to the ZEISS Hunting App, the current date and time are
automatically transferred from your smartphone to the device.
Note:
Please note that you are not connected via the normal WLAN if you have
established a WLAN connection to your ZEISS DTI 3/4. To return to the normal WLAN,
disconnect your ZEISS DTI 3/4 from your smartphone.
USB port
Use the USB port
(13)
on the bottom to charge your device or to transfer data (photos
and videos) to your PC.
The ZEISS DTI 3/4 connects as an MTP device using the USB port. The device is
automatically recognized and can be used immediately on computers with Microsoft
Windows 10 operating system software or later. For computers with Apple Mac OS
operating system software, you need to install additional third-party software to access
the data stored on the device, such as “Android
TM
File Transfer”. ZEISS assumes no
responsibility or guarantee for third-party software.
Microsoft and Windows are either registered trademarks or trademarks of Microsoft
Corp. in the United States and/or other countries.
Apple and macOS are registered trademarks of Apple Inc. in the USA and other
countries.
Android is a trademark of Google LLC.
Tripod thread
A 1/4-inch standard thread
(12)
for standard tripods is located on the bottom of the
device. Screw the device onto a tripod for more steady shooting.
Charging the device
Charge the device via the USB port
(13)
when the battery is empty. An LED
(9)
is
located under the cover that indicates the current charge level.
The battery charge level is shown in the upper right corner of the display. When the
charge level is low, the display changes to red. In the following graphic you can see
what percentage of your battery charge is still available.
<10%
10–<36%
36–<63%
63–<90%
90–100%
Replacing the lens cap
To replace the lens cap
(2)
, unscrew the screws
(3)
using a screwdriver. Remove the
retaining plate
(4)
and the defective lens cap
(2)
. Fit the new lens cap
(2)
and retaining
plate
(4)
. Tighten the screws
(3)
using a screwdriver.
(2)
(4)
(3)
(1)
Care and maintenance of the device
Please do not wipe coarse particles from the lenses (e. g. sand), rather blow them
away or use a fine brush to remove them! Over time, fingerprints can corrode the lens
surface. Breathing on the lens and polishing it with a clean optical cleansing cloth is the
easiest method of cleaning the lens surface.
Dry storage and keeping the outer lens surfaces well ventilated, especially in the
tropics, helps to prevent a possible mold film forming on the optics.
Your ZEISS DTI 3/4 requires no further special care.
Care and maintenance of the battery
Follow these steps to extend the battery life:
•
Avoid storing the device at extreme temperatures.
•
Avoid storing the device with a fully charged battery.
•
Avoid complete discharging of the device.
45°
45°
52.5°
70°


