11 | 15
EN
Color modes
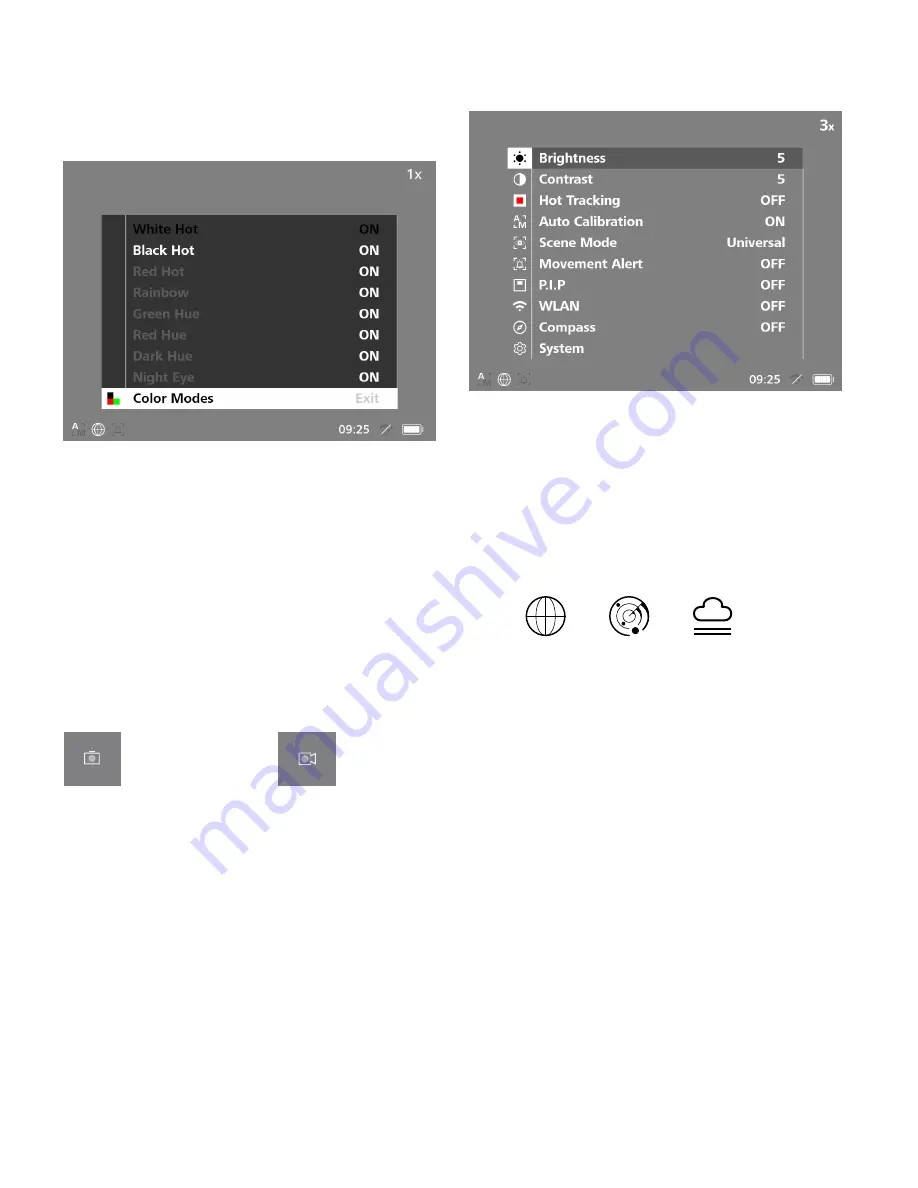
The scene can be displayed in different color modes. Briefly press the menu button
(8)
to change the observation mode. When changed, the selected mode is shown on
the display as text for about 2 seconds. You can activate or deactivate the desired
modes under the system menu item “Color Modes”. When changing with the menu
button
(8)
, only the active modes are changed. The following color modes are
available:
•
White Hot:
Cold areas are displayed here in black and warm areas in white.
•
Black Hot:
Cold areas are displayed here in white and warm areas in black.
•
Red Hot:
Cold areas are displayed here in black and warm areas in white. In
addition, the warmest areas are shown in yellow to red.
•
Red Hot:
A varied color palette displays cold areas in black to blue and warm
areas in yellow to white.
•
Red Hue:
Cold areas are displayed here in black and warm areas in red.
•
Green Hue:
Cold areas are displayed here in black and warm areas in green.
•
Dark Hue:
Cold areas are displayed here in a sepia tone and warm areas in
violet.
•
Night Eye:
This is a combination of White Hot and Black Hot. Cold areas are
displayed here in black to dark brown and warm areas in sepia to light brown.
Shooting mode
You have the possibility to take photos and make videos.
Briefly press the shutter button
(6)
once to capture a photo; a photo symbol appears
on the display. Press and hold the shutter button
(6)
to record a video; a video symbol
appears on the display. During a video recording, photos can also be taken by briefly
pressing the shutter button
(6)
; to confirm, the video symbol briefly switches to the
photo symbol.
Note:
Longer video recordings are automatically split into several smaller files of
10 minutes each when saved.
2
X
2
X
Photo mode
Video mode
Menu
Press and hold the menu button
(8)
to show the main menu on the display. Look
through the viewfinder
(10)
. The main menu offers the following options:
•
Brightness:
Set the brightness of the display here. There are four brightness
levels to choose from. The brightness is lowest at level 1. The brightness is
highest at level 10.
•
Contrast:
Adjust the contrast of the scene here. There are ten contrast levels to
choose from. The contrast is lowest at level 1. The contrast is highest at level 10.
•
Hot Tracking:
In observation mode, select “Hot Tracking” to highlight the
warmest point in the scene with a small red square.
•
Auto Calibration:
Set manual (Auto Calibration = Off) or automatic calibration
(Auto Calibration = On) here.
•
Scene Mode:
Choose from three different modes.
•
Universal – Standard mode for general observation.
•
Detect – The Detect mode generates a high-contrast image to make
thermal signatures more visible.
•
Fog – The Fog mode improves the image in high humidity or foggy
conditions by increasing the sensitivity of the sensor to better see the
target signal.
Universal
Detect
Fog
You can also cycle through the different modes by simultaneously pressing the
right arrow button
(7)
and the menu button
(8)
.
•
Movement Alert:
The movement alert tracks the hottest heat source in the
image and alerts the user when this heat source moves.
•
P.I.P. (Picture in Picture):
A central section of the image is enlarged by a factor
of 2 and shown in a small magnification window on the display.
•
WLAN:
Switch WLAN on/off. When WLAN is switched on, the device creates a
hotspot that allows another device (e.g. smartphone) to make a connection.
•
Compass:
Activate the Compass to orient yourself using the cardinal points.
•
System:
Make all system-relevant settings here, including language, time and
factory settings.
The arrow buttons
(7)
and the menu button
(8)
are used to navigate
in
the main menu.
Press the right arrow button
(7)
to scroll down. Press the left arrow button
(7)
to scroll
up.
Briefly press the menu button
(8)
to select a menu item. This opens the submenu. Make
your settings using the arrow buttons
(7)
.
Briefly press the menu button
(8)
to confirm your selection and return to the main
menu.
Press and hold the menu button
(8)
to exit the main menu and return to observation
mode.


