background image


DOC-USR-00XX-0X                                                


___________________________________________________________________________________________ 

Z3 Technology, LLC 

 100 N 8

th

 ST, STE 250 

 Lincoln, NE 68508-1369 USA 

 +1.402.323.0702 

14 

(8)


Open an Internet browser on the PC on the same network as the Z3-MVE-100R (use Firefox for best 

results. Internet Explorer and Chrome will also work).  Enter the IP address of the Z3-MVE-100R from 
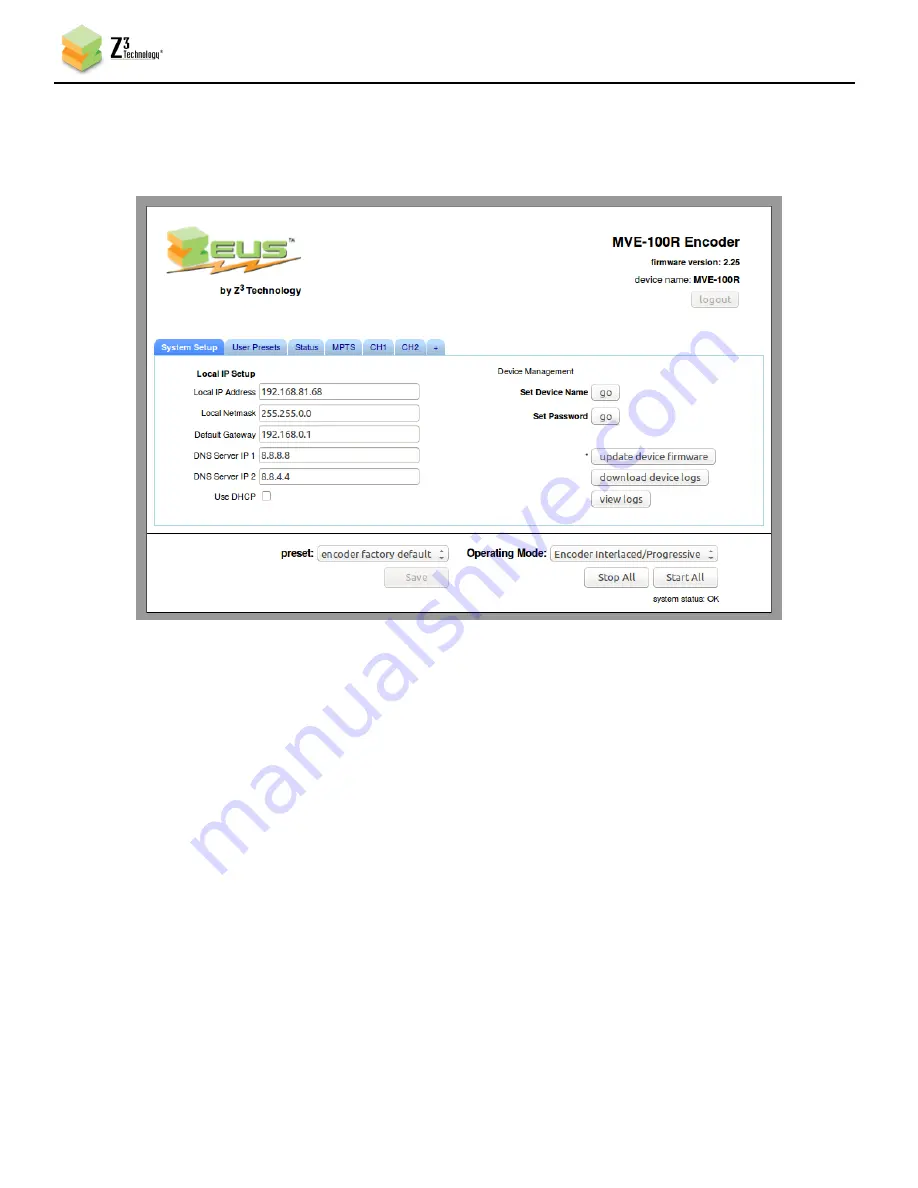
step (7) as the address.  The System Setup page will appear: 


6.3


 Configure CH1 and Encode 


(9)


From the System Setup Tab, click on the “CH1” tab. 


(10)


You should see the Channel 1 configuration tab (see Figure 9). In this tab, set Output Format to 

“UDP,” and Dest Address to the IP address of your PC (192.168.0.6 is the default value).  Also make 
note of the value of “Dest Port” (should be 5004 by default). See the figure on the following page. 


Figure 8  Z3-MVE-100R Web GUI (System Setup Page) 

Содержание Z3-MVE-100R

Страница 1: ...LC All rights reserved This document contains proprietary and confidential information of Z3 Technology LLC Z3 This document may not be used reproduced disclosed or disseminated to anyone without the...

Страница 2: ...osed Captioning Sections and Encoding in ISDB T Mode sections Added description of RTSP and rebooting from GUI Added description of DNS View Logs 16 9 Interlace Mode PCR Interval and Authentication Re...

Страница 3: ...p the HD Source 12 6 2 Connect and Power up the Z3 MVE 100R 12 6 3 Configure CH1 and Encode 14 6 4 Run VLC to View Stream 16 6 5 Streaming RTP 17 6 6 Changing the Bitrate and Frame Rate Dynamically 19...

Страница 4: ...THE Z3 MVE 100R 42 Saving Current Settings 42 10 1 10 2 Making a Firmware Update 42 10 3 Using the Password Feature 44 10 4 Controlling the Z3 MVE 100R through the Front Panel Controls 46 11 0 SUMMAR...

Страница 5: ...Screen for RTP 18 Figure 14 Example of Z3 Video Streaming to VLC RTP 18 Figure 15 Viewing Bitrate in VLC 19 Figure 16 Changing the Bitrate Dynamically 19 Figure 17 Drop in Bit Rate after Dynamic Bitra...

Страница 6: ...100R for Decode 39 Figure 44 Changing to Decoder Mode 39 Figure 45 System Setup in Decoder Mode 40 Figure 46 Decoder Configuration Settings for Decode Example 41 Figure 47 Updating the Device Firmwar...

Страница 7: ...ponent and HDMI It can output RTP UDP TSRTP RTMP or ASI Multiple channels can be combined into one ASI UDP stream or sent to different addresses On the decode side inputs include RTP UDP or ASI It can...

Страница 8: ...100R on page 11 This section describes how to quickly generate a UDP or RTP stream to VLC how to change bitrate dynamically how to adjust the UDP TS rate tuning for latency and using DHCP Details on e...

Страница 9: ...________________________ Z3 Technology LLC 100 N 8th ST STE 250 Lincoln NE 68508 1369 USA 1 402 323 0702 9 Video Cable BNC to RCA Adapter 3 0 INCLUDED PARTS LIST Z3 MVE 100R AC Power Cord BNC to BNC C...

Страница 10: ...PEG 2 Transport Stream Web based configuration software Optional internal HDD Operating Temperature and Humidity 0 to 40 C at 20 80 relative humidity non condensing Storage Temperature and Humidity 10...

Страница 11: ...1 402 323 0702 11 5 0 OPERATING CONTROLS ASI Out2 outputs the same signal as ASI Out1 SDI Out is not currently supported Power Switch LCD Controls Figure 2 Z3 MVE 100R Front View Figure 3 Z3 MVE 100R...

Страница 12: ...source to output 1080p or 1080i Power on the HDMI Source Connect an HDMI cable from the HDMI Source to a monitor Set the HDMI Source to 1080p60 or 1080i output Select and begin playback of the conten...

Страница 13: ...ess of the Z3 MVE 100R will appear along with information regarding what is connected to the HDMI and SDI inputs the input resolution detected Note the IP address Note If you are in a remote location...

Страница 14: ...will also work Enter the IP address of the Z3 MVE 100R from step 7 as the address The System Setup page will appear 6 3 Configure CH1 and Encode 9 From the System Setup Tab click on the CH1 tab 10 Yo...

Страница 15: ...r will automatically try to start If it has done so click on stop near the bottom of the screen The status should then change to STOPPED Then click on start If the encoder had not already started simp...

Страница 16: ...C to View Stream 12 Run VLC on your PC version used in testing at Z3 2 1 5 13 Select Media Open Network Stream In the box type udp 192 168 0 6 5004 where 192 168 0 6 is the IP address of your PC and 5...

Страница 17: ...is relatively simple to change to RTP streaming All that is needed is a one parameter change To stream using RTP complete the following steps 16 In the CH1 configuration tab click on stop to stop the...

Страница 18: ...e IP address of the Z3 MVE 100R ch is 1 for CH1 or 2 for CH2 and m is added if a multicast address is being streamed For example if the IP address of the Z3 MVE 100R is the default value of 192 168 81...

Страница 19: ...o change the bitrate or frame rate without stopping and restarting the encoder To use it complete the following steps 22 In VLC click on Tools and select Codec Information This brings up a window with...

Страница 20: ...ou should see the video bitrate drop and the quality of the picture in VLC change If you click on the status page and click Refresh you will also see the updated bitrate reflected You can also use the...

Страница 21: ...ory is a value of 10Mbps corresponding to 8Mbps for the video There are times however when it is desirable to make this value higher For example if the encoder bit rate is very low below 1Mbps it is a...

Страница 22: ...ng see step 6 in the figure above 28 Open VLC to view your UDP stream see Section 6 4 on how to do this and view the Statistics tab see Section 6 6 You will see a lower value for the overall input rat...

Страница 23: ...nt because the encoder has fewer bits over time to work with The tradeoff between latency and quality through this parameter is left up to the user B frames improve the quality of the picture but they...

Страница 24: ...address that is assigned can be seen on the LCD at boot up or through ZFinder To see how DHCP support works you can complete the following steps 29 The first thing you need to do is set up a custom co...

Страница 25: ...d select as the preset the z3_config1 configuration you just created 32 As soon as you select z3_config1 the screen will reload Check the Use DHCP box 33 Now that DHCP is set in z3_config1 save the co...

Страница 26: ...st time this is done it may take up to 30 seconds for the window to pop up as values get initialized 35 Now that you ve set DHCP and saved it to the configuration z3_config1 and specified that z3_conf...

Страница 27: ...your Windows PC The ZFinder window appears ZFinder does a scan of the network and lists the location of all Z3 systems connected to the network The Z3 MVE 100R appears with the IP address obtained thr...

Страница 28: ...Technology LLC 100 N 8th ST STE 250 Lincoln NE 68508 1369 USA 1 402 323 0702 28 40 A web browser will then open at the IP address of the Z3 MVE 100R and you will see the Web GUI Figure 31 Web GUI Usin...

Страница 29: ...TS File Enable to true When this is done they can then specify the file name in the Aux TS File Location box that appears If a user connects a USB drive for example a value of media sda1 encode_mve10...

Страница 30: ...mplete the following 1 Connect an SDI input with closed caption data to an SDI connector see Figure 3 on page 11 2 Start the encode 3 Open VLC Select Media Open Network Stream If the settings are thos...

Страница 31: ...fect compatibility with other H264 decoders so it can also be used by general users This ISDB T mode also allows CH1 and CH2 to be from the same input This can be used to generate 2 different versions...

Страница 32: ...ously stream them into 1 ASI output and 1 IP stream containing 2 channels Steps showing how to do this follow 7 1 Set up the System 5 Perform steps 1 to 8 in Section 6 0 to connect the Z3 MVE 100R to...

Страница 33: ...________________________________________ Z3 Technology LLC 100 N 8th ST STE 250 Lincoln NE 68508 1369 USA 1 402 323 0702 33 7 4 Initialize CH2 10 Make the same change to MPTS for CH2 Figure 35 Z3 MVE...

Страница 34: ...1 Click on the MPTS tab 2 Set the total MPTS transport rate This should equal the total transport rate of all channels being fed into the MPTS a 20 margin 3 Set the destination s In the example below...

Страница 35: ...streams via ASI You can also view both streams on VLC To do so follow the same steps as 12 to 14 in Section 6 4 on page 16 only this time using the multicast address that was typed in the MPTS tab udp...

Страница 36: ...ample RTMP server to stream to 8 1 Connect the Encoder 1 Follow steps 1 to 11 in Section 6 0 to connect the Z3 MVE 100R for encode and bring up the Encoder GUI 8 2 Configure CH1 for RTMP Streaming 2 C...

Страница 37: ...8 5 View the Content on Wowza 9 Go to a PC that is on the same network as the Wowza server and open a web browser in this example FireFox is used Type in the URL of the Wowza server with the port 8088...

Страница 38: ...8 11 You should see the Test Players popup screen Select the Adobe RTMP tab change the Stream name to 1080 should match the directory you are streaming to in the Z3 MVE 100R and click Start You should...

Страница 39: ...Encoder 1 Follow steps 1 through 10 in Section 6 0 to setup the GUI to stream a TS stream 2 Follow the instructions in Section 6 10 to save the stream to a TS file Call the file encode_mve 100r ts 9 2...

Страница 40: ...th ST STE 250 Lincoln NE 68508 1369 USA 1 402 323 0702 40 6 Once you do this the description at the top right will change from Z3 MVE 100R Encoder to Z3 MVE 100R Decoder and settings for Display Mode...

Страница 41: ...USA 1 402 323 0702 41 9 4 Configure and Run Decoder 8 Click on the CH1 tab and change the settings to match the following configuration 9 About 5 10 seconds later decode should start and you should se...

Страница 42: ...1 If you have a specific configuration you d like to preserve you can save it so that when the Z3 MVE 100R is powered off and back on it automatically uses those settings For an example of doing this...

Страница 43: ...4 This brings you to the File Selection Screen From here select the name of the img file to update with and click Open Figure 49 File Selection Screen The image file to be used will typically have the...

Страница 44: ...Using the Password Feature 8 In the System Setup tab click on go next to Set Password 9 Once you click on go the change password options appear Enter the new password twice and click change 10 Wait f...

Страница 45: ...02 45 11 Retype the IP address in the web browser You should then see a prompt for a user name and password Use admin for the user name and the value you had entered before for the password You should...

Страница 46: ...is used to go back Depending on the menu the right and left arrow keys can also be used sometimes for advance and go back One other general note is that at any time if there is no activity for 15 seco...

Страница 47: ...on to change it to the opposite state is given If a is selected for that channel the user is prompted with an option of changing the state of that channel Load Run Preset Shows current preset used Use...

Страница 48: ...MVE 100R Note that a save of these settings and reboot is needed for changes to take effect Use DHCP Checked Unchecked Sets whether DHCP is used the next time the Z3 MVE 100R is booted up Note that s...

Страница 49: ...d in this release Resolution Decode Only See Note 1 1080p60 Sets the resolution to set the display to Layout Decode Only See Note 2 1x1 Determines layout to use for displaying multiple pictures In mos...

Страница 50: ...esets Tab Parameter Options default in bold Notes new Define a new configuration file Up to 9 configurations can be created rename Rename a configuration file delete Delete a configuration file export...

Страница 51: ...ed picture Height Height of encoded picture A small i will appear if interlaced is being encoded Audio Status Channel The channel number 1 or 2 Subchannel Always 1 in this release Codec The codec bein...

Страница 52: ...of all channels going into this stream plus at least a 10 overhead For example if two 10Mbps channels are being packed into the MPTS stream the recommended Rate is at least 22Mbps Destination 1 ASI U...

Страница 53: ...sizing will occur Follow Input generates the resolution based on the capture resolution see Note 1 for resolutions supported Video Bit Rate 100 12000K 6000K The bit rate for channel 1 Video Profile Hi...

Страница 54: ...es supported Maximum Delay 0 3000 2000 of ms to buffer The higher the value the smoother the encode but also the higher the latency Audio Enable True False True Encode audio Audio Info Entries for eac...

Страница 55: ...r systems that require tighter PTS PCR intervals It is generally recommended to leave this value at 250 Certain decoders may require a value of Max PTS PCR similar to the video delay If an issue is en...

Страница 56: ...lected you should type the path name of the H264 file in Dest Address for example media sda1 example h264 If audio is enabled a companion aac file is then created for example for example h264 a compan...

Страница 57: ...nly 125K 20000K 8000K The rate of the transport stream Normally this value should be set to 1 25 video bit rate audio bit rate This can be set to higher values to allow leeway for times when many bits...

Страница 58: ...44 WQVGA 320x180 QVGA 320x240 SIF 352x240 CIF 352x288 2 CIF 352x576 640x360 VGA 640x480 4 CIF 704x576 16 9 PAL 1024x576 D1 PAL 720x576 D1 NTSC 720x480 720p 1280x720 XGA 1280x1024 1080 1920x1080 Note 2...

Страница 59: ...the user can type the multicast address the decoder should connect to Address Multicast only x y z w 225 1 2 3 The multicast IP address that the decoder retrieves data from used when RTP or UDP is sel...

Страница 60: ...0702 60 11 7 The CH2 Tab Identical to CH1 except the source is SDI instead of HDMI component Also default values of various parameters change as shown below Parameter CH1 CH2 Video Source HDMI Compon...

Страница 61: ...e serial_menu Last value saved in GUI enc dec factory default Factory settings Can also add more profiles by clicking on new in the User Presets tab Save Click to save value that was selected Operatin...

Страница 62: ...uctions to install your Ear Rack Mounts on your Z3 MVE 100R 1 Place the Z3 MVE 100R face up on a dry flat surface 2 Place one of the ear rack brackets on the left and one on the right of the Z3 MVE 10...

Страница 63: ...ng the following steps are needed 1 Log in to the Wowza Streaming Engine Manager Home page by typing http localhost 8088 where localhost is the IP address of the server in this User s Guide 192 168 0...

Страница 64: ...RTSP Publishing are both set to Open and Client Restrictions is set to No client restrictions Then click Save The Wowza server is now configured to work with the Z3 MVE 100R Note You can also specify...

Страница 65: ...l firewalls on the network turned off Try connecting the PC directly to the board without any routers etc Problem Do not see video in VLC UDP Does the IP address set in Dest Address equal the IP addre...

Отзывы: