background image

User Guide for SIP-T58V/A 

Smart Media


Phone


302 

contact to dial out. 

-


Tap 


, and then tap 

Remote Phone Book

. Search for the contact and tap the 

desired contact to dial out. (Remote phone book should be configured in advance, 
refer t

Remote Phone Book 

on page


119


for more information.) 

-


Tap 


, and then tap the desired list. Tap the desired entry to dial out. 

3.


After the party answers the call, press            or tap 

Transfer 

soft key to complete the 

transfer. 

If you are using a handset, the transfer can be completed by hanging up the handset. 

Call Waiting 

You can enable or disable call waiting on the phone. If call waiting is enabled, you can receive 
another call when there is already an active call on the phone. Otherwise, another incoming call 
is automatically rejected by the phone with a busy message when there is an active call on the 
phone. You can also enable or disable the phone to play a warning tone when receiving another 
call. 

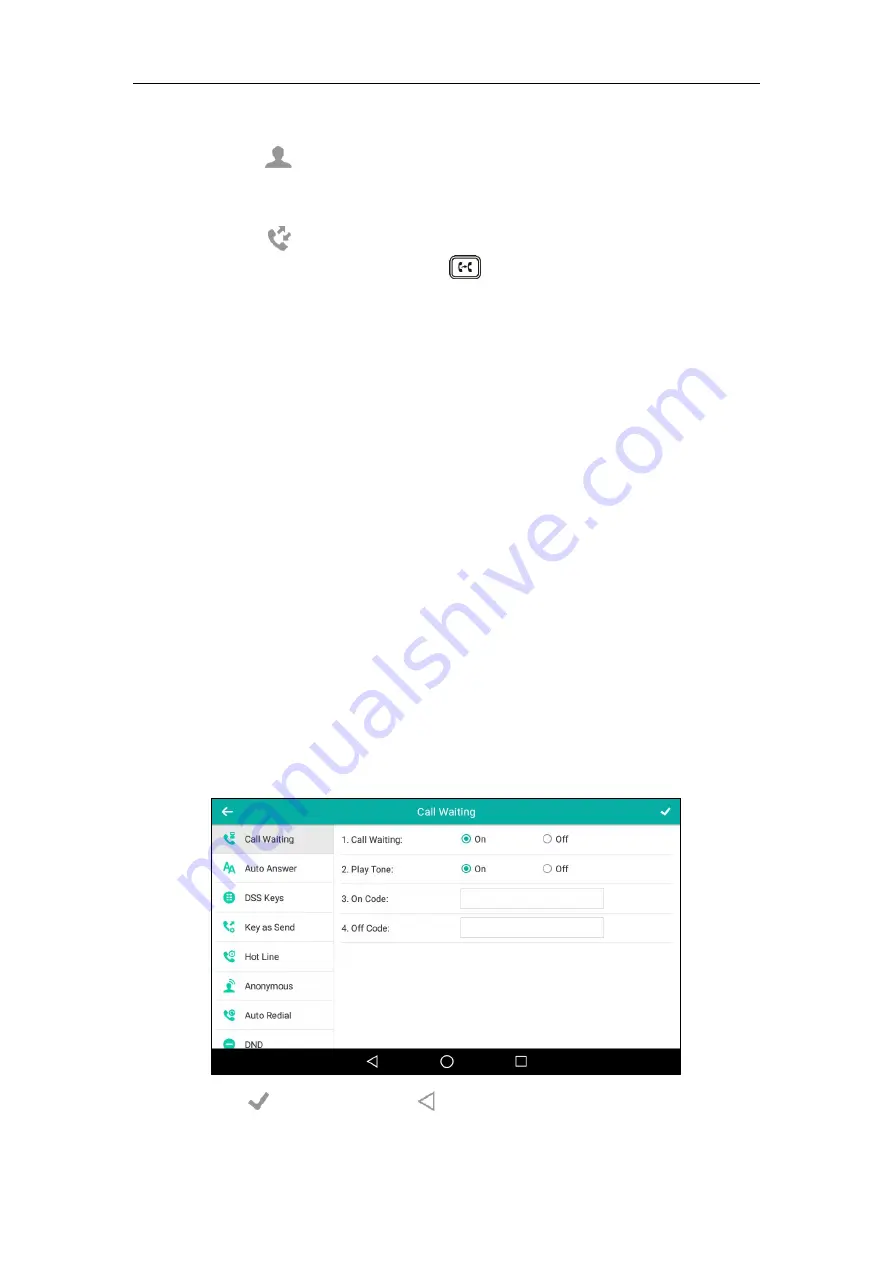
To configure call waiting via phone user interface: 

1.


Swipe down from the top of the screen or swipe left/right to go to the second idle screen. 

2.


Tap 

Settings

->

Features

->

Call


Waiting

3.


Tap the 

On

 radio box in the 

Call Waiting 

field. 

4.


Tap the 

On

 radio box in the 

Play Tone

 field. 

5.


(Optional.) Enter the call waiting on code or off code respectively in the 

On Code

 or 

Off 

Code

 field. 

If on code or off code is configured, the IP phone will send the corresponding code to 
activate or deactivate call waiting on the server. They may vary on different servers. 


6.


Tap        to accept the change or        to cancel. 


Содержание SIP-T58V

Страница 1: ......

Страница 2: ...EXPRESS OR IMPLIED USERS MUST TAKE FULL RESPONSIBILITY FOR THEIR APPLICATION OF PRODUCTS YEALINK XIAMEN NETWORK TECHNOLOGY CO LTD MAKES NO WARRANTY OF ANY KIND WITH REGARD TO THIS GUIDE INCLUDING BUT NOT LIMITED TO THE IMPLIED WARRANTIES OF MERCHANTABILITY AND FITNESS FOR A PARTICULAR PURPOSE Yealink Xiamen Network Technology CO LTD shall not be liable for errors contained herein nor for incidenta...

Страница 3: ...ference will not occur in a particular installation If this equipment does cause harmful interference to radio or television reception which can be determined by turning the equipment off and on the user is encouraged to try to correct the interference by one or more of the following measures 1 Reorient or relocate the receiving antenna 2 Increase the separation between the equipment and receiver ...

Страница 4: ...ealink uses software under the specific terms of the GPL Please refer to the GPL for the exact terms and conditions of the license The original GPL license source code of components licensed under GPL and used in Yealink products can be downloaded online http www yealink com GPLOpenSource aspx BaseInfoCateId 293 NewsCateId 293 CateId 293 ...

Страница 5: ...a phones is that the Yealink USB camera CAM50 is an optional accessory for the SIP T58A IP phone With the CAM50 you can easily turn your SIP T58A into a video phone This guide provides everything you need to quickly use your new phone First verify with your system administrator that the IP network is ready for phone configuration Also be sure to read the Packaging Contents and Regulatory Notices s...

Страница 6: ...User Guide for SIP T58V A Smart Media Phone vi ...

Страница 7: ...d 27 Packaging Contents 27 Optional Accessories 29 Phone Installation 29 Network Connection 34 Connecting to the Wired Network 34 Connecting to the Wireless Network 34 Phone Initialization 34 Registration 35 Using the Touch Screen 35 Idle Screen 35 Navigating Menus and Fields 39 Control Center Notification Center 39 Configuration Screen Display 42 Dialing Screen Display 43 Video Call Screen Displa...

Страница 8: ...ght 80 Language 82 Input Method 83 Time Date 85 Administrator Password 88 Key as Send 88 Phone Lock 89 Audio Settings 92 Volume 92 Ring Tones 95 Key Tone 97 Touch Sounds 98 Notification Sound 99 Silent Mode 99 Contact Management 100 Local Directory 101 Blacklist 118 Remote Phone Book 119 Mobile Contacts 121 Call History Management 124 Viewing History Records 124 Placing a Call from History Records...

Страница 9: ...PP Account Information 188 Removing APP Accounts 190 FileManager 191 Viewing Files 192 Searching Files 195 Copying Files 196 Cutting Files Moving Files 198 Deleting Files 199 Sharing Pictures Videos Audios 200 Gallery 204 Viewing Pictures Videos 205 Editing Pictures 208 Setting a Picture as Wallpaper 209 Printing Pictures 211 Viewing Detail Information of the Pictures Videos 211 Deleting Pictures ...

Страница 10: ...the Calendar Settings 247 Calculator 247 Clock 248 Alarm 248 Clock 252 Timer 255 Stopwatch 256 Basic Phone Features 259 Placing Calls 260 Answering Calls 263 Answering When Not in Another Call 263 Answering When in Another Call 264 Ending Calls 264 Performing Operations during a Call 265 Going to the Idle Screen during a Call 265 Returning to the Talking Screen 266 Changing Video Call Settings 266...

Страница 11: ...nced Phone Features 317 Busy Lamp Field BLF 317 Configuring the BLF Feature on the Phone 317 Using BLF Feature on the Phone 321 BLF List 323 Screenshot 325 Call Recording 326 Call and Conference Recording Using a Softkey 326 Call Recording Using a Record Key 330 Hot Desking 332 Intercom 334 Configuring the Intercom Feature on the Phone 334 Using Intercom Feature on the Phone 337 Multicast Paging 3...

Страница 12: ...ide for SIP T58V A Smart Media Phone xii Message Waiting Indicator MWI 365 Regulatory Notices 369 Service Agreements 369 Limitations of Liability 369 Safety Instructions 369 Appendix A Time Zones 371 Index 373 ...

Страница 13: ...onent Instructions Icon Instructions LED Instructions User Interfaces Documentations If you require additional information or assistance with your new phone contact your system administrator Hardware Component Instructions The main hardware components of the phone are the touch screen the keypad and the USB camera CAM50 ...

Страница 14: ... highlight screen items The IP phone supports three idle screens by default Shows information about calls messages time date and other relevant data Default account Call information caller ID call duration Icons for example Missed call list or second incoming caller information Prompt text for example Save successfully Time and date HEADSET Key Toggles and indicates the headset mode The key LED il...

Страница 15: ...nted vertically For more information on how to adjust the hookswitch tab refer to Yealink Wall Mount Quick Installation Guide for Yealink IP Phones Hookswitch Picking up the handset from the handset cradle the hookswitch bounces and the phone connects to the line Laying the handset down on the handset cradle the phone disconnects from the line Camera Lens 2 Mega pixel camera Provides near site vid...

Страница 16: ...escription Wired network is unavailable Hands free speakerphone mode Handset mode Headset mode Video Voice Mail Auto Answer Do Not Disturb Call Forward Silent mode Camera is not detected Keep Mute Phone Lock Missed Calls Bluetooth mode is on Bluetooth headset is both paired and connected Bluetooth Enabled mobile phone is both paired and connected Wi Fi mode is on ...

Страница 17: ... drive is detected Screenshot captured Downloading file Uploading file Upcoming alarm Unread email Warning Line Key Icons Icon indicator associated with line key features Icons Description Hold Public Hold Private Hold DND Voice Mail Direct Pickup Group Pickup DTMF Prefix LDAP Local Group XML Group Conference Forward ...

Страница 18: ...cord Multicast Paging Group Listening Paging List Hot Desking Zero Touch URL Phone Lock Directory Speed Dial Icon indicator associated with line Icons Description The private line registers successfully Register failed Flashing Registering The shared line registers successfully DND is enabled on this line Call forward is enabled on this line ...

Страница 19: ...bile phone is connecting Icon indicator associated with BLF BLF List Icons Description BLF BLF list idle state Flashing BLF BLF list ringing state Flashing BLF BLF list callout state BLF BLF list talking state BLF hold state BLF list call park state BLF BLF list failed state Icon indicator associated with Intercom Icons Description Intercom idle state Intercom ringing state Callout Intercom callou...

Страница 20: ... shared line receives an incoming call Flashing The shared line is dialing The shared line is in conversation The shared line conversation is placed on public hold for local SCA phone for monitoring SCA phone The shared line conversation is placed on private hold The shared line conversation is barged in by the other shared line party For a multi party call all the shared line parties participatin...

Страница 21: ...Recording starts successfully Using a record key Recording cannot be started Using a record key Recording cannot be stopped Using a record key Icon indicator associated with call history Icons Description Received Calls Placed Calls Missed Calls Forwarded Calls Icon indicator associated with contact Icons Description The default local caller photo and local contact icon The default mobile caller p...

Страница 22: ...o the phone The camera is idle The phone receives an audio only call Flashing green The phone receives a video call Solid red There is an active video call The video call is muted The video call is held Slow flashing red The shutter switch is open but the near site video is stopped transmitting during a video call The video call is placed on hold Off The phone is powered off The camera is not prop...

Страница 23: ...ve For more information on customizing your phone with the available options via phone user interface refer to Customizing Your Phone on page 69 Web User Interface In addition to the phone user interface you can also customize your phone via web user interface In order to access the web user interface you need to know the IP address of your new phone To obtain the IP address swipe down from the to...

Страница 24: ...istrator Password Key as Send Phone Lock Audio Settings Ring Tones Key Tone Touch Sounds Notification Sound Silent Mode Contact Management Local Directory Blacklist Remote Phone Book Mobile Contacts Call History Management Search Source List in Dialing Headset Use Bluetooth Headset Bluetooth Enabled Mobile Phone DSS Keys Account Management Dial Plan Emergency Number Live Dialpad Hotline APP Accoun...

Страница 25: ... Not Disturb DND Call Forward Call Transfer Call Waiting Conference Call Park Call Pickup Anonymous Call Anonymous Call Rejection Advanced Phone Features Busy Lamp Field BLF BLF List Call Recording Hot Desking Intercom Multicast Paging Music on Hold Shared Call Appearance SCA Message SIP Account User Options Activation Label Display Name Register Name User Name Password Server Options SIP Server1 ...

Страница 26: ... Contents Where found Language Quick Start Guide Basic call features and phone customizations In the package On the website English Chinese User Guide Phone Web user interface settings Basic call features and advanced phone features On the website English Note The table above lists most of the feature options Please refer to the relevant sections for more information You can also download the late...

Страница 27: ... Phone Installation Network Connection Phone Initialization Registration Using the Touch Screen Entering Data and Editing Fields Phone Status Basic Network Settings Wireless Network Settings If you require additional information or assistance with your new phone contact your system administrator Packaging Contents The following components are included in your SIP T58V A smart media phone package S...

Страница 28: ...a Phone 28 Phone Stand Handset Handset Cord CAM50 an optional accessory for the SIP T58A Ethernet Cable 2m CAT5E FTP cable Quick Start Guide Check the list before installation If you find anything missing contact your system administrator ...

Страница 29: ...HS32 YHS33 Note Phone Installation If your phone is already installed proceed to Phone Initialization on page 34 This section introduces how to install the phone 1 Insert the camera 2 Attach the stand 3 Adjust angle of the touch screen 4 Attach the optional wall mount bracket We recommend that you use the accessories provided or approved by Yealink The use of unapproved third party accessories may...

Страница 30: ...nnect the power 7 Connect the optional USB flash drive 1 Insert the camera Note 2 Attach the stand The camera is connected to the USB port on the top of the phone And the IP phone only supports the Yealink original USB camera CAM50 You should purchase it separately for SIP T58A smart media phone ...

Страница 31: ...n 4 Attach the optional wall mount bracket Note The hookswitch tab has a lip which allows the handset to stay on hook when the IP phone is mounted vertically For more information refer to Yealink Wall Mount Quick Installation Guide for Yealink IP Phones ...

Страница 32: ...connect the AC power 1 Connect the DC plug on the power adapter to the DC5V port on the phone and connect the other end of the power adapter into an electrical power outlet Note Power over Ethernet With the included or a regular Ethernet cable the SIP T58V A smart media phone can be powered from a PoE compliant switch or hub The IP phone should be used with Yealink original power adapter 5V 2A onl...

Страница 33: ...ger on page 191 Note The USB port on the rear of the phone can also be used to connect color screen expansion module EXP50 or USB headset The SIP T58V A smart media phone officially supports certain USB headset models For more information refer to Tested headset list compatible with Yealink IP Phone For more information on how to use EXP50 refer to Yealink EXP50 User Guide For more information on ...

Страница 34: ...pports Wi Fi feature You can connect your phone to a wireless network The wireless network is more convenient and cost effective than wired network The PC port is unavailable when using wireless network For more information on how to connect to a wireless network refer to Wireless Network Settings on page 58 Phone Initialization After your phone is powered on the system boots up and performs the f...

Страница 35: ... smart media phone supports up to 16 accounts If your phone is not registered you may have to register it For more information on how to register your phone refer to Account Management on page 165 Using the Touch Screen Idle Screen The SIP T58V A smart media phone supports multiple idle screens You can swipe left or right to switch among different idle screens The IP phone supports three idle scre...

Страница 36: ...ault account is displayed on the left of the status bar For more information refer to Default Account on page 167 If there is no account registered on the IP phone this field will display No Service 5 Phone Dialer Tap to enter the dialing screen For more information refer to Dialing Screen Display on page 43 6 Directory Tap to enter the Directory screen and view contacts For more information refer...

Страница 37: ...he Second Idle Screen The second idle screen displays phone s system applications by default No Application Description 1 Settings You can use this application to access phone settings and features You can also swipe down from the top of the screen and then tap Settings to access phone settings and features 2 FileManager You can use this application to manage files in internal SD card as well as U...

Страница 38: ...can use this application to record audio For more information refer to Recorder on page 219 9 Calculator You can use this application to calculate For more information refer to Calculator on page 247 10 Browser You can use this application to present and explore content on the World Wide Web For more information refer to Browser on page 235 The Third Idle Screen The third idle screen displays the ...

Страница 39: ...ifting your finger from the screen till an action occurs Swipe Touch and move When you want to scroll quickly swipe your finger across the screen either up down left or right Drag Touch and hold then move To stop scrolling stop the dragging motion Pinch Open Touch the screen with two or more fingers and then move the fingers away from each other stretch Pinch Close Touch the screen with two or mor...

Страница 40: ...ideo during a video call For more information refer to Stopping Transmitting Video during a Call on page 267 DND Tap to turn on off DND feature quickly For more information refer to Do Not Disturb DND on page 281 FWD Tap to enter Call Forward setting screen For more information refer to Call Forward on page 286 Auto Answer Tap to enter Auto Answer setting screen For more information refer to Auto ...

Страница 41: ...acklight Slider Drag the slider to adjust the screen brightness quickly You can also enter the Backlight setting screen to adjust the screen brightness For more information refer to Backlight on page 80 3 Notification Center Tap Notification Missed Calls Voice Mail Forwarded to view the corresponding notification list Tap the desired notification message to view the details Swipe left or right to ...

Страница 42: ...figuration Area Displays configuration items of the highlighted menu item in the menu tree area 4 Android Keys tap to go back to the previous screen tap to return to the idle screen tap to view and manage the list of recently used applications 5 Tap to go back to previous screen 6 Menu Tree Area Displays menu items Tap the desired menu item to enter the corresponding configuration screen ...

Страница 43: ...d feature Note The line key list appears only if you have added at least one line key 3 Tap to unfold line key list and display all line keys For more information refer to DSS Keys on page 149 4 Tap it or swipe right to hide the line key list 5 Android Keys tap to go back to the idle screen tap to return to the idle screen tap to view and manage the list of recently used applications 6 Dial Pad Ta...

Страница 44: ...n making a call Tap to change the default account For more information refer to Default Account on page 167 9 Tap to go back to the idle screen 10 Directory Tap to enter the Directory screen and view contacts 11 History Tap to enter the History screen and view call history 12 Tap to delete the entered characters one by one Long tap to delete two or more characters 13 Tap to display hide the onscre...

Страница 45: ...Note The line key list appears only if you have added at least one line key 3 Tap to unfold line key list and display all line keys For more information refer to DSS Keys on page 149 4 Tap it or swipe right to hide the line key list 5 Full Screen Tap to show the video on the phone in full screen Only the near site and far site are shown For more information on full screen refer to Video Call Full ...

Страница 46: ...e 267 9 Call Duration Timer Shows the duration time of current call 10 Talking Mode Shows that you are talking using the handset speakerphone or headset You can alternate among the three modes during calls 11 Phone Dialer Tap to enter the dialing screen For more information refer to Dialing Screen Display on page 43 12 Directory Tap to enter the Directory screen and view contacts 13 History Tap to...

Страница 47: ...Getting Started 47 Video Call Full Screen Display Both Far and Near Site Videos Exist From the video call screen do one of the following to view full screen video Tap the big size image Tap Full Screen ...

Страница 48: ...ing Video during a Call on page 267 2 Blank Area Tap to exit the full screen display 3 Far Site Information Shows the information name or number of the far site by default 4 Tap to exit the full screen display 5 Call Duration Timer Shows the duration time of current call 6 Android Keys tap to exit the full screen display tap to return to the idle screen tap to view and manage the list of recently ...

Страница 49: ...board of the English US input method as an example No Item Description 1 26 English Letters Tap to enter letters Tap and hold a key then slide to choose one of the options to enter an alternate character 2 Delete Key Tap to delete the entered characters one by one Long tap to delete two or more characters 3 Label automatically to identify the context sensiti ve features Next Key Tap to go to the n...

Страница 50: ...te character 2 Delete Key Tap to delete the entered characters one by one Long tap to delete two or more characters 3 Label automatically to identify the context sensitiv e features Next Key Tap to go to the next field Done Key Tap to confirm the settings Send Key Tap to dial out the number Go Key Tap to browse the web page 4 Tap to switch to the symbolic input mode 5 Tap to switch to the lowercas...

Страница 51: ...ontext sensiti ve features Next Key Tap to go to the next field Done Key Tap to confirm the settings Send Key Tap to dial out the number Go Key Tap to browse the web page 4 Tap to switch to the numeric symbolic input mode 5 Tap to switch to the lowercase input mode 6 Space Key Tap to enter spaces Long tap to change input method Google Pinyin Input Method You can use Google Pinyin input method to e...

Страница 52: ...witch to the Chinese input mode as shown below Tap to switch to the numeric symbolic input mode as shown below Tap to switch to the symbolic input mode as shown below The other things you need to know If you want to Action Position the cursor Tap to position Select all characters 1 Long tap the entered character s 2 Do one of the following Tap SELECT ALL on the top of the touch screen ...

Страница 53: ...phone keypad and onscreen dial pad only provide digit keys key and key Note Phone Status You can view phone status via phone user interface or web user interface Available information of phone status includes General information IP address MAC address and firmware version Network status IPv4 status or IPv6 status IP mode and MAC address IPv4 uses a 32 bit address IPv6 is an updated version of the ...

Страница 54: ...e Downloads Display the memory cost of the downloaded files Misc Tap to display all folders on the IP phone You can then select the folders to be cleaned up The operating system and system applications occupy some storage space Therefore the actual available space will be smaller than the nominal space Updates on the operating system and firmware version may cause changes to the available space To...

Страница 55: ...5 1 1 1 215 65ff fe64 6e0a for IPv6 3 Enter the user name admin and password admin in the login page 4 Click Confirm to login The phone status is displayed on the first page of the web user interface Note If IP mode of the phone is configured as IPv4 IPv6 you can enter either of them in the browser s address bar to view the phone status IPv6 is not available on all servers Contact your system admi...

Страница 56: ...ced default password admin Network WAN Port 3 Tap the IP Mode field 4 Tap the desired value IPv4 IPv6 or IPv4 IPv6 in the pop up dialog box 5 Tap to accept the change or to cancel You can configure a static IPv4 address for the IP phone Before configuring it make sure that the IP mode is configured as IPv4 or IPv4 IPv6 To configure a static IPv4 address via phone user interface 1 Swipe down from t...

Страница 57: ... or swipe left right to go to the second idle screen 2 Tap Settings Advanced default password admin Network WAN Port IPv6 3 Tap the Type field 4 Tap Static IP in the pop up dialog box 5 Enter the desired value in the IP Address IPv6 IP Prefix Gateway Primary DNS and Secondary DNS field respectively 6 Tap to accept the change or to cancel If you are using an xDSL modem for IPv4 network connection y...

Страница 58: ...e can be connected to wireless network if Wi Fi is available within the area For more information contact your system administrator Note Connecting to the Wireless Network Three ways to connect SIP T58V A smart media phone to the wireless network Manually connect to an available wireless network The wrong network settings may result in inaccessibility of your phone and may also have an impact on y...

Страница 59: ...o the SSID of the connected wireless network Manually Connect to an Available Wireless Network You can manually connect your phone to a wireless network To manually connect to an available wireless network via phone user interface 1 Swipe down from the top of the screen or swipe left right to go to the second idle screen 2 Tap Settings Basic Wi Fi 3 Tap the On radio box in the Wi Fi field The phon...

Страница 60: ...tion has completed successfully the prompt Connected appears under the corresponding SSID You can also swipe down from the top of the screen to enter the control center and toggle Wi Fi on The phone will automatically search for wireless network in your area and try to connect the wireless network that you have connected last time If there are no available wireless networks or the phone cannot con...

Страница 61: ...ation PBC The user simply has to push the WPS key on both the IP phone and gateway router to connect Personal Identification Number PIN The user has to enter a WPS PIN generated randomly by the IP phone on the gateway router to connect Push Button Configuration PBC To connect to the wireless network using PBC method 1 Swipe down from the top of the screen or swipe left right to go to the second id...

Страница 62: ...r gateway router Once WPS setup has completed successfully the touch screen will prompt Connected Personal Identification Number PIN To connect to the wireless network using PIN method 1 Swipe down from the top of the screen or swipe left right to go to the second idle screen 2 Tap Settings Basic Wi Fi 3 Tap the On radio box in the Wi Fi field The phone will automatically search for available wire...

Страница 63: ...tup wireless devices by using a PIN 10 Click the corresponding button in the gateway router s web interface to search WPS clients Once WPS setup has completed successfully the touch screen will prompt Connected Note Manually Add a Wireless Network If your gateway router has SSID broadcast disabled it might not appear in the scanning results In that case you must manually add a wireless network To ...

Страница 64: ... in the Password field If you select 802 1x EAP 1 Tap the EAP method field 2 Tap the desired EAP method in the pop up dialog box If you select PEAP TTLS a Tap the Phase 2 authentication field b Tap the desired Phase 2 authentication method in the pop up dialog box c Enter the identity username in the Identity field d Enter the anonymous identity username in the Anonymous identity field to be used ...

Страница 65: ...ept the change Viewing the Connected Wireless Network Information To view the connected wireless network information 1 Swipe down from the top of the screen or swipe left right to go to the second idle screen 2 Tap Settings Basic Wi Fi 3 Tap Wireless Status to view the detailed wireless network information e g Profile Name SSID or Signal Strength 4 Optional Drag up and down to scroll through the l...

Страница 66: ... Tap the connected SSID the top one 4 Tap Forget Disabling Wi Fi Feature To disable Wi Fi feature do one of the following Swipe down from the top of the screen or swipe left right to go to the second idle screen Tap Settings Basic Wi Fi Tap the Off radio box in the Wi Fi field ...

Страница 67: ...Getting Started 67 Swipe down from the top of the screen to enter the control center and then tap The icon disappears from the status bar and the Wi Fi label resumes to Wi Fi ...

Страница 68: ...User Guide for SIP T58V A Smart Media Phone 68 ...

Страница 69: ...ze the wallpaper of the SIP T58V A smart media phone and color screen expansion module EXP50 if connected You can also change the wallpaper image via phone user interface or web user interface The custom wallpaper can be a built in image a picture stored in internal SD card USB flash drive if connected or a picture uploaded via web user interface For more information on how to connect the USB flas...

Страница 70: ...appear in the pull down lists of Wallpaper and Wallpaper for Expansion Modules synchronously You can delete the custom wallpaper by clicking Del when selecting the desired custom wallpaper in the Wallpaper or Wallpaper for Expansion Modules field Changing the Wallpaper To change the phone wallpaper or EXP50 wallpaper via phone user interface 1 Swipe down from the top of the screen or swipe left ri...

Страница 71: ... Your Phone 71 4 Do one of the following Tap Gallery The touch screen displays all Gallery albums Select a desired Gallery album Tap a desired picture to preview and then tap Set wallpaper or Set as exp background ...

Страница 72: ...und built in wallpapers and the recently used wallpapers list on the bottom of the touch screen Do one of the following Select a desired wallpaper from the build in wallpapers and recently used wallpapers list and then tap Set wallpaper or Set as exp background Tap Pick image The touch screen displays the recently saved pictures ...

Страница 73: ...ly used wallpapers list Tap Set wallpaper or Set as exp background You can long tap the empty spot on the idle screen and then tap WALLPAPERS the effect is equal to tapping Settings Basic Display Wallpaper Wallpapers Then you can change the phone wallpaper as the operating instructions described above You can also change the phone EXP wallpaper when viewing pictures by FileManager or Gallery appli...

Страница 74: ...ere is an incoming call A new prompt e g missed call new voice mail or forwarded call The status of BLF key changes If your phone is idle again for a specified period of time the screen saver will start again The SIP T58V A smart media phone supports four screen saver types Clock Colors Photo Frame and Photo Table If you set the screen saver type to Clock the touch screen will display as below whe...

Страница 75: ...s below when screen saver starts If you set the screen saver type to Photo Frame the touch screen will display the selected pictures one by one when screen saver starts If you set the screen saver type to Photo Table the touch screen will display the selected pictures as below when screen saver starts ...

Страница 76: ...me in the pop up dialog box 5 Do one of the following Tap the Clock radio box Optional Tap next to the radio box Tap the Style field to set the clock type to Analog or Digital Tap the Night mode radio box to display the screen saver dimly for dark rooms Tap to return to the Screen Saver setting screen Tap the Colors radio box Tap the Photo Frame radio box Tap next to the radio box to select the de...

Страница 77: ...used to turn off the backlight and screen to conserve energy The IP phone enters power saving mode after it has been idle for a certain period of time If you connect a color screen expansion module EXP50 to the IP phone the IP phone and EXP50 will enter or exit power saving mode synchronously The IP phone will exit power saving mode when Press any key Tap the touch screen Pick up or hang up the ha...

Страница 78: ...o enable the power saving feature via web user interface 1 Click on Settings Power Saving 2 Select Enabled from the pull down list of Power Saving 3 Click Confirm to accept the change Configuring the Office Hour Office Hour specifies the starting time and ending time in the office each day To configure the office hour via web user interface 1 Click on Settings Power Saving 2 Select a desired day o...

Страница 79: ...ey on the phone pick up hang up the handset or tap the touch screen By default the Office Hour Idle TimeOut is much longer than the Off Hour Idle TimeOut If you use the IP phone the idle timeout that applies User Input Extension Idle TimeOut or Office Hour Off Hour Idle TimeOut is the timeout with the highest value If the phone has an incoming call or message the User Input Extension Idle TimeOut ...

Страница 80: ...time to change the intensity or turn on the backlight permanently Always On Backlight is on permanently 15s 30s 60s 120s 300s 600s or 1800s Backlight is changed when the phone is inactive after the designated time in seconds If you connect a color screen expansion module EXP50 to the IP phone the screen s intensity of both the phone and EXP50 will change synchronously To configure the backlight vi...

Страница 81: ... to cancel You can also drag the backlight slider on the control center to change the intensity of the touch screen To configure the backlight active level on the control center 1 Swipe down from the top of the screen to enter the control center 2 You can do one of the following Drag the backlight slider ...

Страница 82: ...he lowest Backlight is configurable via web user interface at the path Settings Preference Language The default language of the phone user interface is English If the language of your web browser is not supported by the phone the web user interface will use English by default You can change the language for the phone user interface and the web user interface respectively To change the language for...

Страница 83: ...1 Click on Settings Preference 2 Select the desired language from the pull down list of Language 3 Click Confirm to accept the change Text displayed on the web user interface will change to the selected language Input Method SIP T58V A smart media phone supports two kinds of input methods Android Keyboard AOSP English US and Google Pinyin The default input method is English US You can change the c...

Страница 84: ...he screen or swipe left right to go to the second idle screen 2 Tap Settings Basic Language Input Current Input 3 Tap the desired input method in the pop up dialog You can also long tap the following keys on the onscreen keyboard to change the input method For Android Keyboard AOSP English US input method ...

Страница 85: ... Time Protocol SNTP server contact your system administrator for more information To configure the SNTP setting via phone user interface 1 Swipe down from the top of the screen or swipe left right to go to the second idle screen 2 Tap Settings Basic Time Date General 3 Tap the Type field 4 Tap SNTP Settings in the pop up dialog box 5 Tap the Time Zone field 6 Tap the time zone that applies to your...

Страница 86: ... time and date manually via phone user interface 1 Swipe down from the top of the screen or swipe left right to go to the second idle screen 2 Tap Settings Basic Time Date General 3 Tap the Type field 4 Tap Manual Settings in the pop up dialog box 5 Enter the specific date and time in the corresponding fields 6 Tap to accept the change or to cancel The time and date displayed on the touch screen w...

Страница 87: ...notes the first three letters of the month The date formats available Date Format Example 2016 09 12 WWW MMM DD Mon Sep 12 DD MMM YY 12 Sep 16 YYYY MM DD 2016 09 12 DD MM YYYY 12 09 2016 MM DD YY 09 12 16 DD MMM YYYY 12 Sep 2016 WWW DD MMM Mon 12 Sep To configure the date and time format via phone user interface 1 Swipe down from the top of the screen or swipe left right to go to the second idle s...

Страница 88: ...t right to go to the second idle screen 2 Tap Settings Advanced default password admin Set Password 3 Enter the current password in the Current PWD field 4 Enter the new password in the New PWD field 5 Re enter the new password in the Confirm PWD field 6 Tap to accept the change or to cancel Administrator password is configurable via web user interface at the path Security Password Key as Send You...

Страница 89: ...fting the handset pressing the Speakerphone key the HEADSET key or tapping the Answer soft key and end the call by hanging up the handset pressing the Speakerphone key or tapping the EndCall soft key Note To activate the phone lock via phone user interface 1 Swipe down from the top of the screen or swipe left right to go to the second idle screen 2 Tap Settings Advanced default password admin Phon...

Страница 90: ...ignated time in seconds 6 Tap to accept the change When the phone is locked the touch screen prompts Phone locked and displays the icon on the status bar To unlock the phone you must know the phone unlock PIN The default phone unlock PIN is 123 To unlock the phone via phone user interface 1 Tap the screen or tap the locked key the touch screen prompts Unlock PIN ...

Страница 91: ...interface 1 Swipe down from the top of the screen or swipe left right to go to the second idle screen 2 Tap Settings Basic Change PIN 3 Enter the desired value in the Current PIN New PIN and Confirm PIN field respectively 4 Tap to accept the change or to cancel Note The unlock PIN length must be within 15 digits You can also unlock the phone by administrator password When you enter the administrat...

Страница 92: ...me Press the Volume key to adjust the ringer volume when the phone is idle or ringing When adjusting ringer volume the touch sound and notification sound volume will change as well For more information on ring tones touch sounds and or notification sound refer to Ring Tones on page 95 Touch Sounds on page 98 and or Notification Sound on page 99 Talking volume Press the Volume key to adjust the rec...

Страница 93: ...e when the phone is ringing 1 Press to adjust the ringer volume You can also press to adjust the ringer volume when selecting a ring tone For more information refer to Ring Tones on page 95 Note You can also drag the volume slider to adjust the ringer volume If the ringer volume is adjusted to minimum the icon will appear on the status bar ...

Страница 94: ...djust the volume of currently engaged audio device handset speakerphone or headset You can also drag the volume slider to adjust the talking volume To adjust the key tone volume When the phone is on the dialing screen 1 Press to adjust the key tone volume You can also drag the volume slider to adjust the key tone volume ...

Страница 95: ... to indicate incoming calls You can select different ring tones to distinguish different accounts registered on your phone or to distinguish your phone from your neighbor s To select a ring tone for the phone via phone user interface 1 Swipe down from the top of the screen or swipe left right to go to the second idle screen 2 Tap Settings Basic Sound Ring Tones Common 3 Drag up and down to scroll ...

Страница 96: ...dle screen 2 Tap Settings Basic Sound Ring Tones 3 Tap the desired account 4 Drag up and down to scroll through the list of available ring tones 5 Tap the desired ring tone If Common is selected this account will use the ring tone selected for the phone 6 Optional Press to adjust the ringer volume 7 Tap to accept the change or to cancel A ring tone for the account is configurable via web user inte...

Страница 97: ...tone the phone will produce a sound when you press the keypad To enable key tone via phone user interface 1 Swipe down from the top of the screen or swipe left right to go to the second idle screen 2 Tap Settings Basic Sound Key Tone The priority of ring tone for an incoming call on the phone is as follows Contact ring tone refer to Adding Contacts Group ring tone refer to Adding Groups Account ri...

Страница 98: ...u enable touch sounds the phone will produce a sound when you tap an option on the touch screen To enable touch sounds via phone user interface 1 Swipe down from the top of the screen or swipe left right to go to the second idle screen 2 Tap Settings Basic Sound Touch Sounds 3 Tap the On radio box in the Touch Sounds field 4 Tap to accept the change or to cancel Note Touch sound is configurable vi...

Страница 99: ... field 4 Tap the desired notification sound in the pop up dialog box 5 Optional Press to adjust the notification sound 6 Tap OK to accept the change or Cancel to cancel Note Silent Mode If you turn on the silent mode the IP phone won t produce ring tone key tone touch sound notification sound from phone s speaker To enable the silent mode via phone user interface do one of the following Swipe down...

Страница 100: ...p of the screen to enter the control center and toggle Silent on Note Contact Management This section provides the operating instructions for managing contacts Topics include Local Directory Blacklist Remote Phone Book Mobile Contacts Silent mode is configurable via phone user interface only You may have no permission to turn on the silent mode Contact your system administrator for more informatio...

Страница 101: ...one s local directory You can add new groups and contacts edit delete or search for a contact or simply dial a contact number from the local directory Adding Groups To add a group to the local directory 1 Tap 2 Tap Settings 3 Tap New Group 4 Enter the desired group name in the highlighted field 5 Tap to accept the change 6 Tap after the group name to specify a ring tone for the group ...

Страница 102: ...ing tone refer to Adding Contacts Account ring tone refer to Ring Tones Phone ring tone refer to Ring Tones If a specific ring tone is selected this group will use the ring tone according to the priority Contact ring tone refer to Adding Contacts Group ring tone 8 Tap OK to accept the change Editing Groups To edit a group in the local directory 1 Tap 2 Tap Settings 3 Tap the desired group ...

Страница 103: ...tomizing Your Phone 103 4 Tap after the group name 5 Edit the group name in the highlighted field 6 Tap to accept the change Deleting Groups To delete a group from the local directory 1 Tap 2 Tap Settings ...

Страница 104: ...t the change or Cancel to cancel Adding Contacts You can add contacts to the local directory in one of the following ways Manually From call history From a remote phone book Adding Contacts Manually To add a contact to the local directory manually 1 Tap 2 Tap If you want to add a contact to the specified contact group you can tap the contact group ...

Страница 105: ...box If Auto is selected this contact will use the ring tone according to the priority Group ring tone refer to Adding Groups Account ring tone refer to Ring Tones Phone ring tone refer to Ring Tones 8 Tap the Photo field 9 Tap the desired photo in the pop up dialog box 10 Tap to accept the change or tap and then tap Discard to cancel Note Adding Contacts from Call History To add a contact to the l...

Страница 106: ...User Guide for SIP T58V A Smart Media Phone 106 3 Tap after the desired entry 4 Tap Add 5 Edit the corresponding fields 6 Tap to accept the change The entry is successfully saved to the local directory ...

Страница 107: ...ectory from a remote phone book 1 Tap Remote Phone Book 2 Tap the desired remote phone book The phone then connects to the remote phone book and proceeds to load it The contacts in the remote phone book are displayed on the touch screen 3 Tap after the desired contact in the remote phone book 4 Tap Add ...

Страница 108: ...verwrite the original contact Tap OK to overwrite the original contact in the local directory or Cancel to cancel For more information on remote phone book operation refer to Remote Phone Book on page 119 Editing Contacts To edit a contact in the local directory 1 Tap 2 Tap after the desired contact If the contact was added to a specified contact group you can tap the contact group first and then ...

Страница 109: ...ou want to edit 4 Tap to accept the change or tap and then tap Discard to cancel Deleting Contacts To delete a contact from the local directory 1 Tap 2 Tap after the desired contact If the contact was added to a specified contact group you can tap the contact group first and then tap after the desired contact 3 Tap Delete ...

Страница 110: ...or SIP T58V A Smart Media Phone 110 The touch screen prompts the following warning 4 Tap OK to accept the change or Cancel to cancel To delete all contacts 1 Tap 2 Tap Settings 3 Tap the Select All radio box 4 Tap ...

Страница 111: ... the change or Cancel to cancel Uploading Contact Photos To upload a new custom photo for the contact via web user interface 1 Click on Directory Local Directory 2 Click Upload Photo and then locate and upload a photo file from your local computer The web user interface prompts Upload success ...

Страница 112: ... the contact via web user interface 1 Click on Directory Local Directory 2 Click the desired contact you want to edit 3 Select the desired photo from the pull down list of Photo 4 Click Edit to accept the change The phone only supports png jpg jpeg and bmp format files The file size must be less than 2M You can only delete custom photos ...

Страница 113: ...to a specified contact group you can tap the contact group first and then do one of the following Tap the desired contact If only one number for the contact is stored in the local directory the IP phone will dial out the number If multiple numbers for the contact are stored in the local directory tap the desired number to dial out Tap after the desired contact If only one number for the contact is...

Страница 114: ...If multiple numbers for the contact are stored in the local directory tap Send to display all numbers Tap the desired number to dial out Searching for Contacts To search for a contact in the local directory 1 Tap 2 Do one of the following Tap Search ...

Страница 115: ... can dial from the result list Tap the desired letter e g T along the right side to jump to contacts whose names start with T or t Drag up and down to select the desired contact to view or dial out Importing Exporting Contact Lists You can manage your phone s local directory via phone user interface or web user interface But you can only import or export the contact list via web user interface To ...

Страница 116: ...r local system The web user interface prompts The original contact will be covered continue 3 Click OK to complete importing the contact list To import a CSV contact list file via web user interface 1 Click on Directory Local Directory 2 Click Import CSV to locate and upload a contact list file the file format must be csv from your local system ...

Страница 117: ...lete Old Contacts checkbox It will delete all existing contacts while importing the contact list 5 Click Import to complete importing the contact list To export a contact list via web user interface 1 Click on Directory Local Directory 2 Click Export XML or Export CSV 3 Click Save to save the contact list to your local system Note Importing exporting contact lists is available via web user interfa...

Страница 118: ...ls from the blacklist directory contacts will be rejected automatically To add a contact to the blacklist directory manually 1 Tap Blacklist 2 Tap 3 Enter the contact s name and the office mobile or other numbers in the corresponding fields 4 Tap the Account field 5 Tap the desired account in the pop up dialog box If Auto is selected the phone will use the default account when placing calls to the...

Страница 119: ... page 113 and or Searching for Contacts on page 114 Remote Phone Book You can add contacts to the local directory search for a contact or simply dial a contact number from the remote phone book You can configure your new phone to access up to 5 remote phone books The phone supports up to 5000 remote phone book entries For the access URL of the remote phone book contact your system administrator Fo...

Страница 120: ... the desired remote phone book The phone then connects to the remote phone book and proceeds to load it The contacts in the remote phone book are displayed on the touch screen You can tap to go back to the idle screen Incoming Outgoing Call Lookup You can enable the phone to present the caller callee identity stored in the remote phone book when receiving placing a call An access URL for a remote ...

Страница 121: ...ntacts directory of your IP phone For more information refer to Bluetooth Enabled Mobile Phone on page 141 You can add a contact to the local directory or blacklist directory from mobile contacts You cannot add a contact to the mobile contacts directory on your IP phone Note For operating instructions on placing calls to and or searching for contacts in the mobile contacts directory refer to the o...

Страница 122: ...t the corresponding fields 6 Tap to accept the change or tap and then tap Discard to cancel The entry is successfully saved to the local directory To add a contact to the blacklist directory from the mobile contacts directory 1 Tap Mobile Contacts 2 Tap after the desired contact 3 Tap Blacklist ...

Страница 123: ...he contacts temporarily on the mobile phone After updating the contacts you add edit delete on the mobile phone will sync to the mobile contacts directory Note The contact that be added to the local directory or blacklist directory will not disappear after you disconnect the mobile phone from the IP phone If you disconnect the mobile phone from IP phone while the IP phone is updating the mobile ph...

Страница 124: ...ou can view call history place a call add a contact or delete an entry from the call history list History record feature is enabled by default if you don t want to save the call history you can disable the feature Viewing History Records To view call history 1 Tap The touch screen displays all call records 2 Drag up and down to scroll You can tap Missed Calls Placed Calls Received Calls or Forward...

Страница 125: ...e touch screen Placing a Call from History Records To place a call from the call history list 1 Tap The touch screen displays all call records 2 Drag up and down to scroll You can tap Missed Calls Placed Calls Received Calls or Forwarded Calls to view entries in each call list directly 3 Tap the desired entry ...

Страница 126: ...ays all call records 2 Drag up and down to scroll You can tap Missed Calls Placed Calls Received Calls or Forwarded Calls to view entries in each call list directly 3 Tap after the desired entry 4 Tap Blacklist 5 Enter the desired values in the corresponding fields 6 Tap to accept the change or tap and then tap Discard to cancel For more information refer to Blacklist on page 118 ...

Страница 127: ...rds 2 Drag up and down to scroll You can tap Missed Calls Placed Calls Received Calls or Forwarded Calls to view entries in each call list directly 3 Tap after the desired entry 4 Tap Delete The touch screen prompts the following warning 5 Tap OK to confirm the deletion or Cancel to cancel To delete all entries from the call history list 1 Tap ...

Страница 128: ...hone 128 The touch screen displays all call records 2 Drag up and down to scroll You can tap Missed Calls Placed Calls Received Calls or Forwarded Calls to view entries in each call list directly 3 Tap Settings 4 Tap the Select All radio box ...

Страница 129: ...1 Swipe down from the top of the screen or swipe left right to go to the second idle screen 2 Tap Settings Features History Record 3 Tap the Off radio box in the History Record field 4 Tap to accept the change or to cancel Search Source List in Dialing You can search for a contact from the desired lists when the phone is in the dialing screen The lists can be Local Directory History Remote Phone B...

Страница 130: ... the display order of the enabled list select the desired list and click or 6 Click Confirm to accept the change The touch screen will display search results in the adjusted order Note To search for an entry in the enabled search source lists 1 Pick up the handset press the Speakerphone key or tap the line key 2 Enter a few continuous characters of the entry s name or continuous numbers of the ent...

Страница 131: ...rovides an introduction to wired headset use Note The SIP T58V A smart media phone supports three types of headsets YHS32 YHS33 headset USB headset and Bluetooth headset You can connect up to three types of headsets at once The IP phone will use the headset by the priority USB Bluetooth headset YHS32 YHS33 headset If both a Bluetooth headset and a USB headset are connected only the last connected ...

Страница 132: ... enter the desired number and tap Send the phone will then place a call using the headset automatically For more information on using the headset to place a call refer to Placing Calls on page 260 To deactivate the headset mode 1 Press again on the phone The HEADSET key LED goes out and the icon disappears from the status bar Headset Prior You can use headset in priority when headset prior feature...

Страница 133: ...ties while the one connected to the handset jack will only be able to listen Note To enable dual headset via web user interface 1 Click on Features General Information 2 Select Enabled from the pull down list of Dual Headset 3 Click Confirm to accept the change Note Dual headset is configurable via web user interface only If headset prior is enabled the headset mode will not be deactivated until y...

Страница 134: ...d at a time You can also share files with friends via Bluetooth You can pair and connect a Bluetooth headset speakerphone microphone or a Bluetooth enabled mobile phone to your IP phone And the Bluetooth operating instructions on different Bluetooth devices are the same The following take Bluetooth headset as example For more information on Bluetooth enabled mobile phone refer to Bluetooth Enabled...

Страница 135: ...er interface 1 Swipe down from the top of the screen or swipe left right to go to the second idle screen 2 Tap Settings Basic Bluetooth 3 Tap the Off radio box in the Bluetooth field The Bluetooth icon disappears from the status bar Bluetooth mode is configurable via web user interface at the path Features Bluetooth Pairing and Connecting the Bluetooth Headset Before you pair a Bluetooth headset c...

Страница 136: ...o to the second idle screen 2 Tap Settings Basic Bluetooth 3 Tap the On radio box in the Bluetooth field If there is no Bluetooth device found on the touch screen tap to search for the Bluetooth device 4 Tap the desired Bluetooth headset to connect to your phone Once the connection has completed successfully the prompt Connected appears under the Bluetooth headset name ...

Страница 137: ... devices the other Bluetooth devices can scan and find your IP phone But if your IP phone is not visible to other Bluetooth devices your IP phone device name will not display in scanning list of other device To make the phone discoverable 1 Swipe down from the top of the screen or swipe left right to go to the second idle screen 2 Tap Settings Basic Bluetooth 3 Tap the On radio box in the Bluetoot...

Страница 138: ...he Device Name field The default device name is Yealink T58 4 Tap to accept the change or to cancel You should make your phone discoverable first and then the pre configured Bluetooth device name will display in scanning list of other device Renaming the Paired Bluetooth Device To rename the paired Bluetooth device 1 Swipe down from the top of the screen or swipe left right to go to the second idl...

Страница 139: ...name displayed in scanning list of other devices will not be changed Note Disconnecting the Bluetooth Headset To disconnect your Bluetooth headset from your phone 1 Swipe down from the top of the screen or swipe left right to go to the second idle screen 2 Tap Settings Basic Bluetooth 3 Tap the connected Bluetooth headset 4 Tap OK to accept the change or Cancel to cancel The icon only appears afte...

Страница 140: ...ooth headset it disappears from the PAIRED DEVICES list To connect it to your phone again you just need to tap the desired Bluetooth headset in the AVAILABLE DEVICES list To unpair Bluetooth headset via phone user interface 1 Swipe down from the top of the screen or swipe left right to go to the second idle screen 2 Tap Settings Basic Bluetooth The touch screen displays the paired and connected Bl...

Страница 141: ...etooth mode making the phone discoverable editing device information renaming the paired Bluetooth device and disconnecting unpairing the paired Bluetooth enabled mobile phone refer to the operating instructions of Bluetooth Headset on page 134 Note Pairing and Connecting the Bluetooth Enabled Mobile Phone You can only connect one Bluetooth device at a time After connection the IP phone will autom...

Страница 142: ...bile phone is discoverable To pair and connect the Bluetooth Enabled Mobile Phone with your phone 1 Swipe down from the top of the screen or swipe left right to go to the second idle screen 2 Tap Settings Basic Bluetooth 3 Tap the On radio box in the Bluetooth field If there is no Bluetooth Enabled mobile phone found on the touch screen tap the Scan soft key to search for the Bluetooth Enabled mob...

Страница 143: ...the IP phone will not sync the mobile contacts If you tap Cancel you can also manually enable the mobile contacts sync feature on the IP phone For more information refer to Syncing the Mobile Contacts to the IP Phone on page 144 If you enable mobile contacts sync feature you also need to authorize the IP phone to sync the contacts temporarily on the mobile phone Once the connection has completed s...

Страница 144: ...ount key to reconnect the last paired Bluetooth Enabled mobile phone Syncing the Mobile Contacts to the IP Phone If you disable the mobile contacts sync feature when you pair and connect the Bluetooth Enabled mobile phone to the IP phone refer to Pairing and Connecting the Bluetooth Enabled Mobile Phone you need to enable the mobile contacts sync feature manually when you want to sync the mobile c...

Страница 145: ...ontacts in the mobile phone will display in the Mobile Contacts list For operating instructions on adding contact to local blacklist directory from mobile contacts directory update the mobile contacts directory or placing calls to and searching for contacts in the mobile contacts directory refer to the operating instructions of Mobile Contacts on page 121 Note If the mobile phone disconnects from ...

Страница 146: ...l from Mobile The outgoing call information will appear on both your IP phone and mobile phone screen After the call is picked up the audio goes through the IP phone although the mobile phone screen also shows a connected call You can hold mute or end the call on the IP phone and after you hold the call you can resume the call or place a new call Note You can control the call s audio to go through...

Страница 147: ...upport sending files via Bluetooth You can send pictures videos or audios to a Bluetooth enabled mobile phone or other Bluetooth devices displayed in the AVAILABLE DEVICES list For more information refer to Sharing Pictures Videos Audios on page 200 and Sharing Pictures Videos on page 215 Receiving Files via Bluetooth The Bluetooth enabled mobile phone or other Bluetooth devices can share files wi...

Страница 148: ... information refer to the documentation from the Bluetooth device manufacturer The IP phone will play a notification sound and the touch screen prompts Accept incoming file 2 Tap Accept to start receiving the file The touch screen prompts The file will be received Check progress in the Notification panel The icon will display on the status bar ...

Страница 149: ... phone supports 27 line keys and 3 programable keys Line Keys You can assign predefined functionalities to line keys You can also define a label for a line key feature which will appear on the touch screen Line keys allow you to quickly access features such as recall and voice mail The line key can indicate the monitored status when the line keys are assigned with particular features such as BLF T...

Страница 150: ...functionality to a line key via phone user interface 1 Do one of the following Tap on the home screen when there is no line key configured on your phone Drag up and down to scroll through the line key list if required Drag the line key to the Edit field Tap on the bottom left of the line key list ...

Страница 151: ...the string that will appear on the touch screen in the Label field 6 Optional Enter the corresponding value in the Value field 7 Optional Enter the corresponding value in the Extension field 8 Tap to accept the change or to cancel Changing the Location of the Line Keys You can change the line key s location to a blank area on the Line keys field You can also change the location of two line keys An...

Страница 152: ...Smart Media Phone 152 2 Drag a line key to the desired location at which another line key locates For example exchange the locations of line key 1 and line key 2 The following shows the locations of two line keys after exchange ...

Страница 153: ... 153 Deleting a Line Key To delete a line key 1 Do one of the following Drag up and down to scroll through the line keys if required Tap on the bottom left of the line key list The touch screen will display all the line keys ...

Страница 154: ...on non current page you may miss the call because there is no notification on the current page If page tips feature is enabled the breathing light will appear at the top bottom of the line key list when the status of particular feature e g BLF Line Intercom assigned to the line key on the non current page changes You can drag the line key list up or down to view the line key and the breathing ligh...

Страница 155: ...example of the breathing light appears at the top of the line key list The following figure shows an example of the breathing light appears at the bottom of the line key list To configure the page tips feature via web user interface 1 Click on DSSKey Line key ...

Страница 156: ...accept the change Note Line Key Features Line key features are explained in the following subchapters in detail Line Speed Dial Voice Mail Direct Pickup Group Pickup DTMF Prefix Local Group XML Group LDAP Conference Forward Transfer Hold DND Group Listening Zero Touch Page tips feature is configurable via web user interface only ...

Страница 157: ...to speed up dialing the numbers frequently used hard to remember or perform blind transfer conveniently during the call Dependencies Type Speed Dial Account ID the account this feature will be applied to Label key label displayed on the touch screen Value the number you want to dial out transfer to Usage When the IP phone is idle tap the speed dial key to dial out the number specified in the Value...

Страница 158: ...ickup You can use this key feature to answer incoming calls in a group that is associated with their own group Dependencies Type Key Event Key Type GPickup Account ID the account this feature will be applied to Label key label displayed on the touch screen Value the group pickup code Usage Tap the group pickup key on your phone when a phone number in the group receives an incoming call The call is...

Страница 159: ...n the Local Group field XML Group You can use this key feature to quickly access a remote group in your remote phone book You should configure a remote phone book in advance For more information refer to Remote Phone Book on page 118 Dependencies Type Key Event Key Type XML Group PhoneBook Name the remote group name you want to access if the remote phone book is configured Label key label displaye...

Страница 160: ...d an incoming call to the number specified in the Value field Note Transfer When there is an active call on the phone you can use this key feature to handle the call differently depending on the transfer mode assigned to the DSS key Dependencies Type Key Event Key Type Transfer Label key label displayed on the touch screen Value the number you want to transfer to Usage When the transfer mode via D...

Страница 161: ...e touch screen Usage When DND is in phone mode 1 Tap the DND key to enable DND 2 Tap the DND key again to disable DND When DND is in custom mode 1 Tap the DND key to access the custom DND screen You can enable or disable DND for one or all accounts Group Listening You can use this key feature to activate the Speakerphone and Handset Headset mode at the same time It is suitable for group conversati...

Страница 162: ...e network parameters in the corresponding fields 4 Tap the Next soft key 5 Configure the auto provision parameters in the corresponding fields 6 Tap the Next soft key The phone will reboot to update configurations URL You can use this key feature to trigger the phone to send an HTTP GET request containing a specific URL Dependencies Type URL Label key label displayed on the touch screen URL the UR...

Страница 163: ...one on page 141 Dependencies Type Mobile Account Label key label displayed on the touch screen Usage When the IP phone receives an incoming mobile call 1 Tap the mobile account key to accept the incoming call 2 Tap the mobile account key to place a new call and the active call is placed on hold Programable Keys You can customize the function keys To customize a programable key via web user interfa...

Страница 164: ...ist to select the desired default account Note Ext Keys If EXP50 is connected to the phone you can customize features for ext keys To customize ext keys via phone user interface 1 Long press the desired key on the EXP50 The IP phone touch screen will enter the user setting interface of this key 2 Select the desired key type from the Type field 3 Optional Select the desired key event type from the ...

Страница 165: ...interface 1 Swipe down from the top of the screen or swipe left right to go to the second idle screen 2 Tap Settings Advanced default password admin Accounts 3 Tap the desired account 4 Tap the Activation field 5 Tap Enabled in the pop up dialog box 6 Enter the desired value in the Label Display Name Register Name User Name Password and SIP Server1 2 field respectively Contact your system administ...

Страница 166: ...nts To disable an account via phone user interface 1 Swipe down from the top of the screen or swipe left right to go to the second idle screen 2 Tap Settings Advanced default password admin Account 3 Tap the desired account 4 Tap the Activation field 5 Tap Disabled in the pop up dialog box 6 Tap to accept the change or to cancel Account registration is configurable via web user interface at the pa...

Страница 167: ...ap the Default Account field 4 Tap the desired account in the pop up dialog box 5 Tap to accept the change or to cancel The label of the default account is displayed on the left of the status bar The IP phone will use this account by default when dialing out You can also tap the label of the default account and then tap the desired account to be the new default account Note Default account is conf...

Страница 168: ...s to this account will be distributed evenly among the available line keys Outgoing calls will be distributed similarly Your phone can be configured to have a combination of accounts with a single line key and accounts with multiple line keys Dial Plan Dial plan is a string of characters that governs the way your SIP T58V A smart media phone processes the inputs received from your phone keypad The...

Страница 169: ...x 001 xxx 45 xx Replace 9001 145 2 When you dial out 0012354599 on your phone the IP phone will replace the number with 90012354599 1 means 3 digits in the first parenthesis that is 235 2 means 2 digits in the second parenthesis that is 99 Note Replace Rule You can configure one or more replace rules up to 100 to remove the specified string and replace it with another string You can configure a pa...

Страница 170: ...he change To delete one or more replace rules via web user interface 1 Click on Settings Dial Plan Replace Rule 2 Select one or more replace rules by checking the checkbox es 3 Click Del to delete the replace rule s Dial now You can configure one or more dial now rules up to 100 on your phone When the dialed number matches the dial now string the number will be dialed out automatically For example...

Страница 171: ... enter the number 234 the phone will dial out 234 automatically without the pressing of any key Note Delay Time for Dial Now Rule You can configure the delay time for dial now rules That is you can configure your phone to automatically dial out the phone number which matches a dial now rule after the designated delay time To configure the delay time for dial now rule via web user interface 1 Click...

Страница 172: ...592 Min Length 1 Max Length 15 When you dial out the number 56789 the length of the number is between 1 and 15 the phone will add the area code and dial out the number 059256789 You can only configure one area code rule on your phone To configure the area code and lengths via web user interface 1 Click on Settings Dial Plan Area Code 2 Enter the desired values in the Code Min Length 1 15 and Max L...

Страница 173: ...ne the dialing will fail and the touch screen will prompt Forbidden Number To add a block out number via web user interface 1 Click on Settings Dial Plan Block Out 2 Enter the desired value in the BlockOut Number field 3 Enter the desired line ID in the Account field or leave it blank For more information on the valid values for the Account field refer to Replace Rule on page 169 4 Click Confirm t...

Страница 174: ...r to Phone Lock on page 89 Note To specify emergency numbers via web user interface 1 Click on Features Phone Lock 2 Enter the emergency number in the Emergency field For multiple emergency numbers enter a comma between every two numbers The default emergency numbers are 112 911 and 110 3 Click Confirm to accept the change Note Live Dialpad You can enable live dialpad on the SIP T58V A smart media...

Страница 175: ...er immediately upon lifting the handset pressing the Speakerphone key or tapping the line key You can also configure a delay where the phone will dial out the hotline number automatically after a designated period of time To configure the hotline number via phone user interface 1 Swipe down from the top of the screen or swipe left right to go to the second idle screen 2 Tap Settings Features Hot L...

Страница 176: ...User Guide for SIP T58V A Smart Media Phone 176 The default value is 4 5 Tap to accept the change or to cancel Hotline is configurable via web user interface at the path Features General Information ...

Страница 177: ...pics include Managing Applications and Widgets Managing Running Applications APP Accounts FileManager Gallery Recorder Camera Email Browser Calendar Calculator Clock Managing Applications and Widgets Adding a Widget to the Idle Screen The SIP T58V A smart media phone provides widgets like analog clock calendar digital clock email and photo gallery You can conveniently add these widgets to the idle...

Страница 178: ...or SIP T58V A Smart Media Phone 178 To add a widget to idle screen 1 Long tap the empty spot on the idle screen 2 Tap WIDGETS 3 Drag the desired widget up down left right to the destination spot on the idle screen ...

Страница 179: ... gallery widget you will be required to choose the desired images to display Before adding a widget to the idle screen make sure the idle screen have enough space for the widget Otherwise the widget cannot be added and the touch screen will prompt No more room on this Home screen Resizing a Widget Certain widgets such as calendar digital clock and email can be resized on the idle screen To resize ...

Страница 180: ...lication or widget you should know the following You can drag an application or widget to the rightmost of three idle screens to add an idle screen If there is only one application or widget on the screen you cannot drag the application or widget to the rightmost of three idle screens to add an idle screen The idle screen except the home screen will be deleted automatically if there is no applicat...

Страница 181: ... on the screen The application itself will not be uninstalled To remove a widget from the idle screen 1 Long tap the desired item for about 2 seconds The Remove field will appear on the top of the touch screen 2 Drag the item to the Remove field to remove it Creating a Folder You can create a folder to organize your applications For example you can place the same kind of applications in a folder ...

Страница 182: ...dia Phone 182 To create a folder 1 Drag an application icon over another application icon 2 Lift your finger when a folder frame appears around the applications A new folder containing the selected applications is automatically created ...

Страница 183: ...ination spot on the idle screen to move the application from the folder to the idle screen The folder will be deleted automatically if there is only one application in the folder To rename a folder 1 Tap the desired folder to expand the folder 2 Tap the Unnamed Folder field 3 Enter the desired folder name 4 Tap Done on the onscreen keyboard 5 Tap the blank area of the touch screen The folder name ...

Страница 184: ...tions Tap the desired application to access the application If there are no running applications the touch screen will prompt Your recent screens appear here APP Accounts Email and Calendar applications require a registered account You can create accounts to have the best experience with your phone You can also sync the account information or remove the account Adding APP Accounts To add an app ac...

Страница 185: ...System Applications 185 2 Tap Settings Basic APP accounts 3 Tap Add account 4 Tap a desired account type 5 Enter the email address 6 Tap Next or Manual setup ...

Страница 186: ...e stored on the server side and users can see them from the IP phone or other mail clients as well Please check with your network administrators for the correct email account settings for IMAP Exchange When using Exchange all emails are stored in the central Exchange mail server and can be checked using capable mail client such as Microsoft Outlook Please check with your network administrators for...

Страница 187: ...System Applications 187 9 Configure the incoming server settings 10 Tap Next 11 Configure the outgoing server settings 12 Tap Next 13 Configure the account options ...

Страница 188: ... field as the sender name 16 Tap Next You are able to start using the email account now Syncing APP Account Information To sync account information via phone user interface 1 Swipe down from the top of the screen or swipe left right to go to the second idle screen 2 Tap Settings Basic APP accounts ...

Страница 189: ...9 3 Tap the desired account type 4 Do one of the following Tap and then tap Sync now In this example it will sync both ll50466499 sina com and ll506466400 sina com information Tap a desired account Tap and then tap Sync now ...

Страница 190: ... example it will only sync ll50466499 sina com information Removing APP Accounts To remove an app account via phone user interface 1 Swipe down from the top of the screen or swipe left right to go to the second idle screen 2 Tap Settings Basic APP accounts ...

Страница 191: ...t to accept the change or Cancel to cancel FileManager FileManager is a tool that allows you to view search delete copy or move photo video audio files You can also share files via Bluetooth or email It helps you to access and manage files in internal SD card as well as USB flash drive For more information on how to connect the USB flash drive to your phone refer to Phone Installation on page 29 ...

Страница 192: ...e USB Storage field to view the pictures stored in USB flash drive Your pictures will display as a list 4 Tap the desired picture to view The IP phone will automatically launch Gallery application to preview the picture You can set the picture as wallpaper print the picture and or view detail information of the picture For more information refer to Setting a Picture as Wallpaper on page 209 Printi...

Страница 193: ...SB Storage field to view the videos stored in USB flash drive Your videos will display as a list 4 Tap the desired video to play The IP phone will automatically launch Gallery application to view the video During the playing you can do the following Tap the touch screen Then appears on the touch screen Tap to pause the playing Then appears on the touch screen Tap to continue the playing Drag the s...

Страница 194: ...to launch FileManager application 3 Tap Audios in the Local Storage field If a USB flash drive has been connected to your phone you can tap Audios in the USB Storage field to view the audios stored in USB flash drive Your audios will display as a list The menu keys and Android keys will disappear within 5 seconds you may tap the touch screen to show them again ...

Страница 195: ...aying or rewind the playing Press to adjust the volume of the speakerphone Tap to stop the playing You can also swipe down from the top of the screen to enter the control center and then tap USB to launch FileManager application to view the files if you have connected a USB flash drive to the phone Searching Files To search files 1 Swipe left or right to go to the second idle screen 2 Tap to launc...

Страница 196: ...can drag up and down to scroll through the searching results and then tap the desired result to view the file Copying Files You can copy the files that stored in the USB flash drive to internal SD card or copy the files that stored in internal SD card to the USB flash drive To copy files 1 Swipe left or right to go to the second idle screen 2 Tap to launch FileManager application 3 Tap Photos Vide...

Страница 197: ...w the files stored in USB flash drive Your files will display as a list 4 Drag up and down to scroll through the files if required 5 Tap the checkbox es before the desired file s 6 Tap The following prompt will appear on the touch screen of the phone 7 Tap the desired storage device to copy the file to 8 Tap to accept the change or to cancel ...

Страница 198: ...the file is moved the file will not be kept in the source storage device To cut files 1 Swipe left or right to go to the second idle screen 2 Tap to launch FileManager application 3 Tap Photos Videos Audios in Local Storage field If a USB flash drive has been connected to your phone you can tap Photos Videos Audios in the USB Storage field to view the files store in USB flash drive Your files will...

Страница 199: ...een will prompt Cut successfully You can also tap the Select All checkbox to cut all files Deleting Files To delete files 1 Swipe left or right to go to the second idle screen 2 Tap to launch FileManager application 3 Tap Photos Videos Audios in Local Storage field If a USB flash drive has been connected to your phone you can tap Photos Videos Audios in the USB Storage field to view the files stor...

Страница 200: ...Cancel to cancel You can also tap the Select All checkbox to delete all files Sharing Pictures Videos Audios You can share pictures videos audios with other device via Bluetooth or email Before sharing pictures videos audios via Bluetooth make sure the Bluetooth device is discoverable The operating instructions on sharing pictures video and audios are the same the following take sharing pictures a...

Страница 201: ... has been connected to your phone you can tap Photos in the USB Storage field to view the pictures stored in USB flash drive Your pictures will display as a list 4 Drag up and down to scroll through the files if required 5 Tap the checkbox es before the desired picture s 6 Tap 7 Tap Bluetooth and then tap Always or Just once ...

Страница 202: ...Note 8 Tap the desired Bluetooth device to share the pictures The touch screen will prompt Sending n file to XXX n represents the number of pictures that is being send 9 Accept the Bluetooth file transfer request on the Bluetooth device If the Bluetooth mode of the IP phone is deactivated the touch screen will prompt To use Bluetooth services you must first turn on Bluetooth Turn on Bluetooth now ...

Страница 203: ... detail information about the shared pictures To share picture s via email 1 Swipe left or right to go to the second idle screen 2 Tap to launch Gallery application 3 Tap Photos in the Local Storage field If a USB flash drive has been connected to your phone you can tap Photos in the USB Storage field to view the pictures stored in USB flash drive Your pictures will display as a list 4 Drag up and...

Страница 204: ...ment The attachment files size must be within 5MB You can also share pictures with other devices via Bluetooth or email when previewing the pictures And the operating instructions are the same with sharing pictures by Gallery application For more information refer to Sharing Pictures Videos on page 215 Gallery You can use Gallery application to view pictures videos stored in internal SD card USB f...

Страница 205: ...ond idle screen 2 Tap to launch Gallery application By default the pictures videos are displayed as thumbnails in an albums arrangement mode 3 Optional Tap Albums You can tap Albums Locations Times People Tags to view the pictures videos in different arrangement modes 4 Swipe left right to view all albums if required ...

Страница 206: ...Grid view to view the pictures in different modes Tap and then tap Slideshow to start a slide show of the pictures in the album Tap and then tap Group by Tap a desired group type in the pop up dialog box to view the pictures in different arrangement modes Tap a desired picture to preview the picture If you tap a video album you can do the following Tap the album name on top left of the touch scree...

Страница 207: ...pplications 207 Tap Filmstrip view or Grid view to view the videos in different mode Tap and then tap Group by Tap a desired group type in the pop up dialog box to view the videos in different arrangement modes ...

Страница 208: ...a picture 1 Swipe left or right to go to the second idle screen 2 Tap to launch Gallery application 3 Tap a desired picture album 4 Tap the desired pictures 5 You can do the following Tap and then tap Rotate left Rotate right to rotate the picture left right Tap and then tap Crop to resize the picture Tap and then tap Edit The touch screen will display as below ...

Страница 209: ...ure clockwise Tap Mirror to flip the picture symmetrically Tap Draw to draw the picture Tap to adjust the exposure contrast saturation etc 6 Tap SAVE to accept the change Note Setting a Picture as Wallpaper To set a picture as wallpaper 1 Preview the picture refer to Viewing Pictures Videos The menu keys and Android keys will disappear within 5 seconds you may tap the touch screen to show them aga...

Страница 210: ...as 4 Do one of the following Tap Wallpaper and then tap Set wallpaper to set the picture as phone wallpaper Tap Exp Background and then tap Set as exp background to set the picture as EXP wallpaper Note The menu keys and Android keys will disappear within 5 seconds you may tap the touch screen to show them again ...

Страница 211: ...e picture Before printing the picture make sure your phone has connected to the network printer For more information refer to the documentation from the printer manufacturer Viewing Detail Information of the Pictures Videos The operating instructions on viewing detail information of pictures and videos are the same the following take viewing detail information of pictures as example ...

Страница 212: ...A Smart Media Phone 212 To view detail information of the picture 1 Preview the picture refer to Viewing Pictures Videos 2 Tap The touch screen will display as below 3 Tap Details to view the detail information of the picture ...

Страница 213: ...owing take deleting pictures as example To delete picture s 1 Swipe left or right to go to the second idle screen 2 Tap to launch Gallery application 3 Tap a desired picture album 4 Do one of the following Long tap one of the pictures Tap on other pictures to select multiple pictures Tap and then tap Select item Tap the desired picture s to select multiple pictures ...

Страница 214: ...d picture s The touch screen prompt Delete selected item 6 Tap OK to accept the change or Cancel to cancel Taking a Picture Video Before taking a picture video you should connect the camera to the IP phone For more information on how to connect the camera refer to Insert the camera on page 30 To take a picture video 1 Swipe left or right to go to the second idle screen 2 Tap to launch Gallery appl...

Страница 215: ... pictures videos via Bluetooth make sure the Bluetooth device is discoverable The operating instructions on sharing pictures and sharing video are the same the following take sharing pictures as example To share picture s via Bluetooth 1 Swipe left or right to go to the second idle screen 2 Tap to launch Gallery application 3 Tap a desired picture album 4 Do one of the following Long tap one of th...

Страница 216: ...Media Phone 216 Tap and then tap Select item Tap the desired picture s to select multiple pictures You can also tap n items selected n represents the number of pictures you selected and then tap Select all to select all pictures 5 Tap ...

Страница 217: ... 7 Tap the desired Bluetooth device to share the pictures The touch screen will prompt Sending n file to XXX n represents the number of pictures that is being send 8 Accept the Bluetooth file transfer request on the Bluetooth device If the Bluetooth mode of the IP phone is deactivated the touch screen will prompt To use Bluetooth services you must first turn on Bluetooth Turn on Bluetooth now Tap ...

Страница 218: ...ccessfully or unsuccessfully You can tap the notification to view the detail information about the shared pictures To share picture s via email 1 Swipe left or right to go to the second idle screen 2 Tap to launch Gallery application 3 Tap a desired picture album 4 Do one of the following Long tap one of the pictures Tap on other pictures to select multiple pictures Tap and then tap Select item Ta...

Страница 219: ...subject in the Subject field 11 Tap SEND to send the email The pictures are transferred as mail attachment The attachment files size must be within 5MB Recorder You can use Recorder application to record audios and manage the recorded audios During recording you can mark specific moments so that you can quickly find and listen to them later There is a time limit 12 hours on the recorder The record...

Страница 220: ...iority USB flash drive internal SD card Note Recording Audios To record an audio 1 Swipe left or right to go to the second idle screen 2 Tap to launch Recorder application 3 Tap to start recording 4 You can do one of the following Tap to pause the recording and then tap to resume the recording The recorded audios are saved in amr format You can play the recorded audios on either the phone itself o...

Страница 221: ...or tap to cancel the recording The recorded audio will be displayed on the right list automatically Managing Recorded Audios You can also use the Recorder application to play delete rename the recorded audios To play the recorded audio 1 Swipe left or right to go to the second idle screen 2 Tap to launch Recorder application The recorded audios will display as a list 3 Tap before the desired recor...

Страница 222: ... to skip forward the playing or rewind the playing Drag the slider to the position with red flag to listen to the marked moments Press to adjust the volume of the speakerphone Tap to stop the playing To delete the recorded audio 1 Swipe left or right to go to the second idle screen 2 Tap to launch Recorder application The recorded audios will display as a list ...

Страница 223: ...udio The touch screen prompt Are you sure to delete 5 Tap OK to accept the change or Cancel to cancel If you want to delete all recorded audios tap on the top right of the touch screen To rename a recorded audio 1 Swipe left or right to go to the second idle screen 2 Tap to launch Recorder application ...

Страница 224: ... 30 The pictures videos taken by camera are saved in the internal SD card And the pictures are saved with the name consisting of a prefix IMG and date time stamp for example IMG_20160303 111413 was created on March 3 2016 at 11 14 13 The videos are saved with the name consisting of a prefix VID and date time stamp for example VID_20160303 112328 was created on March 3 2016 at 11 23 28 Note The pic...

Страница 225: ... Camera application 3 Optional Tap and then do the following Tap to turn on the camera grid Tap to configure the camera timer 4 Tap to take a picture The IP phone will play a tone You can swipe left to view all pictures taken by the camera Recording Videos To record a video 1 Swipe left or right to go to the second idle screen ...

Страница 226: ... on the camera grid 5 Tap to start recording The IP phone will play a tone and recording time will appear on the left top of the touch screen 6 Tap to stop recording The IP phone will play a tone You can swipe left to view all videos taken by the camera Camera Settings To configure camera settings 1 Swipe left or right to go to the second idle screen ...

Страница 227: ...System Applications 227 2 Tap to launch Camera application 3 Swipe right 4 Tap ...

Страница 228: ...ning in email you should configure the type of your email account Signing In Email When launching the Email application for the first time a wizard will be provided for you to set up the email account step by step To sign in email 1 Do one of the following Swipe left or right to go to the second idle screen Tap to launch Email application Swipe left or right to go to the third idle screen Tap the ...

Страница 229: ...m Applications 229 2 Tap to launch Email application 3 Tap 4 Compose the email 5 Enter the email account you want to send the email to in the To field 6 Optional Enter the email subject in the Subject field ...

Страница 230: ...mail the IP phone will play a notification sound And there is an incoming email notification on the notification center you can tap the notification to read the email To read an email 1 Swipe left or right to go to the second idle screen 2 Tap to launch Email application If the email you want to read is not in the inbox you can tap on the top left of the touch screen to select the folder that cont...

Страница 231: ...email 1 Swipe left or right to go to the second idle screen 2 Tap to launch Email application If the email you want to delete is not in the inbox you can tap on the top left of the touch screen to select the folder that contains the email you want to delete 3 Long tap the desired email ...

Страница 232: ...d idle screen 2 Tap to launch Email application If the email you want to configure is not in the inbox you can tap on the top left of the touch screen to select the folder that contains the email you want to configure 3 You can do the following Tap to mark the email as unread read Tap and then tap Print to print the email Long tap the desired email Tap and then tap Add star to star the email ...

Страница 233: ...e screen 2 Tap to launch Email application 3 Tap on the top left of the touch screen 4 Tap Settings Add account A new email account setup wizard will show up For more information refer to Adding APP Accounts on page 184 Once another email account is successfully added the touch screen will display as below You can tap on the bottom left of the touch screen to switch between the email accounts ...

Страница 234: ...84 After you sign in the email you can choose the desired folder to display on the widget If you add an email widget to display the unread emails then you want the widget to display the incoming emails you should add a new widget To use the email widget 1 Swipe left or right to go to the third idle screen 2 Tap the email widget 3 Tap the desired account if you have more than one email account ...

Страница 235: ... and FileManager applications support data transfer via Email You can send pictures audios or videos as mail attachments to other account For more information refer to Sharing Pictures Videos Audios on page 200 and Sharing Pictures Videos on page 215 Browser The Browser application could be used in a similar way as a PC based web browser i e browse web pages bookmarks set home pages clear history ...

Страница 236: ...hone will automatically retrieve and list similar websites 4 Tap the website you want to visit or enter the full URL then tap Go on the onscreen keyboard to browse the web page 5 You can do the following Scroll up down to view the web page Pinch open or pinch close the web page Managing Bookmarks You can bookmark the web pages that you frequently visit ...

Страница 237: ...en 2 Tap to launch Browser application 3 Open the web page you want to bookmark 4 Tap 5 Edit the bookmark information in corresponding fields 6 Tap OK to accept the change Then the web page is added to the BOOKMARKS list To open a web page from the bookmarks list 1 Swipe left or right to go to the second idle screen ...

Страница 238: ...hone 238 2 Tap to launch Browser application 3 Tap to access the BOOKMARKS list There are some pre configured bookmarks by default 4 Tap the web page you want to visit To edit a bookmark 1 Swipe left or right to go to the second idle screen ...

Страница 239: ...ions 239 2 Tap to launch Browser application 3 Tap to access the BOOKMARKS list There are some pre configured bookmarks by default 4 Long tap the bookmark you want to edit 5 Tap Edit bookmark in the pop up dialog box ...

Страница 240: ...h Browser application 3 Tap to access the BOOKMARKS list There are some pre configured bookmarks by default 4 Long tap the bookmark you want to delete 5 Tap Delete bookmark in the pop up dialog box 6 Tap OK to accept the change or Cancel to cancel Setting a Home Page You can set the web page you visit most frequently as the home page Then each time you open the browser this web page is automatical...

Страница 241: ...System Applications 241 To set a home page 1 Swipe left or right to go to the second idle screen 2 Tap to launch Browser application 3 Tap 4 Tap Settings General Set homepage ...

Страница 242: ...n BOOKMARKS list and then tap Set as homepage Clearing the Navigation History You can periodically clear your navigation history to protect your privacy and prevent information disclosure To clear the navigation history 1 Swipe left or right to go to the second idle screen 2 Tap to launch Browser application 3 Tap 4 Tap Settings Privacy security Clear history ...

Страница 243: ...o modify browser settings 1 Swipe left or right to go to the second idle screen 2 Tap to launch Browser application 3 Tap 4 Tap Settings 5 Customize the browser style you prefer Calendar You can use the Calendar application to synchronize events from email account as well as creating modifying and viewing the events The IP phone also provides notification for the ...

Страница 244: ...nt you should sign in an email account first If you have registered an account on the Email application already you can skip this operation To sign in calendar 1 Swipe left or right to go to the second idle screen 2 Tap to launch Calendar application 3 Tap 4 Tap Add account 5 Sign in the Calendar refer to Adding APP Accounts ...

Страница 245: ...screen 2 Tap to launch Calendar application 3 Tap a desired date 4 Tap 5 Edit the event 6 Tap DONE to accept the change or CANCEL to cancel Checking Events On the calendar screen you can check the information about an event you have added To view calendar 1 Swipe left or right to go to the second idle screen ...

Страница 246: ...ptional Tap on the top left of the touch screen Tap Day Week Month Agenda to select different time format to view the calendar In the agenda view the events you have added are displayed as a list You can tap Touch to view events before XXX Touch to view events after XXX to view all events ...

Страница 247: ...o the second idle screen 2 Tap to launch Calendar application 3 Tap 4 Tap Settings 5 Customize the general settings and account settings Calculator You can use the Calculator application to perform simple or complex calculations To access the calculator application 1 Swipe left or right to go to the second idle screen ...

Страница 248: ...unch Calculator application Clock You can use the Clock application to set an alarm check the time of other cities in the world calculate the lasting time of an event and set a timer Alarm To set an alarm clock 1 Tap the digital clock widget on the home screen ...

Страница 249: ...System Applications 249 2 Tap on the top left of the touch screen 3 Tap 4 Tap the desired number to enter the alarm time 5 Tap OK The alarm clock you have set is displayed on the touch screen ...

Страница 250: ...a desired ringtone for alarm Note To edit an alarm clock 1 Tap the digital clock widget on the home screen 2 Tap on the top left of the touch screen 3 Drag up and down to scroll through alarms 4 Select a desired alarm 5 Tap the desired option to edit the alarm clock If you have set the time format as 12 Hour you need to select AM or PM when setting the alarm time For more information on time forma...

Страница 251: ...n alarm clock 1 Tap the digital clock widget on the home screen 2 Tap on the top left of the touch screen 3 Select a desired alarm 4 Tap on the bottom left of the alarm to delete the desired alarm You can tap UNDO to cancel the deletion ...

Страница 252: ...ooze length field and then tap the desired snooze time after the alarm clock rings in the pop up dialog box Tap the Alarm volume field and then drag the slider to adjust the alarm volume Tap the Volume buttons field and then configure the desired function for the Volume key when the alarm is ringing Snooze Press when the alarm is ringing the alarm will stop and ring after a specified period of tim...

Страница 253: ...tem Applications 253 The touch screen displays the current date and time 2 Tap 3 Drag up and down to scroll through the cities 4 Tap the checkbox before the desired city 5 Tap to return to the clock screen ...

Страница 254: ...e clock display mode 1 Tap the digital clock widget on the home screen 2 Tap and then tap Settings 3 You can do the following Tap the Style field Tap Analog or Digital in the pop up dialog box Mark the Automatic home clock radio box Tap the Home time zone field Tap a desired time zone in the pop up dialog box for the home clock ...

Страница 255: ...tem Applications 255 Timer To set a timer 1 Tap the digital clock widget on the home screen 2 Tap 3 Enter the time by tapping the digits on the right of the screen You can tap to delete the entered numbers ...

Страница 256: ... add an additional minute Tap to pause the timer then you can do the following Tap to resume the timer Tap to restart the timer Tap to delete the current timer The timer beeps when the time is up It keeps beeping until you tap to stop Stopwatch To set a stopwatch 1 Tap the digital clock widget on the home screen ...

Страница 257: ...ap to pause the stopwatch Tap to reset the stopwatch Tap and then tap Bluetooth or Email to share the record via Bluetooth or email For more information refer to Sending Files via Bluetooth on page 147 and Sending Files via Email on page 235 Tap to add laps while the stopwatch is running ...

Страница 258: ...User Guide for SIP T58V A Smart Media Phone 258 ...

Страница 259: ...l This chapter provides basic operating instructions for the SIP T58V A smart media phone Topics include Placing Calls Answering Calls Ending Calls Performing Operations during a Call Changing Video Call Settings Redialing Numbers Recent Call In Dialing Auto Answer Auto Redial Call Completion Recall Call Mute Un mute Call Hold Resume Do Not Disturb DND Call Forward Call Transfer Call Waiting Confe...

Страница 260: ...parties that set up a call with you can send video If you do not connect the camera to the phone the IP phone will not transmit the near site video For more information on how to connect the camera refer to Insert the camera on page 30 You can also place an audio only call with the other party that is video enabled For more information contact your system administrator During a call you can altern...

Страница 261: ...the send key or set neither For more information refer to the Key as Send on page 88 You can also tap or to search for an entry or contact after picking up the handset and then tap the desired entry or contact to place a call Note You can also dial using the SIP URI or IP address To obtain the IP address of a phone swipe down from the top of the screen or swipe left right to go to the second idle ...

Страница 262: ...te the headset mode Enter the desired number using the keypad or the dial pad on the touch screen Press or tap Send Note The SIP T58V A smart media phone can handle multiple calls at a time However only one active call the call that has audio associated with it can be in progress at any time The SIP T58V A smart media phone can handle a maximum of 50 calls at one time To place multiple calls You c...

Страница 263: ... the headset mode deactivated tap the line key To answer a call using the headset Do one of the following Press With the headset mode activated tap the Answer soft key With the headset mode activated tap the line key You can reject incoming calls by tapping the Reject soft key to stop the phone from playing ring tone You can also activate the Do Not Disturb mode to reject the incoming calls withou...

Страница 264: ... The incoming call information is displayed on the touch screen Do one of the following Tap the Answer soft key Tap the incoming call avatar Tap Answer The incoming call is answered and the original call is placed on hold Ending Calls To end a call Do one of the following If you are using the handset tap the EndCall soft key or hang up the handset ...

Страница 265: ... screen to access the corresponding application And after the operation you can return to the call conveniently The following operations are not allowed during the call Record by Recorder application Take pictures Record videos Playback audios videos Launch Camera application Going to the Idle Screen during a Call To go to the idle screen during a call 1 Tap or to go to the idle screen To end a ca...

Страница 266: ...ndow will display all participants video image If you hold the video call or you are in an audio only call the floating video window will not display You can drag the floating video window to the desired location Returning to the Talking Screen To return to the talking screen Tap Tap the floating video window Tap Back To Talking on the top of the touch screen Changing Video Call Settings When you ...

Страница 267: ...ra will not transmit video to your contact and the far site cannot see you Stopping transmitting video does not create an audio only call Even if you stop transmitting video you can see the other party and the call is still a video call To place an audio only call contact your system administrator Changing the Video Layout during Calls During video calls near site and far site video images are dis...

Страница 268: ...terface 1 Tap the near site small window video during a video call The near site video will display in the center of the touch screen and the far site video will display on the top right of the touch screen The following figure shows what the touch screen looks like after you tap the near site video ...

Страница 269: ...screen looks like in the same size mode You can tap or the blank area of the touch screen to go back to video call screen refer to Video Call Screen Display or tap the desired image to go back to one big other small layout To change the video layout to the full screen mode during a video call via phone user interface 1 From the video call full screen do one of the following Tap the large window Pi...

Страница 270: ...big other small layout To change the video layout during a video conference call via phone user interface The default screen layout during a video conference call is the same size mode The following figure shows what the touch screen looks like during a three way video conference call You can tap or the blank area of the touch screen to go back to video call screen refer to Video Call Screen Displ...

Страница 271: ... Camera Settings on page 226 To preview the near site video when the phone is idle do one of the following Swipe down from the top of the screen to enter the control center and tap Video Swipe left or right to go to the second idle screen and tap to launch Camera application Redialing Numbers To redial the last dialed number from your phone 1 Press twice A call to your last dialed number is attemp...

Страница 272: ...st of Recent Call In Dialing 3 Click Confirm to accept the change Note To view placed calls list when the phone is on the dialing interface 1 Pick up the handset press the Speakerphone key or tap the line key The touch screen displays the placed calls list 2 Drag up and down to scroll through placed calls Recent call in dialing is configurable via web user interface only ...

Страница 273: ...st Auto Answer You can use auto answer to automatically answer an incoming call on a line Auto answer is configurable on a per line basis To configure auto answer via phone user interface 1 Swipe down from the top of the screen or swipe left right to go to the second idle screen 2 Tap Settings Features Auto Answer 3 Tap the On radio box in the desired line 4 Tap to accept the change or to cancel ...

Страница 274: ...l a phone number when the called party is busy You can also configure the number of auto redial attempts and the time to wait between redial attempts To configure auto redial via phone user interface 1 Swipe down from the top of the screen or swipe left right to go to the second idle screen 2 Tap Settings Features Auto Redial 3 Tap the On radio box in the Auto Redial field 4 Enter the desired time...

Страница 275: ... Tap to accept the change or to cancel Auto redial is configurable via web user interface at the path Features General Information To use auto redial When the called party is busy the touch screen prompts the following 1 Tap OK to activate auto redial ...

Страница 276: ...etion to notify the caller who failed to reach a desired party when the party becomes available to receive a call To enable call completion via phone user interface 1 Swipe down from the top of the screen or swipe left right to go to the second idle screen 2 Tap Settings Features Call Completion 3 Tap the On radio box in the Call Completion field 4 Tap to accept the change or to cancel Call comple...

Страница 277: ...ed When the called party becomes idle the touch screen prompts the following 1 Tap OK to redial the number Note Recall You can tap a recall key to place a call back to the last incoming call To configure a recall key via phone user interface 1 Swipe down from the top of the screen or swipe left right to go to the second idle screen Call completion is not available on all servers For more informati...

Страница 278: ...ppear on the touch screen in the Label field 9 Tap to accept the change or to cancel You can also tap on the idle screen to configure a recall key For more information refer to DSS Keys on page 149 Recall key is configurable via web user interface at the path DSSKey Line key Call Mute Un mute You can mute the microphone of the active audio device during an active call so that the other party canno...

Страница 279: ... MUTE key the phone stays in the mute state until you un mute the microphone or until the phone restarts It helps prevent the other party from hearing the noise coming from your room when auto answer is enabled on your phone When you mute the phone in an idle state or any other states the mute key LED illuminates solid red and the icon appears on the status bar To mute a call 1 Press during an act...

Страница 280: ...You can place an active call on hold Only one active call can be in progress on the phone at any time Other calls can be made and received while placing the original call on hold When you place a call on hold your IP PBX may play music to the other party while waiting To place a call on hold 1 Press or tap the Hold soft key during a call The following shows an audio only call has been held ...

Страница 281: ...the number of missed calls will appear on the touch screen and callers will receive a busy message All calls you receive while DND is enabled are logged to your missed calls list Note You can enable disable DND for the phone system or you can customize DND for each or all accounts Two DND modes Phone default DND is effective for the phone system Custom DND can be configured for each or all account...

Страница 282: ... 2 In the DND block mark the desired radio box in the Mode field 3 Click Confirm to accept the change Note To enable DND in phone mode 1 Swipe down from the top of the screen to enter the control center and toggle DND on The icon on the status bar indicates that DND is enabled DND mode is configurable via web user interface only ...

Страница 283: ...ecific account 1 Swipe down from the top of the screen to enter the control center and then tap DND The touch screen displays a list of accounts registered on the phone 2 Tap the desired account 3 Tap the On radio box in the Status field When DND and busy forward are enabled in phone mode all incoming calls will be forwarded to the configured destination number For more information on busy forward...

Страница 284: ...284 4 Optional Enter the DND on code or off code respectively in the On Code or Off Code field 5 Tap to accept the change If you enable DND for the default account the associated line icon will change to and the icon will appear on the status bar ...

Страница 285: ...the status bar Note To configure the DND authorized numbers via web user interface 1 Click on Features Forward DND 2 Select Enabled from the pull down list of DND Emergency 3 Enter the numbers in the DND Authorized Numbers field When DND and busy forward are enabled for a specific account incoming calls on the specific account will be forwarded to the configured destination number For more informa...

Страница 286: ...p the Off radio box of the DND Enable field 4 Tap to accept the change Call Forward You can configure your phone to forward incoming calls to another party static forwarding You can also forward calls while your phone is ringing dynamic forwarding You can forward an incoming call to an international telephone number This feature is enabled by default Incoming calls from some authorized numbers not...

Страница 287: ...stom Call forward can be configured for each or all accounts To configure the call forward mode via web user interface 1 Click on Features Forward DND 2 In the Forward block mark the desired radio box in the Mode field 3 Click Confirm to accept the change Note Call forward mode is configurable via web user interface only Call forward is local to the phone and may be overridden by the server settin...

Страница 288: ...ction a If you tap Always Forward 1 Tap the On radio box in the Always Forward field 2 Enter the destination number you want to forward all incoming calls to in the Forward To field 3 Optional Enter the always forward on code or off code respectively in the On Code or Off Code field b If you tap Busy Forward 1 Tap the On radio box in the Busy Forward field 2 Enter the destination number you want t...

Страница 289: ... before forwarding from the pull down list The default ring time is 12 seconds 5 Optional Enter the no answer forward on code or off code respectively in the On Code or Off Code field 5 Tap to accept the change or to cancel The icon on the status bar indicates that the call forward is enabled You can also swipe down from the top of the screen to enter the control center tap Forward to enter the de...

Страница 290: ...ttings Features Call Forward Press when the phone is idle Swipe down from the top of the screen to enter the control center and then tap Forward 2 Tap the desired account 3 Tap the desired forwarding type 4 Depending on your selection a If you tap Always Forward 1 Tap the On radio box in the Always Forward field 2 Enter the destination number you want to forward all incoming calls to in the Forwar...

Страница 291: ...al Enter the always forward on code or off code respectively in the On Code or Off Code field You can also enable always forward for all accounts Do the following 1 Tap and then tap All Lines The touch screen prompts Copy to all lines ...

Страница 292: ...io box in the Busy Forward field 2 Enter the destination number you want to forward incoming calls to when the phone is busy in the Forward To field 3 Optional Enter the busy forward on code or off code respectively in the On Code or Off Code field You can also enable busy forward for all accounts Do the following 1 Tap and then tap All Lines ...

Страница 293: ...he No Answer Forward field 2 Enter the destination number you want to forward unanswered incoming calls to in the Forward To field 3 Tap the After Ring Time field 4 Tap the desired ring time to wait before forwarding from the pull down list The default ring time is 12 seconds 5 Optional Enter the no answer forward on code or off code respectively in the On Code or Off Code field ...

Страница 294: ...e 294 You can also enable no answer forward for all accounts Do the following 1 Tap and then tap All Lines The touch screen prompts Copy to all lines 2 Tap OK to accept the change or Cancel to cancel 5 Tap and then tap Save to accept the change ...

Страница 295: ...ange to and the icon will appear on the status bar If you enable call forward for the non default account only the associated line icon will change to the icon will not appear on the status bar If you enable call forward for all accounts all line icons will change to and the icon will appear on the status bar ...

Страница 296: ... Emergency 3 Enter the numbers in the Forward Authorized Numbers field For multiple numbers enter a comma between every two numbers 4 Click Confirm to accept the change When call forward is enabled on the phone the phone cannot forward incoming calls from the numbers specified in the Forward Authorized Numbers field Note To disable call forward in phone mode Do one of the following Swipe down from...

Страница 297: ...gs Features Call Forward Press when the phone is idle Swipe down from the top of the screen to enter the control center and then tap Forward The touch screen displays a list of accounts registered on the phone 2 Tap the desired account 3 Tap the desired forwarding type 4 Tap the Off radio box 5 Tap and then tap Save to accept the change Dynamic Forwarding To forward an incoming call to another par...

Страница 298: ...onsulting Blind Transfer Before performing a blind transfer except you use dial number method make sure that the transfer mode via Dsskey is configured as Blind Transfer For more information on how to configure it refer to Configuring Transfer Mode via DssKey on page 320 To perform a blind transfer 1 Press or tap the Transfer soft key during a call 2 Do one of the following Enter the number you wa...

Страница 299: ...be configured in advance refer to Remote Phone Book on page 119 for more information Tap and then tap the desired list Tap the desired entry to complete the transfer The call is then connected to the number to which you are transferring To perform a blind transfer conveniently do one of the following When there is an active call for the account selected from the Account ID field on the speed dial ...

Страница 300: ...arty Semi Attended Transfer Before performing a semi attended transfer except you use dial number method make sure that the transfer mode via Dsskey is configured as New Call or Attended Transfer For more information on how to configure it refer to Configuring Transfer Mode via DssKey on page 320 To perform a semi attended transfer 1 Press or tap the Transfer soft key during a call 2 Do one of the...

Страница 301: ...transfer when receiving ringback If you are using a handset the transfer can be completed by hanging up the handset Attended Transfer Before performing an attended transfer except you use dial number method make sure that the transfer mode via Dsskey is configured as New Call or Attended Transfer For more information on how to configure it refer to Configuring Transfer Mode via DssKey on page 320 ...

Страница 302: ... is already an active call on the phone Otherwise another incoming call is automatically rejected by the phone with a busy message when there is an active call on the phone You can also enable or disable the phone to play a warning tone when receiving another call To configure call waiting via phone user interface 1 Swipe down from the top of the screen or swipe left right to go to the second idle...

Страница 303: ... conference call and five way audio only and video mixed conference The audio only and video mixed conference supports five parties participated including yourself at the same time including a maximum of three way video calls The following figure shows what the touch screen looks like in a mixed conference call with three way video calls and two way audio only calls To set up a local conference ca...

Страница 304: ...you have added all intended parties Note To join calls in a conference 1 Make sure you have an active call and one or more calls are on hold either on the same line key or a different line key 2 Do one of the following Drag one far site window to another far site window The phone will enter the video call full screen within 5 seconds during a call you may tap or blank area of the touch screen to s...

Страница 305: ...tures 305 The touch screen prompts the following Tap Conference Tap the desired call for conference and ensure that the call is active Tap the Conference soft key Tap the Hold call to join the calls in the conference ...

Страница 306: ...nference call Long tap the desired party if the far site only supports audio only call you can just tap it the phone will prompt a dialog box as the following picture shows You can do the following Tap Far Mute to mute the party The muted party can hear everyone but no one can hear the muted party Tap Remove to remove the party Tap Cancel or to close the dialog box Network Conference You can use n...

Страница 307: ... Click Confirm to accept the change Note To set up a network conference call 1 Place a call to the first party 2 Tap the Conference soft key to place a new call The active call is placed on hold 3 Enter the number of the second party and press or tap Conference 4 When the second party answers the call tap the Conference soft key to add the second party to the conference 5 Tap the Conference soft k...

Страница 308: ... room You can park an active call by tapping the call park key on the phone If the call is parked successfully the response is either a voice prompt confirming that the call was parked or a visible prompt on the touch screen Note To configure a call park key via phone user interface 1 Swipe down from the top of the screen or swipe left right to go to the second idle screen 2 Tap Settings Features ...

Страница 309: ...ll between phone C and B Note Call Pickup You can use call pickup to answer someone else s incoming call on your phone The SIP T58V A smart media phone supports directed call pickup and group call pickup Directed call pickup is used for picking up a call that is ringing at a target phone number Group call pickup is used for picking up a call that is ringing at any phone number in a certain group T...

Страница 310: ...ted call pickup and configure the directed call pickup code on a global basis via web user interface 1 Click on Features Call Pickup 2 Select Enabled from the pull down list of Directed Call Pickup 3 Enter the directed call pickup code in the Directed Call Pickup Code field 4 Click Confirm to accept the change To configure the directed call pickup code on a per line basis via web user interface 1 ...

Страница 311: ...s on the touch screen 2 Tap DPickup on your phone when the target phone receives an incoming call 3 Enter the phone number which is receiving an incoming call 4 Tap DPickup again The call is answered on your phone You can also configure a line key as a direct pickup key via phone user interface or web user interface Once configured you can pick up a call by tapping the direct pickup key directly F...

Страница 312: ... the pull down list of Group Call Pickup 3 Enter the group call pickup code in the Group Call Pickup Code field 4 Click Confirm to accept the change To configure the group call pickup code on a per line basis via web user interface 1 Click on Account Advanced 2 Select the desired account from the pull down list of Account 3 Enter the group call pickup code in the Group Call Pickup Code field 4 Cli...

Страница 313: ...example you want to call to consult some of the services but don t want to be harassed Anonymous call is configurable on a per line basis You can also configure the phone to send anonymous call on off code to the server to activate deactivate anonymous call on the server side Note To configure anonymous call via phone user interface 1 Swipe down from the top of the screen or swipe left right to go...

Страница 314: ... code and off code respectively in the On Code and Off Code field beneath the Send Anony Code field The phone will send the configured on code or off code depending on your selection when you enable or disable anonymous call feature on the phone 7 Tap to accept the change or to cancel Anonymous call is configurable via web user interface at the path Account Basic ...

Страница 315: ...le on a per line basis You can also configure the phone to send anonymous call rejection on off code to the server to activate deactivate anonymous call rejection on the server side To configure anonymous call rejection via phone user interface 1 Swipe down from the top of the screen or swipe left right to go to the second idle screen 2 Tap Settings Features Anonymous 3 Tap the desired line 4 Tap ...

Страница 316: ... disable anonymous call rejection feature on the phone 7 Tap to accept the change or to cancel Anonymous call rejection is configurable via web user interface at the path Account Basic If phone B has anonymous call feature enabled and places a call to your phone the call will be rejected and the touch screen of the phone B will display the following ...

Страница 317: ...fic line for status changes on the phone For example you can configure a BLF key on the phone to monitor the status of a friend s line busy or idle The BLF key icon illuminates solid red when the friend s line is in use For more information contact your system administrator Configuring the BLF Feature on the Phone You need to configure the IP phone to perform BLF monitoring IP phones being monitor...

Страница 318: ...all directly 11 Tap to accept the change or to cancel BLF key is configurable via web user interface at the path DSSKey Line key Configuring Visual and Audio Alert for BLF pickup You can enable audio alert feature for BLF pickup on the phone This allows the monitoring phone to play a warning tone when the monitored line receives an incoming call You can also enable visual alert feature for BLF pic...

Страница 319: ...F key icon flashes red The caller ID appears on the touch screen if enabled In the following figure the touch screen shows an incoming call from 1024 on the monitored line You can do the following actions Tap the DPickup soft key to pick up the call Tap the Send soft key to dial out the monitored phone number Tap the NewCall soft key to place a new call Tap the Cancel soft key to exit the screen V...

Страница 320: ...Call Pickup Code If you configure the directed call pickup code in advance you can pick up the monitored user s incoming call by tapping the BLF key You can configure the directed call pickup code when configuring a BLF key For more information refer to Configuring a BLF Key on page 317 You can also configure the directed call pickup code on a global or per line basis via web user interface If you...

Страница 321: ...onfirm to accept the change To configure the directed call pickup code on a per line basis via web user interface 1 Click on Account Advanced 2 Select the desired account from the pull down list of Account 3 Enter the desired pickup code in the Directed Call Pickup Code field 4 Click Confirm to accept the change Using BLF Feature on the Phone You can use the BLF key in the following ways Place a c...

Страница 322: ... to Blind Transfer and there is already an active call on the IP phone you can do the following 1 Tap the BLF key of the monitored user which you want to transfer this call to Then the active call is connected to the number of the monitored user To perform a semi attended transfer When the transfer mode via Dsskey is set to Attended Transfer and there is already an active call on the IP phone you ...

Страница 323: ...com including a list of user1 user2 on the server The BLF List keys on the IP phone can present the status of user1 and user2 The key icons illuminate flashing or solid depending on the status of those users For more BLF List key icon refer to Icon indicator associated with BLF BLF List on page 19 You can use the BLF List keys in the following ways When the monitored user is idle tap the BLF list ...

Страница 324: ...List Retrieve Call Parked Code has been configured in advance If the code is not configured the phone will place a call to the monitored user instead of retrieving the parked call when you tap the BLF List key To configure BLF List settings via web user interface 1 Click on Account Advanced 2 Select the desired account from the pull down list of Account 3 Enter the BLF List URI in the BLF List URI...

Страница 325: ...a prefix Screenshot and date time stamp for example Screenshot_2016 03 02 14 00 26 was created on March 2 2016 at 14 00 26 You can view the screenshots by FileManager or Gallery application For more information refer to FileManager on page 191 and Gallery on page 204 Note To capture a screenshot 1 Swipe down from the top of the screen to enter the control center 2 Tap Screenshot The pickup code is...

Страница 326: ...clude a date time stamp and the other party s number IP address name or the first person s number IP address name you called for example 20160302 1452 Tom was created on March 2 2016 at 14 52 and you have a call with Tom The recorded audio only calls are saved in aac format ou can view the recorded files by FileManager application By default the recorded files are saved in the internal SD card But...

Страница 327: ... not available When there are no connected calls on your phone When you place a new call to transfer or to conference When the phone prompts you to answer an incoming call The recording is not be paused when the following occurs You place a call on hold You mute a call You set up a conference call You perform the semi attended or attended transfer An incoming calls arrives on your phone Call Recor...

Страница 328: ...And there is a red flag on this moment when playing the recorded file If you tap the Hold soft key or press the key while recording only you are recorded If you press while recording only the callee is recorded Note When you end a call while recording the recording will be stopped and saved automatically To stop recording while the phone records do one of the following Swipe the soft key area left...

Страница 329: ...e Recording You can record conference calls in the same way as other calls with the following exceptions All conference participants are recorded while recording If one of the participants taps the Hold soft key or press the key only that participant is recorded When a conference call is placed on hold recording of the conference is paused You can place or answer other calls which will be recorded...

Страница 330: ...tures DSS Keys 3 Tap the desired line key 4 Tap the Type field 5 Tap Key Event in the pop up dialog box 6 Tap the Key Type field 7 Tap Record in the pop up dialog box 8 Optional Enter the string that will appear on the touch screen in the Label field If you record a call using a softkey the recorded file will be stored in the internal SD card or USB flash drive For more information refer to Call a...

Страница 331: ...L Record field 8 Tap to accept the change or to cancel Record and URL record keys are configurable via web user interface at the path DSSKey Line Key The Record and URL Record keys control the recording function and are available During an active call When calls are on hold or muted During a conference call The Record and URL Record keys are not available when There are no connected calls on your ...

Страница 332: ...primary motivation for hot desking is cost reduction This feature is regularly used in places where not all the employees are in the office at the same time or not in the office for very long which means that actual personal offices would be often vacant consuming valuable space and resources You can use hot desking on the SIP T58V A smart media phone to log out of existing accounts and then log i...

Страница 333: ... Label field 9 Tap to accept the change or to cancel Hot desking key is configurable via web user interface at the path DSSKey Line Key To use hot desking 1 Tap the hot desking key when the phone is idle The touch screen prompts the following warning 2 Tap OK Registration configurations of all accounts on the phone will be cleared immediately ...

Страница 334: ...m key to monitor the target extension for status changes on the phone Note Configuring the Intercom Feature on the Phone Configuring an Intercom Key To configure an intercom key via phone user interface 1 Swipe down from the top of the screen or swipe left right to go to the second idle screen 2 Tap Settings Features DSS Keys 3 Tap the desired line key 4 Tap the Type field 5 Tap Intercom in the po...

Страница 335: ...lly answers an incoming intercom call You can also enable the phone to automatically answer an incoming intercom call while there is already an active call on the phone The active call is then placed on hold Intercom features you need to know Intercom Feature Description Accept Intercom Enable or disable the IP phone to automatically answer an incoming intercom call Intercom Mute Enable or disable...

Страница 336: ...ntercom Tone is enabled by default Intercom Barge You can enable or disable the phone to automatically answer an incoming intercom call while there is already an active call on the phone If Intercom Barge is enabled the phone will automatically answer the intercom call and place the active call on hold If Intercom Barge is disabled the phone will handle an incoming intercom call like a waiting cal...

Страница 337: ... when the target phone is idle 1 Tap the intercom key The target extension plays a warning tone and automatically answers the call in the hands free speakerphone mode by default Picking up an Incoming Call of the Target Extension When the target extension receives an incoming call the intercom key icon of the target extension will become and solid If you configure the directed call pickup code in ...

Страница 338: ... that the Yealink IP phones running old firmware version old paging mechanism can be regarded as listening to channel 0 It is the default channel 1 to 25 You can broadcast audio to a specific channel We recommend that you specify these channels when broadcasting with Polycom IP phones which have 25 channels you can listening to 26 to 30 You can broadcast audio to a specific channel We recommend th...

Страница 339: ...sired channel in the Channel field The valid channel ranges from 0 to 30 11 Tap to accept the change or to cancel Multicast paging key is configurable via web user interface at the path DSSKey Line Key To configure a paging list key via phone user interface 1 Swipe down from the top of the screen or swipe left right to go to the second idle screen 2 Tap Settings Features DSS Keys 3 Tap the desired...

Страница 340: ...when the phone is idle If the paging list key is not configured you can also swipe down from the top of the screen or swipe left right to go to the second idle screen Then tap Settings Features Paging List to configure the paging list 2 Tap after the desired paging group 3 Enter the multicast IP address and port number e g 224 5 6 20 10008 in the Address field The valid multicast IP addresses rang...

Страница 341: ...p to accept the change or to cancel 7 Repeat steps 2 to 6 you can add more paging groups Paging list is configurable via web user interface at the path Directory Multicast IP To delete paging group via phone user interface 1 Tap the paging list key when the phone is idle ...

Страница 342: ...u can tap on the top right of the touch screen You can also configure the phone to use a default codec for sending multicast RTP stream via web user interface To configure a default codec for multicast paging via web user interface 1 Click on Features General Information 2 Select the desired codec from the pull down list of Multicast Codec The icon only appears after the configured paging group ...

Страница 343: ...gnored automatically If Disabled is selected from the pull down list of Paging Barge the voice call in progress will take precedence over all incoming multicast paging calls Valid values in the Paging Barge field 1 to 31 Define the priority of the active call 1 with the highest priority 31 with the lowest Disabled The voice call in progress will take precedence over all incoming paging calls If G7...

Страница 344: ...e 3 Select the desired value from the pull down list of Paging Priority Active 4 Enter the multicast IP address es and port number e g 224 5 6 20 10008 which the phone listens to for incoming RTP multicast in the Listening Address field 5 Optional Enter the label in the Label field Label will appear on the touch screen when receiving the multicast RTP stream 6 Select the desired channel to listen ...

Страница 345: ...on is established again Tap the EndCall soft key to cancel the multicast RTP session Tap the Record soft key to record a call To stop recording tap the Stop soft key Note To send RTP stream via a paging key list when the receiver s phone is idle 1 Tap paging list key when the phone is idle 2 Do one of the following to send RTP Tap the desired paging group Tap after the desired paging group and the...

Страница 346: ...d the phone will send a SIP INVITE message to the Music on Hold Server account The Music on Hold Server account automatically answers the SIP INVITE messages and immediately plays audio from some source located anywhere LAN Internet to the held party Contact your system administrator for the SIP URI To configure music on hold server via web user interface 1 Click on Account Advanced 2 Select the d...

Страница 347: ...all to this extension will cause both phones to ring simultaneously The incoming call can be answered on either phone but not both This feature is very useful in the boss and secretary scenario For example the secretary can share the boss s extension on her phone When there is an incoming call to the extension of the boss both the phones of the boss and the secretary will ring simultaneously Eithe...

Страница 348: ...ed line on the phone If auto linekeys feature is enabled For example party A party B share the account 4603 phone A registers the primary account 4603 and assigns line key 1 and line key 2 for the account 4603 phone B registers the alternate account 4603_1 and assigns line key 1 and line key 2 for the account 4603_1 phone C registers the account 4604 To configure the auto linekeys feature via web ...

Страница 349: ...Advanced Phone Features 349 If Auto LineKeys is enabled you can automatically assign multiple DSS keys with Line type for a registered shared line on the phone 3 Click Confirm to accept the change ...

Страница 350: ...er of line key on phone A via web user interface 1 Register the primary account 4603 2 Click on Advanced and then select Share Call Appearance from the pull down list of Shared Line 3 Enter the desired number in the Number of line key field This field appears only if Auto Linekeys feature is enabled ...

Страница 351: ...t value is 1 In this example the value is set to 2 4 Click Confirm to accept the change The phone A will automatically configure the line keys from the first unused DSS key according to the configured number in the Number of line key field ...

Страница 352: ...eb user interface 1 Register the alternate account 4603_1 Enter the primary account 4603 in the Register Name field 2 Click on Advanced and then select Share Call Appearance from the pull down list of Shared Line 3 Enter the desired number in the Number of line key field This field appears only if Auto Linekeys feature is enabled ...

Страница 353: ...e you can retrieve the held call on either phone A or phone B when you place a call on public hold you can retrieve the held call only on phone A when you place a call on private hold on phone A By default the private hold soft key isn t displayed on the touch screen You need to configure either the private hold soft key or a private hold key before you place the call on private hold To configure ...

Страница 354: ...left right to go to the second idle screen 2 Tap Settings Features DSS Keys 3 Tap the desired line key 4 Tap the Type field 5 Tap Key Event in the pop up dialog box 6 Tap the Key Type field 7 Tap Private Hold in the pop up dialog box 8 Optional Enter the string that will appear on the touch screen in the Label field Configuring the private hold soft key may affect the softkey layout in the Talking...

Страница 355: ... Pull Feature Access Code field 4 Click Confirm to accept the change The phone will dial out 11 automatically when you tap the CallPull soft key Using SCA Feature on the IP Phone This section provides you with detailed information on using the SIP T58V A smart media phone in a SCA Hybrid Key System scenario In a SCA Hybrid Key System scenario the status of the line key icon which associates with a...

Страница 356: ...f phone A do one of the following on phone A Press or tap the Hold soft key The original call is placed on hold Tap the NewCall soft key to enter the dialing screen Enter the desired number using the keypad or the dial pad on the touch screen Press or tap Send Phone A will dial the entered number using the line key 2 automatically Tap the line key The original call is placed on hold Enter the desi...

Страница 357: ... phone A displays the information of the incoming call e g Incoming call pbx yealink com Note Do one of the following on phone A Tap the line key 2 Phone B stops ringing Tap the Answer soft key Phone B stops ringing Tap the incoming call prompt box Tap the Answer soft key Phone B stops ringing The incoming call is answered and the original call is placed on hold The icon indicators of the line key...

Страница 358: ... on the line key 1 Note Placing a Call on Hold To place a call on public hold 1 Press or tap the Hold soft key on phone A when party A and party C are talking The icon indicators of line key 1 on phone A and phone B will become To place a call on private hold 1 Press the PriHold soft key or private hold key on phone A when there is an active call on the shared line You may need to swipe the soft k...

Страница 359: ... conversation between phone A and phone C is retrieved To retrieve the call on phone B Do one of the following Tap Long tap the desired line key The Cancel CallPull NewCall and Retrieve soft keys appear on the touch screen Tap the Retrieve soft key to retrieve the call The conversation is established between phone B and phone C phone A disconnects the call And the line key icon on phone A and phon...

Страница 360: ...ill set up a conference call with the other parties in the active call 3 Press tap the Hold soft key or the EndCall soft key If any party in the conference call presses or taps the Hold soft key two way voice can be heard between the remaining parties If party A or party B taps the EndCall soft key the remaining parties are still connected If the other party not the shared line party taps the EndC...

Страница 361: ...e In soft key to interrupt the active call of phone A Party B may hear a warning tone and then set up a conference call with the other parties of the active call 4 Press tap the Hold soft key or the EndCall soft key If any party in the conference call presses taps the Hold soft key two way voice can be heard between the remaining parties If party A or party B taps the EndCall soft key the remainin...

Страница 362: ... B and phone C To retrieve a call from another shared phone If there is an active call between phone A and phone C do the following 1 Long tap the desired line key on phone B The Cancel CallPull NewCall and Barge In soft keys appear on the touch screen of phone B 2 Tap the CallPull soft key The active call has been retrieved from the phone A successfully If there is a held call between phone A and...

Страница 363: ...or LED will slowly flash red and the touch screen will prompt n New Voice Mail s n indicates the number of unread voice mails e g 176 New Voice Mail s and display an icon If the voice mail pop up message box disappears it won t pop up again unless the user receives a new voice mail or the user re registers the account that has unread voice mail s Note You can configure the phone not to display the...

Страница 364: ...p Set Voice Mail 4 Enter the voice mail access code e g 88 in the desired account field 5 Tap to accept the change or to cancel Note Listening to Voice Mails To listen to voice mails 1 When the touch screen prompts that the phone receives a new voice mail press or tap Connect to dial out the voice mail access code 2 Follow the voice prompt to listen to your voice mails Note Voice mail access codes...

Страница 365: ...power indicator LED slowly flashes red This will be cleared when you retrieve all voice mails or delete them The MWI service is unsolicited for some servers so the SIP T58V A smart media phone only handles the MWI messages sent from the server But for other servers the MWI service is solicited so the SIP T58V A smart media phone must enable subscription for MWI Note The MWI subscription parameters...

Страница 366: ...cription Period Seconds field 5 Click Confirm to accept the change The IP phone will subscribe to the account number for MWI service by default To enable subscribe MWI to voice mail via web user interface 1 Click on Account Advanced 2 Select the desired account from the pull down list of Account 3 Select Enabled from the pull down list of Subscribe for MWI 4 Select Enabled from the pull down list ...

Страница 367: ... voice mail number in the Voice Mail field 6 Click Confirm to accept the change The IP phone will subscribe to the voice mail number for MWI service using Subscribe MWI To Voice Mail Note MWI subscription is configurable via web user interface only ...

Страница 368: ...User Guide for SIP T58V A Smart Media Phone 368 ...

Страница 369: ...e safety instructions before use The following basic safety precautions should always be followed to reduce the risk of fire electrical shock and other personal injury General Requirements Before you install and use the device read the safety instructions carefully and observe the situation during operation During the process of storage transportation and operation please always keep the device dr...

Страница 370: ...ind on the product or use the equipment near water for example near a bathtub washbowl kitchen sink wet basement or near a swimming pool Do not tread on pull or over bend any cable in case of malfunction of the device During a thunderstorm stop using the device and disconnect it from the power supply Unplug the power plug and the Asymmetric Digital Subscriber Line ADSL twisted pair the radio frequ...

Страница 371: ...rtugal Lisboa Porto Funchal Spain Canary Islands Las Palmas United Kingdom London 1 Albania Tirane Austria Vienna Belgium Brussels Caicos Chad Croatia Zagreb Czech Republic Prague Denmark Kopenhagen France Paris Germany Berlin Hungary Budapest Italy Rome Luxembourg Luxembourg Macedonia Skopje Namibia Windhoek Netherlands Amsterdam Spain Madrid 2 Estonia Tallinn Finland Helsinki Gaza Strip Gaza Gre...

Страница 372: ...ey Melboume Canberra Russia Vladivostok 10 30 Australia Lord Howe Islands 11 New Caledonia Noumea Russia Srednekolymsk Time 11 30 Norfolk Island 12 New Zealand Wellington Auckland Russia Kamchatka Time 12 45 New Zealand Chatham Islands 13 Tonga Nukualofa 13 30 Chatham Islands 14 Kiribati ...

Страница 373: ...308 Call Pickup 309 Call Recording 326 Call Recording Using a Record Key 330 Call Transfer 298 Call Waiting 302 Camera 224 Camera Settings 226 Changing Video Call Settings 266 Changing the Video Layout during Calls 267 Checking Events 245 Clearing the Navigation History 242 Clock 248 Conference 303 Configuration Screen Display 42 Configuring an Access URL 119 Configuring the BLF Feature on the Pho...

Страница 374: ... Dialpad 174 Listening to Voice Mails 364 Local Conference 303 Local Directory 101 M Making the Phone Discoverable 137 Managing Applications and Widgets 177 Managing Bookmarks 236 Managing Running Applications 184 Managing Recorded Audios 221 Manually Connect an Available Wireless Network 59 Message 363 Message Waiting Indicator MWI 365 Mobile Contacts 121 Modifying Browser Settings 243 Modifying ...

Страница 375: ...rding 287 Stopping Transmitting Video during a Call 267 Stopwatch 256 System Applications 177 System Customizations 131 T Table of Contents vii Taking Pictures 225 Taking a Picture Video 214 The Home Screen 36 The Second Idle Screen 37 The Third Idle Screen 38 Touch Sounds 98 Time Date 85 Timer 255 U Unpairing the Bluetooth Device 140 Uploading Contact Photos 111 Uploading the Custom Picture via W...

Отзывы: