7.4 Registering Instructions
7-14
4
(cont’d)
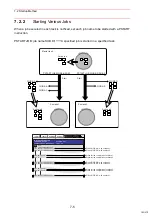
To change the synchronization number, select “1” of “SYNCHRO
NO.” When the number input status enters, enter the synchroni-
zation number, “SYNCHRO NO.” by pressing the Numeric keys,
and press [ENTER].
To add the number of synchronized tasks, select “UNUSED” of
“SYNCHRO NUM.” The selection dialog box appears. Select
“SNUM=.”
After changed or added the additional items, press [ENTER]. The
DETAIL EDIT window is closed, and the JOB CONTENT window
appears.
5
Press [INSERT] and [ENTER]. The instruction displayed in the input buffer line is registered.
Operation
Explanation
TSYNC
2
UNUSED
TSYNC 2
SYNCHRO NO.
SYNCHRO NUM
Short Cut
Main Menu
DETAIL EDIT
EDIT
DISPLAY
UTILITY
JOB
TSYNC
2
SNUM=
3
TSYNC 2 SNUM=3
SYNCHRO NO.
SYNCHRO NUM
Short Cut
Main Menu
DETAIL EDIT
EDIT
DISPLAY
UTILITY
JOB
172/210


