background image

3.2  Operating Procedures for Utility Functions 

3.2.3  Origin Search (Fn003)

3-14

3

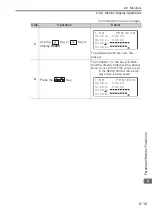
Press the 

 Key.

The status display will change to 

1:RUN

 and the motor will change to 

the servo ON state.

Note: If the Servomotor is already at the 

origin, 

Complete

 will be displayed.

4

Press the 

 Key. The Servomo-

tor will rotate in the forward direc-
tion and stop at the origin within 

one rotation. (Press the 

 Key 

to operate the motor in the reverse 
direction and stop at the phase-C 
position.) Hold down the key until 
the motor stops.

If the origin search is completed 
normally, 

Complete

 will be dis-

played in the upper right corner of 
the display.

5

Press the 

 Key.

The status display will change to 

1:BB

 and the motor will change to 

the servo OFF state. The display will 
change from 

Complete

 to 

Z-

Search.

6

Press the 

 Key.

The display will return to the Utility 
Mode Main Menu.

7

Turn the SERVOPACK power sup-
ply OFF and ON again.

Continued from previous page.

Step

Operation

Result

U n 0 0 0 =

0

0 0 0 0 0

U n 0 0 2 =

0

0 0 0 0 0

U n 0 0

3

=

0

0 0 0 0 0 0 0 7 7 4

U n 0 0 D =

0

0 0 0 0 0 0 0 0 0 0

1 : R U N             Z -

S

e a r c h

U n 0 0 0 =

0

0 0 0 0 0

U n 0 0 2 =

0

0 0 0 0 0

U n 0 0

3

=

0

0 0 0 0 0 0 0 0 0 0

U n 0 0 D =

0

0 0 0 0 0 0 1 D 5 8

1 : R U N             C o m p l e t e

U n 0 0 0 =

0

0 0 0 0 0

U n 0 0 2 =

0

0 0 0 0 0

U n 0 0

3

=

0

0 0 0 0 0 0 0 0 0 0

U n 0 0 D =

0

0 0 0 0 0 0 1 D 5 8

1 : B B                 Z -

S

e a r c h

1 : B B

F U N C T I O N

F n 0 0 2 : J O G
F n 0 0

3

: Z -

S

e a r c h

F n 0 0 4 : P r o g r a m   J O G
F n 0 0 5 : P r m   I n i t

Содержание E7 Drive

Страница 1: ...Model JUSP OP05A 1 E Digital Operator 7 Series AC Servo Drive Operating Manual MANUAL NO SIEP S800001 33F 1 2 3 4 Introduction Parameter Monitor Functions Utility Functions Parameter Copy Functions...

Страница 2: ...liability is assumed with respect to the use of the information contained herein Moreover because Yaskawa is con stantly striving to improve its high quality products the information contained in this...

Страница 3: ...of the chapters of this manual are described in the following table Refer to these chapters as required Chapter Chapter Title Contents 1 Introduction Describes the names of Digital Operator parts how...

Страница 4: ...7C Servomotors Other Documents Built in Function Manuals 7 Series 7S 7W SERVOPACK Product Manuals 7 Series 7S 7W SERVOPACK Hardware Option Product Manuals Option Module User s Manuals 7 Series 7S 7W...

Страница 5: ...23 Provides detailed infor mation on 7 Series AC Servo Drives including features and specifications Built in Function Manuals 7 Series AC Servo Drive 7C SERVOPACK Motion Control User s Manual SIEP S8...

Страница 6: ...Series 263IF 01 EtherNet IP Communication Module User s Manual SIEP C880700 39 Machine Controller MP2000 Series I O Module User s Manual SIEP C880700 34 Provide detailed infor mation on the specifi ca...

Страница 7: ...es Installation Guide Fully closed Module TOBP C720829 03 Provides detailed pro cedures for installing the Fully closed Mod ule in a SERVOPACK V Series V Series for Large Capacity Models 7 Series Inst...

Страница 8: ...ing in trial operation and tuning Servo Drives writing monitoring and main taining programs and other information 7 Series 7C SERVOPACK Troubleshooting Manual 7 Series AC Servo Drive 7C SERVOPACK Trou...

Страница 9: ...n for tuning monitoring and main taining the Servo Drives 7 Series AC Servo Drive 7S SERVOPACK with MECHATROLINK III Communications References Product Manual SIEP S800001 28 7 Series AC Servo Drive 7S...

Страница 10: ...odule Product Manual SIEP S800001 70 7 Series AC Servo Drive 7W SERVOPACK with MECHATROLINK III Communications References Product Manual SIEP S800001 29 7 Series 7S 7W SERVOPACK with Hardware Option S...

Страница 11: ...oduct Manual SIEP S800001 89 7 Series AC Servo Drive 7S SERVOPACK with FT EX Specification for Application with Special Motor SGM7D Motor Product Manual SIEP S800001 91 7 Series AC Servo Drive 7S SERV...

Страница 12: ...AC Servo Drives V Series V Series for Large Capacity Models 7 Series User s Manual Safety Module SIEP C720829 06 Provides detailed infor mation required for the design and mainte nance of a Safety Mod...

Страница 13: ...ive Servomotor Product Manual SIEP S800001 38 7 Series Peripheral Device Selection Manual 7 Series AC Servo Drive Peripheral Device Selection Manual SIEP S800001 32 Provides the following information...

Страница 14: ...file Command Manual SIEP S800002 32 Provides detailed infor mation on the MECHATROLINK 4 communications stan dard servo profile com mands that are used for a 7 Series Servo System Programming Manuals...

Страница 15: ...led oper ating procedures for the SigmaWin Engi neering Tool for a 7 Series Servo System Distributed I O Module User s Manual MECHATROLINK III Compatible I O Module User s Manual SIEP C880781 04 Descr...

Страница 16: ...rvomotor and SERVOPACK Servo System A servo control system that includes the combination of a Servo Drive with a host controller and peripheral devices servo ON Supplying power to the motor servo OFF...

Страница 17: ...everse Signals The names of reverse signals i e ones that are valid when low are written with a forward slash before the signal abbreviation Notation Example BK is written as BK Rotary Servomotors Lin...

Страница 18: ...t for the parameter Position Speed Parameter Meaning When Enabled Classification After startup Setup Parameter number Setting Range 10 to 20 000 0 1 Hz 400 Immediately Setting Unit Default Setting Whe...

Страница 19: ...ng aids are used to indicate certain types of information for easier reference Indicates precautions or restrictions that must be observed Also indicates alarm displays and other precautions that will...

Страница 20: ...ation marked as shown below is important for safety Always read this information and heed the precautions that are provided DANGER Indicates precautions that if not heeded are likely to result in loss...

Страница 21: ...e of the product or burning WARNING Use a power supply with specifications number of phases volt age frequency and AC DC type that are appropriate for the product There is a risk of burning electric s...

Страница 22: ...ns in this document There is a risk of injury product damage or machine damage Do not use the product in an environment that is subject to water corrosive gases or flammable gases or near flammable ma...

Страница 23: ...gases Locations that are near flammable materials Locations that are subject to dust salts or iron powder Locations that are subject to water oil or chemicals Locations that are subject to vibration...

Страница 24: ...amaged by the gases or fumes resulting from the fumigation process In partic ular disinfectants containing halogen which includes chlorine fluo rine bromine or iodine can contribute to the erosion of...

Страница 25: ...or chemicals Locations that are subject to vibration or shock that exceeds product specifications Locations that are subject to radiation If you store or install the product in any of the above locati...

Страница 26: ...work This could damage the machine or cause an accident that may result in death or injury Connect the AC and DC power supplies to the specified SERVO PACK terminals Connect an AC power supply to the...

Страница 27: ...lure or malfunction Connect wires to power supply terminals and motor connection terminals securely with the specified methods and tightening torque Insufficient tightening may cause wires and termina...

Страница 28: ...I O Signal Cables or Encoder Cables together or run them through the same duct If you do not place power lines and low current lines in separate ducts separate them by at least 30 cm If the cables ar...

Страница 29: ...nd discon nect it from the machine There is a risk of injury Forcing the motor to stop for overtravel is disabled when the Jog Origin Search or Easy FFT utility function is executed Take nec essary pr...

Страница 30: ...he servo the Ser vomotor will stop as follows If you turn OFF the main circuit power supply during operation with out turning OFF the servo the Servomotor will stop abruptly with the dynamic brake If...

Страница 31: ...m or warning may occur if communications are performed with the host controller while the SigmaWin or Digital Operator is operating If an alarm or warning occurs it may interrupt the current process a...

Страница 32: ...ameter settings or if the copy operation is not completed normally normal operation may not be possible possibly resulting in machine or equipment damage NOTICE Discharge all static electricity from y...

Страница 33: ...ay flow possibly resulting in fire If an alarm occurs shut OFF the main circuit power supply There is a risk of fire due to a regenerative resistor overheating as the result of regenerative transistor...

Страница 34: ...of this document because it has been lost or damaged contact your nearest Yaskawa representative or one of the offices listed on the back of this document This document is subject to change without n...

Страница 35: ...red product in a manner in which it was not originally intended Causes that were not foreseeable with the scientific and technological understanding at the time of shipment from Yaskawa Events for whi...

Страница 36: ...r property Systems that require a high degree of reliability such as systems that supply gas water or electricity or systems that operate continuously 24 hours a day Other systems that require a simil...

Страница 37: ...gital Operator Types and Connections 1 2 1 2 Part Names and Functions 1 5 1 3 Changing Functions 1 7 1 4 Status Indications 1 8 Parameter Monitor Functions 2 2 1 Parameters 2 2 2 1 1 Setting Parameter...

Страница 38: ...rent Detection Signal Offset Fn00E 3 33 3 2 14 Manually Adjust Motor Current Detection Signal Offset Fn00F 3 35 3 2 15 Write Prohibition Setting Fn010 3 38 3 2 16 Display Servomotor Model Fn011 3 41 3...

Страница 39: ...ization FnB08 3 123 3 2 40 Absolute Encoder Origin Setting FnB09 3 125 3 2 41 INDEXER Status Monitor FnB0A 3 127 3 2 42 INDEXER Parameter Setting Initialization FnB0B 3 132 3 2 43 INDEXER Alarm Reset...

Страница 40: ...you can use with 7 Series SERVOPACKs as well as the names of parts how to change between func tions and the status indications 1 1 Digital Operator Types and Connections 1 2 1 2 Part Names and Functio...

Страница 41: ...ters in a SERVO PACK You can use the following two types of Digital Operators with 7 Series SERVOPACKs Digital Operator for V Series and 7 Series SERVOPACKs JUSP OP05A 1 E Digital Operators for III Se...

Страница 42: ...ERVOPACKs JUSP OP05A 1 E To use the Digital Operator for V Series and 7 Series SERVOPACKs JUSP OP05A 1 E connect it to the CN3 connector on the SERVO PACK VCMP SVON COIN TGON REF CHARGE ALARM DATA JOG...

Страница 43: ...OP05A and JUSP OP05A E with a 7 Series SERVOPACK To do so use the JZSP CVS05 A3 E Digital Operator Converter Cable to connect to the SERVOPACK Connect to the CN3 connector on the SERVOPACK VCMP SVON C...

Страница 44: ...ence TGON Lit while the motor is operating REF Lit when the speed reference input is larger than the rotation detection level Pn502 Position control Lit while a reference pulse is being input Torque c...

Страница 45: ...in it moves the cursor up one line In Utility Mode moves the cursor up four lines at a time Turns the servo ON and OFF as required to execute utility func tions For example this is necessary to execut...

Страница 46: ...x i s 0 1 A C 9 0 A x i s 0 2 F i l e l i s t l o a d i n g P l e a s e w a i t Power ON Initial Display Displayed for approx two seconds Parameter Copy Mode Main Menu Dis play You can copy parameters...

Страница 47: ...ocked RUN Motor is operating A An alarm has occurred is the alarm code PT NT Forward drive and reverse drive prohibited overtravel status P OT Forward drive prohibited overtravel status N OT Reverse d...

Страница 48: ...meter monitor functions 2 1 Parameters 2 2 2 1 1 Setting Parameters 2 2 2 1 2 Types of Parameters 2 6 2 2 Monitors 2 7 2 2 1 Monitor Items 2 7 2 2 2 Interpreting the Monitor Displays 2 10 2 2 3 Monito...

Страница 49: ...and Pn001 Application Function Selections 1 require you to set each digit The following example shows how to set Pn000 n X Rotation Direction Selection to 1 reverse rotation Step Operation Result 1 Pr...

Страница 50: ...ave changed a parameter for which the power supply must be turned OFF and ON again an A 941 alarm Change of Parameters Requires Restart will be displayed 7 Turn the SERVOPACK power sup ply OFF and ON...

Страница 51: ...irst digit on the right in the setting will flash Continued on next page 1 B B P R M M O N U n 0 0 0 0 0 0 0 0 0 U n 0 0 2 0 0 0 0 0 0 U n 0 0 8 0 0 0 0 0 0 0 0 0 0 0 U n 0 0 D 0 0 0 0 0 0 0 0 0 0 0 1...

Страница 52: ...e setting from 500 to 1 000 9 Press the Key The parameter setting is saved in the SERVOPACK and the cursor moves to the parameter number Continued from previous page Step Operation Result 1 B B P R M...

Страница 53: ...ced Autotuning with Reference Fn202 on page 3 79 3 2 30 One Parameter Tuning Fn203 on page 3 84 You can also set the tuning parameters individually to make adjust ments Refer to the following section...

Страница 54: ...oder pulses from the polarity origin displayed in decimal Linear encoder pulses Un004 Rotary Servomotors Rotational Angle 2 electrical angle from polarity origin deg Linear Servomotor Electrical Angle...

Страница 55: ...n settings 2 2 Un015 Safety I O Signal Monitor Un020 Rated Motor Speed min 1 Un021 Maximum Motor Speed min 1 Un025 SERVOPACK Installation Environment Monitor Un026 1 Servomotor Installation Environmen...

Страница 56: ...rs cannot be used for Analog Voltage Pulse Train Reference SERVO PACKs 3 Scale pitch Un084 10Un085 pm Un041 Position within One Rotation of Absolute Encoder Encoder pulses Un042 Lower Bits of Absolute...

Страница 57: ...ations 1 CN1 40 S ON Servo ON signal 2 CN1 41 P CON Proportional Control signal 3 CN1 42 P OT Forward Drive Prohibit signal 4 CN1 43 N OT Reverse Drive Prohibit signal 5 CN1 44 ALM RST Alarm Reset sig...

Страница 58: ...signal 2 CN1 4 N OT Reverse Drive Prohibit signal 3 CN1 5 DEC Origin Return Deceleration Switch signal 4 CN1 6 EXT1 External Latch Input 1 signal 5 CN1 7 EXT2 External Latch Input 2 signal 6 CN1 8 EXT...

Страница 59: ...ame 1 You can change the allocations 1 CN1 31 and CN1 32 ALM Servo Alarm signal 2 2 CN1 25 and CN1 26 COIN Positioning Completion signal or V CMP Speed Coincidence Detection signal 3 CN1 27 and CN1 28...

Страница 60: ...ange the allocations 1 CN1 19 and CN1 20 ALM Servo Alarm signal for axis 1 2 2 CN1 21 and CN1 22 ALM Servo Alarm signal for axis 2 2 3 CN1 23 and CN1 24 BK Brake signal for axis 1 4 CN1 25 and CN1 26...

Страница 61: ...to move the cursor to the bottom line 3 Use the Key or Key to display Un006 4 Press the Key once to move the cursor up one line Continued on next page Motor Speed Torque Reference Input Signal Monitor...

Страница 62: ...dicator on the key will flash and the display status will be saved Note Do not turn OFF the power supply to the SERVOPACK while the dis play status is being saved Continued from previous page Step Ope...

Страница 63: ...g Program Fn004 3 15 3 2 5 Initialize Parameters Fn005 3 18 3 2 6 Clear Alarm History Fn006 3 20 3 2 7 Reset Absolute Encoder Fn008 3 21 3 2 8 Autotune Analog Speed Torque Reference Offset Fn009 3 23...

Страница 64: ...et Origin Fn020 3 58 3 2 24 Reset Motor Type Change Detected Status Fn021 3 60 3 2 25 Software Reset Fn030 3 61 3 2 26 Polarity Detection Fn080 3 64 3 2 27 Tuning less Level Setting Fn200 3 67 3 2 28...

Страница 65: ...der Origin Setting FnB09 3 125 3 2 41 INDEXER Status Monitor FnB0A 3 127 3 2 42 INDEXER Parameter Setting Initialization FnB0B 3 132 3 2 43 INDEXER Alarm Reset FnB0C 3 134 3 2 44 INDEXER Alarm History...

Страница 66: ...sets any absolute encoder alarms and resets the multiturn data to zero Wrt OFF Fn009 Autotune Analog Speed Torque Reference Offset Automatically adjusts the speed or torque analog reference offset Wrt...

Страница 67: ...e motor from the origin in the SERVO PACK Wrt OFF Fn021 Reset Motor Type Change Detected Status Deletes detection alarms Wrt Fn030 Software Reset Internally performs a software reset of the SERVOPACK...

Страница 68: ...s the notch filters Wrt OFF FnB03 Edit Save Program Table Used to edit or save program tables Wrt FnB04 Edit Save ZONE Table Used to edit or save ZONE tables Wrt FnB05 Edit Save Jog Speed Table Used t...

Страница 69: ...i e when Fn010 is set to 0001 the display will change as shown below The following term definitions are used in this section Servo Ready The main circuit power supply is ON There are no alarms There...

Страница 70: ...t have occurred A time stamp gives the total operation time to the point at which the alarm occurred in increments of 100 ms from when the control power supply and main circuit power supply were turne...

Страница 71: ...history Step Operation Result 1 Press the Key to display the Utility Mode Main Menu and then use the Key or Key to select Fn000 2 Press the Key The Fn000 Display Alarm History display will appear 3 Pr...

Страница 72: ...hine Also to prevent the motor from falling over secure it to the machine The range of motion of your machine must be considered when you set the jogging speed The jogging speed is set in Pn304 Joggin...

Страница 73: ...Key to set Pn304 Jogging Speed to 1 000 5 Press the Key The setting will be saved and the cursor will move to the parameter number Continued on next page 1 B B F U N C T I O N F n 0 0 0 A l m H i s t...

Страница 74: ...re does not increase abnormally 8 Press the Key The status display will change to BB and the motor will change to the servo OFF state 9 Press the Key The display will return to the Utility Mode Main M...

Страница 75: ...e Pro hibit input signal are disabled during an origin search Preparations Always check the following before you execute an origin search The parameters must not be write prohibited Fn010 must be set...

Страница 76: ...he Key The status display will change to 1 BB and the motor will change to the servo OFF state The display will change from Complete to Z Search 6 Press the Key The display will return to the Utility...

Страница 77: ...must be OFF The servo must be in ready status The range of machine motion and the safe movement speed of your machine must be considered when you set the travel distance and movement speed There must...

Страница 78: ...n531 Pn533 Pn534 Pn535 Pn536 4 Press the Key The status display will change to 1 RUN and the motor will change to the servo ON state Continued on next page 1 B B F U N C T I O N F n 0 0 3 Z S e a r c...

Страница 79: ...ill be entered and the motor will stop even during operation When the set program jogging operation has been completed the status display will change to 1 END for approximately one second It will then...

Страница 80: ...not be write prohibited Fn010 must be set to 0000 The servo must be OFF Operating Procedure Step Operation Result 1 Press the Key to display the Utility Mode Main Menu and then use the Key or Key to s...

Страница 81: ...n the dis play while the parameters are being initialized It will stop flashing when processing has been completed and the follow ing status displays will appear SERVOPACKs with Analog Volt age Pulse...

Страница 82: ...e Key to display the Utility Mode Main Menu and then use the Key or Key to select Fn006 2 Press the Key The Fn006 Clear Alarm History execution display will appear 3 Press the Key Note Press the Key t...

Страница 83: ...When you want to reset the multiturn data in the absolute encoder Note 1 You cannot reset alarms from the SERVOPACK to clear the A 810 alarm Encoder Backup Alarm or the A 820 alarm Encoder Checksum Al...

Страница 84: ...y will flash DONE for approximately one sec ond and then return to 1 A 810 5 Press the Key The display will return to the Utility Mode Main Menu 6 Turn the power supply OFF and ON again The parameter...

Страница 85: ...tions Always check the following before you automatically adjust the analog speed torque reference offset The parameters must not be write prohibited Fn010 must be set to 0000 The servo must be OFF 1...

Страница 86: ...ress the Key Note Press the Key to cancel automatically adjusting the analog speed torque reference offsets The display will return to the Utility Mode Main Menu The offsets for the analog voltage ref...

Страница 87: ...When a position loop is created with the host computer and the posi tion deviation when the Servomotor is stopped by a servo lock is to be set to 0 To intentionally set the offset to a desired value T...

Страница 88: ...is saved in the SER VOPACK When the data has been written the status display will flash DONE for approxi mately one second and then return to 1 RUN 7 Press the Key The display will return to the Util...

Страница 89: ...he torque reference The offset is adjusted manually in the following cases To intentionally set the offset to a desired value To check an offset that was set automatically Preparations Always check th...

Страница 90: ...et is written to the SERVOPACK When the data has been written the status display will flash DONE for approxi mately one second and then return to 1 RUN 7 Press the Key The display will return to the U...

Страница 91: ...e offsets connect to the measuring device that you will actually use when the output voltage is 0 V e g for the speed monitor when the servo is OFF and the motor shaft is not moving Preparations Alway...

Страница 92: ...ults are written to the SERVOPACK When the data has been written the status display will flash DONE for approximately one second and then return to 1 BB 7 Press the Key The display will return to the...

Страница 93: ...ill be reduced by 1 2 Also if you set 125 the gain will be 100 125 0 4 or 150 There fore the monitor output voltage will be increased by a factor of 1 5 Note These offsets are not initialized even if...

Страница 94: ...for approximately one sec ond and then return to 1 BB 7 Press the Key The display will return to the Utility Mode Main Menu Continued from previous page Step Operation Result 1 B B G a i n A D J C H 2...

Страница 95: ...o reason to execute it Execute this utility function if you think the torque ripple is abnormally large due to the current detection signal offset Note This offset is not initialized even if you execu...

Страница 96: ...tic adjustment The dis play will return to the Utility Mode Main Menu The offset of the motor current detection signal will be automati cally adjusted When processing has been com pleted the status di...

Страница 97: ...orque ripple is still large Observe the following precautions when you execute this utility function Do not couple the motor shaft to the machine operate the motor with no load and operate the motor a...

Страница 98: ...rque ripple Adjustment range 512 to 511 Note ZADJIU Zero adjustment of the phase U current 5 Press the Key The cursor will move to the offset for phase V Continued on next page 1 B B F U N C T I O N F...

Страница 99: ...amount by which you change the offsets and repeat the same process 8 Press the Key The adjustment results are written to the SERVOPACK When the data has been written the status display will flash DONE...

Страница 100: ...Display Alarm History Can be executed Fn002 Jog Cannot be executed Fn003 Origin Search Cannot be executed Fn004 Jog Program Cannot be executed Fn005 Initialize Parameters Cannot be executed Fn006 Clea...

Страница 101: ...ference Cannot be executed Fn203 One Parameter Tuning Cannot be executed Fn204 Adjust Anti resonance Control Cannot be executed Fn205 Vibration Suppression Cannot be executed Fn206 Easy FFT Cannot be...

Страница 102: ...setting to 0000 4 Press the Key The setting is written to the SERVO PACK When the data has been written the status display will flash DONE for approximately one second and then 1 A 941 will be display...

Страница 103: ...motor that is con nected to the SERVOPACK If the SERVOPACK has custom specifica tions the specifications number is also displayed Preparations No preparations are required Operating Procedure Step Ope...

Страница 104: ...SGMCS L SGMCS M SGMCS N SGMCS R SGMCV C SGMCV D SGMCV B SGMCV E SGMCV L SGMCV M SGMCV N SGMCV R A0 A1 A3 A7 AC AD AE AF 32 33 34 35 36 37 38 39 72 73 74 75 76 77 78 79 Servomotor Model No Type E N C O...

Страница 105: ...ollows for a Linear Servomotor 1 B B M t l n f o 4 0 0 W 40 Servomotor input voltage Servomotor capacity E N C O R D E R 0 1 8 b i t T Y P E 4 0 A C 2 0 0 V Linear Servomotor Servomotor Model No Type...

Страница 106: ...and then use the Key or Key to select Fn012 2 Press the Key The Fn012 Display Software Ver sion execution display will appear and the software versions of the SERVOPACK and encoder will be displayed 3...

Страница 107: ...value of the multiturn limit Pn205 when an absolute encoder is being used an A CC0 alarm Multiturn Limit Disagreement will be output You can use this utility function to reset that alarm and change t...

Страница 108: ...g has been com pleted the status display will flash DONE for approximately one sec ond and then return to 1 A CC0 4 Press the Key The display will return to the Utility Mode Main Menu 5 Turn the SERVO...

Страница 109: ...ls If it finds any errors it outputs alarms You can use this utility function to reset those alarms Note 1 This utility function is the only way to reset errors for Option Modules The errors are not r...

Страница 110: ...mately one sec ond and then return to 1 BB 5 Press the Key The display will return to the Utility Mode Main Menu 6 Turn the SERVOPACK power sup ply OFF and ON again The parameter settings are now enab...

Страница 111: ...rs Use this utility function if A 520 or A 911 alarms are not output at a suitable time when vibration is detected with the default vibration detection level Pn312 or Pn384 Otherwise it is not necessa...

Страница 112: ...inuously updated until you press the Key again 4 Press the Key The vibration detection level will be initialized When processing has been com pleted the status display will flash DONE for approximatel...

Страница 113: ...el Fn01B 3 51 3 Utility Functions 5 Press the Key The display will return to the Utility Mode Main Menu Continued from previous page Step Operation Result 1 R U N F U N C T I O N F n 0 1 4 O p t I n i...

Страница 114: ...Items SERVOPACK ID Information SERVOPACK model SERVOPACK serial number SERVOPACK manufacturing date SERVOPACK input voltage Maximum applicable motor capacity W Maximum applicable rated motor current A...

Страница 115: ...lay hidden information 3 Press the Key The motor information will be dis played Note Use the Key or Key to display hidden information Continued on next page 1 R U N F U N C T I O N F n 0 1 B V i b l v...

Страница 116: ...e Key The display will return to the Utility Mode Main Menu Continued from previous page Step Operation Result Serial number Manufacturing date Model Encoder resolution Encoder type E n c o d e r 1 4...

Страница 117: ...to the SER VOPACK You can use this utility function to display the following items ID Information Displayed Items Motor ID Infor mation Servomotor model Servomotor order number Servomotor input volta...

Страница 118: ...Ser vomotor ID information will be displayed first 1 2 3 3 Press the Key The encoder ID information will be displayed 3 Continued on next page 1 B B F U N C T I O N F n 0 1 E S v M o t O p I D F n 0 1...

Страница 119: ...e Key or Key to display hidden information 4 Press the Key The parameter file ID information will be displayed 3 5 Press the Key The display will return to the Utility Mode Main Menu Continued from pr...

Страница 120: ...you are using an external absolute encoder for fully closed loop control The external absolute encoders from the following manufacturers are supported Environmental Resistant Absolute Linear Scale fr...

Страница 121: ...he display while the origin is being set It will stop flashing when setting the origin has been completed and the following status displays will appear SERVOPACKs with Analog Volt age Pulse Train Refe...

Страница 122: ...se the Key or Key to select Fn021 2 Press the Key The Motor Type Change Detected status will be reset When processing has been com pleted the status display will flash DONE for approximately one sec o...

Страница 123: ...ower supply to the SERVOPACK OFF and ON again Note 1 Execute this utility function only after confirming that the servo is OFF and that the motor is stopped including not turning due to inertia or an...

Страница 124: ...xecuted After the software reset starts RESET5 will no longer be dis played After the reset has been completed the display that appears when the power is turned ON will be dis played The display will...

Страница 125: ...3 3 Utility Functions 5 Press the Key The display will return to the Utility Mode Main Menu Continued from previous page Step Operation Result 1 B B F U N C T I O N F n 0 2 0 S O r i g S e t F n 0 3 0...

Страница 126: ...ormation in the SERVOPACK Executing this utility function eliminates the need to detect the polarity every time you turn ON the power supply so that you can start operation immediately Preparations Al...

Страница 127: ...detection Magnetic Pole Adjustment will flash on the display When polarity detection has been completed the servo will turn OFF automatically When polarity detection has been completed the following d...

Страница 128: ...tection Fn080 3 66 5 Press the Key The display will return to the Utility Mode Main Menu Continued from previous page Step Operation Result 1 B B F U N C T I O N F n 0 3 0 S o f t R e s e t F n 0 8 0...

Страница 129: ...ty function to set the tuning less rigidity and load levels Preparations Always check the following before you set the tuning less rigidity and load levels The parameters must not be write prohibited...

Страница 130: ...3 If there is overshooting in the response waveform or if the allowable load moment of inertia is exceeded i e outside of prod uct specifications press the Key to change the mode setting to 2 If you h...

Страница 131: ...the vibration frequency 2 If you change the rigidity level automatically set notch filters will be canceled If vibration occurs however the notch fil ters will be set again 3 You can also change the...

Страница 132: ...ol Vibration suppression mode 2 or 3 Preparations Always check the following before you perform advanced autotuning If the settings are not suitable NO OP will be displayed and advanced autotuning wil...

Страница 133: ...anced autotuning while the SERVOPACK is in speed control the SERVOPACK will change to position con trol automatically to perform advanced autotuning The SER VOPACK will return to speed control after c...

Страница 134: ...lating Moment of Inertia Specify whether to calculate the moment of inertia Normally select ON ON Calculate the moment of inertia default setting OFF Do not calculate the moment of inertia Note If the...

Страница 135: ...oder resolution is 16 777 216 24 bits the stroke travel distance will be set to 800 000 If the default electronic gear ratio is used Pn20E 64 and Pn210 1 then Note 1 Set the parameters so that the num...

Страница 136: ...ion will stop temporar ily Note 1 Calculating the moment of iner tia will not start if the sign of the stroke does not agree with the key that is pressed Key or Key 2 If Jcalc is set to OFF calculat i...

Страница 137: ...make adjust ments using one parameter tuning Fn203 If adjustments are completed nor mally the servo will be turned OFF The status display will flash END as shown below for approximately two seconds a...

Страница 138: ...essfully completed Machine vibration is occur ring or the COIN Position ing Completion output signal is turning ON and OFF when the Servomotor stops Increase the setting of Pn522 Positioning Com plete...

Страница 139: ...mpleted width is too narrow or pro portional control P control is being used Increase the setting of Pn522 If proportional con trol is set turn OFF the P CON Proportional Control signal The moment of...

Страница 140: ...e stroke Err2 The moment of inertia fluctu ated greatly and did not con verge within 10 tries Calculate the moment of inertia based on the machine specifica tions set the value in Pn103 and execute ad...

Страница 141: ...p gain and speed loop gain Filters torque reference filter and notch filters Friction compensation Anti resonance control Vibration suppression Preparations Always check the following before you perfo...

Страница 142: ...mode 1 Tunes the SERVOPACK for response and stability standard adjust ment level 2 Tunes the SERVOPACK for positioning default setting 3 Tunes the SERVOPACK for positioning giving priority to suppress...

Страница 143: ...or Key Tuning will be started 1 ADJ will flash on the display during autotun ing Note Tuning is not executed while 1 BB is displayed If tuning is completed normally the status display will flash END a...

Страница 144: ...atus shown in step 1 The adjusted settings will be saved in the SERVOPACK The status dis play will flash DONE as shown below for approximately one sec ond and then 1 A 941 will be dis played 8 Turn th...

Страница 145: ...omatic gain switching The HWBB was activated Release the HWBB Error Probable Cause Corrective Action The gain adjust ment was not successfully completed Machine vibration is occur ring or the COIN Pos...

Страница 146: ...s are adjusted Gains e g position loop gain and speed loop gain Filters torque reference filter and notch filters Friction compensation Anti resonance control Preparations Always check the following b...

Страница 147: ...ect the problem 3 2 30 One Parameter Tun ing Fn203 Preparations on page 3 84 3 To change the moment of inertia ratio use the Key or Key to move the cursor and use the Key or Key to change the value 4...

Страница 148: ...efault setting 3 Rigid systems in which the Servomotor is directly coupled to the machine without gear or other drive system 6 Input the S ON Servo ON input signal from an external device The status d...

Страница 149: ...the display If anti resonance control is set ARES will be displayed on the bottom row of the display If the vibration is small press the Key to force a search for the vibration frequency 11 Press the...

Страница 150: ...3 2 30 One Parameter Tun ing Fn203 Preparations on page 3 84 3 To change the moment of inertia ratio use the Key or Key to move the cursor and use the Key or Key to change the value 4 Press the Key Th...

Страница 151: ...Belt drive mechanisms 2 Ball screw drive mechanisms default setting 3 Rigid systems in which the Servomotor is directly coupled to the machine without gear or other drive system 6 Input the S ON Serv...

Страница 152: ...ally returned to the previous value 4 The higher the value of the FF level the shorter the positioning time will be and the better the response will be If the level is too high however overshoot ing o...

Страница 153: ...ing the data The display will return to the status shown in step 1 2 Press the Key to readjust the level without saving the val ues The adjusted settings will be saved in the SERVOPACK and DONE will b...

Страница 154: ...if required to increase the response after performing this utility function If the anti resonance gain is increased e g when one parameter tuning is performed vibration may occur again If that occurs...

Страница 155: ...The Tuning Mode Selection Display will appear Note If the initial setting display does not appear and the status display changes to NO OP refer to the following section and correct the problem 3 2 31...

Страница 156: ...the set ting of this parameter is lowered the detection sensitivity will be increased Vibration may not be detected accurately if the setting is too small The vibration frequency will be dis played at...

Страница 157: ...Go to step 8 If fine tuning is not required go to step 9 8 Use the Key or Key to move the cursor and the Key or Key to fine tune the fre quency 9 Press the Key Note Press the Key to cancel saving the...

Страница 158: ...the following section and correct the problem 3 2 31 Adjust Anti reso nance Control Fn204 Preparations on page 3 92 3 Use the Key or Key to set Tuning Mode to 1 4 Press the Key The following display...

Страница 159: ...l insufficient at a gain of 200 cancel the setting and lower the control gain by using a different method such as one parameter tuning 8 If fine tuning of the frequency is necessary press the Key The...

Страница 160: ...esult 1 Press the Key to display the Utility Mode Main Menu and then use the Key or Key to select Fn204 2 Press the Key The following display will appear Note If the initial setting display does not a...

Страница 161: ...s the Key The cursor will move from damp to freq Go to step 6 If fine tuning is not required go to step 7 6 Use the Key or Key to move the cursor and the Key or Key to fine tune the fre quency 7 Press...

Страница 162: ...ses this utility function is not necessary Use this utility function only if fine tuning is required or readjustment is required as a result of a failure to detect vibration Perform one parameter tuni...

Страница 163: ...ession 1 Frequency A Note 1 If the setting frequency and actual operating frequency are different Setting will flash 2 Frequency detection will not be performed if there is no vibra tion or if the vib...

Страница 164: ...and actual operating frequency are different Setting will flash 6 Press the Key The Setting will stop flashing and the currently displayed frequency will be set for the vibration suppres sion functio...

Страница 165: ...cancel saving the data The display will return to the status shown in step 1 The adjusted setting will be saved in the SERVOPACK The status dis play will flash DONE as shown below for approximately o...

Страница 166: ...settings according to the detected resonance frequencies The notch filters are effective for elimi nating high frequency vibration and noise Execute this utility function after the Servomotor power i...

Страница 167: ...Key or Key to set the reference amplitude Reference amplitude range 1 to 800 Note First execute the utility function with the default value Increasing the reference amplitude will increase the detecti...

Страница 168: ...layed on the second line If the first notch filter has already been set the second notch filter value will be dis played If the first and second notch filters have already been set only the result of...

Страница 169: ...h filter value is set If the first and second notch filters have already been set the filter values are not changed Note Pn408 n 1 Use first stage notch filter Pn409 1375 Hz First Stage Notch Filter F...

Страница 170: ...able The parameters must not be write prohibited Fn010 must be set to 0000 The program must not be running or on hold A program table save operation must not be in progress for any means other than th...

Страница 171: ...e table settings with the keys Refer to the following section for detailed setting methods for each item Details on How to Set Table Set tings on page 3 111 6 On pressing the key the setting is entere...

Страница 172: ...RSPD POUT 0 POS000 SPD000 RDST000 RSPD000 POUT000 1 POS001 SPD001 RDST001 RSPD001 POUT001 2 POS002 SPD002 RDST002 RSPD002 POUT002 3 POS003 SPD003 RDST003 RSPD003 POUT003 4 POS004 SPD004 RDST004 RSPD00...

Страница 173: ...th INDEXER Module Product Manual Manual No SIEP S800001 64 POS Target Position SPD Positioning Speed RDST Registration Distance RSPD Registration Speed ACC Acceleration Move cursor Change target posit...

Страница 174: ...lowing order N A Z Pressing the key changes the display in the reverse order Move cursor Move cursor Move cursor Change elapsed time Change elapsed time Change elapsed time Change elapsed time Change...

Страница 175: ...n on page 3 108 Step Operation Result 1 Display the program table editing screen 2 Press the key to view the pro gram table save operation screen 3 Move the cursor with the keys to select STORE Note S...

Страница 176: ...e with INDEXER Module Product Manual Manual No SIEP S800001 64 Preparation Always check the following before you edit or save a ZONE table The parameters must not be write prohibited Fn010 must be set...

Страница 177: ...using the keys and change the ZONE boundary values using the keys 6 On pressing the key the setting is entered and the cursor returns to the ZONE table number side 7 Repeat steps 3 to 6 to set the ZON...

Страница 178: ...2 2 0 0 N Z 2 0 0 P Z 2 3 0 0 N Z 3 0 0 P Z 3 3 0 0 N Z 3 0 0 P Z 3 4 0 0 N Z 4 0 0 P Z 4 4 0 0 N Z 4 0 0 P Z 4 5 0 0 N Z 5 0 0 P Z 5 5 0 0 N Z 5 0 0 P Z 5 6 0 0 N Z 6 0 0 P Z 6 6 0 0 N Z 6 0 0 P Z 6...

Страница 179: ...display to the ZONE table editing screen 4 Press the key to start saving the ZONE table to flash memory Do not turn off the control power supply until saving has been com pleted normally 5 When savin...

Страница 180: ...e a jog speed table The parameters must not be write prohibited Fn010 must be set to 0000 A JOG speed table save operation must not be in progress for any means other than the digital operator Editing...

Страница 181: ...G speed table number side 7 Repeat steps 3 to 6 to set the JOG speed table On completing the set ting of all the JOG speed tables to be used save the JOG speed tables to flash memory by following the...

Страница 182: ...t be write prohibited Fn010 must be set to 0000 The program must not be running or on hold A program table save operation must not be in progress for any means other than the digital operator Executio...

Страница 183: ...the key to open the Util ity Function Mode main menu and move the cursor with the keys to select FnB06 2 Press the key to view the FnB06 operation screen 3 Press the key to start program table initial...

Страница 184: ...any means other than the digital operator Execution of the RES command must not be in progress Operating Procedure Step Operation Result 1 Press the key to open the Util ity Function Mode main menu a...

Страница 185: ...Preparation Always check the following before you initialize a JOG speed table The parameters must not be write prohibited Fn010 must be set to 0000 A JOG speed table save operation must not be in pr...

Страница 186: ...e key to view the FnB08 operation screen 3 Press the key to start JOG speed table initialization Do not turn off the control power supply until initialization has been completed normally To cancel the...

Страница 187: ...value must not be outside the range for PnB25 An absolute encoder must be connected and Pn002 must be set to n 0 Operating Procedure DANGER This function replaces the coordinates of the reference posi...

Страница 188: ...key The display returns to the Utility Function Mode main menu without executing the operation 5 When origin setting has been com pleted normally Done is dis played 6 Press the key to return to the Ut...

Страница 189: ...n Result 1 Press the key to open the Util ity Function Mode main menu and move the cursor with the keys to select FnB0A 2 Press the key to view the FnB0A operation screen 3 Use the keys to change the...

Страница 190: ...is in effect E A is the alarm code ALM HBB During hard wire base block ALM P OT Forward run prohibited Over travel ALM N OT Reverse run prohibited Over travel ALM P LS Forward software limit ALM N LS...

Страница 191: ...otocoupler ON Lower level Photocoupler OFF IN2 Continued on next page Continued from previous page Display Code Display Content Display Example Units Serial Command IN2 1110 9 8 7 6 5 4 3 2 1 digit Di...

Страница 192: ...l Upper level Photocoupler ON Lower level Photocoupler OFF OUT2 Continued on next page Continued from previous page Display Code Display Content Display Example Units Serial Command OUT2 9 8 7 6 5 4 3...

Страница 193: ...osition POS 12345678 Refer ence unit POS DST Target Dis tance DST 12345678 Refer ence unit DST Continued on next page Continued from previous page Display Code Display Content Display Example Units Se...

Страница 194: ...RPOS RDST Registra tion Target Distance RDST 12345678 Refer ence unit RDST PGM STEP Program Step PGM STEP PGMSTEP End When the pro gram is not running PGMSTEP 12345 The program step being exe cuted PG...

Страница 195: ...he Util ity Function Mode main menu and move the cursor with the keys to select FnB0B 2 Press the key to view the FnB0B operation screen 3 Press the key to start initializa tion of the parameters Do n...

Страница 196: ...ed The RES command must not being executed Operating Procedure INDEXER Module alarms are not reset by the ALARM RESET button of the digital operator To reset INDEXER Module alarms execute alarm resett...

Страница 197: ...or clear the alarm history To cancel the FnB0C operation press the key before pressing the key The display returns to the Utility Function Mode main menu without executing the operation 5 When alarm...

Страница 198: ...occur NONE is dis played 3 Use the keys to scroll the alarm history 4 Press the key to return to the Utility Function Mode main menu To clear the alarm history execute the Reset INDEXER Alarm FnB0C u...

Страница 199: ...rameter Copy Mode Functions 4 2 4 2 Operating Procedures in Parameter Copy Mode 4 3 4 2 1 Reading Parameters from the SERVOPACK SERVO OP 4 3 4 2 2 Writing Parameters to the SERVOPACK OP SERVO 4 6 4 2...

Страница 200: ...ith the MECHATROLINK 4 communications reference use the parameter editing func tions of the SigmaWin Refer to the following manual for details AC Servo Drive Engineering Tool SigmaWin Operation Manual...

Страница 201: ...rameter Copy Mode Main Menu Display 4 2 1 Reading Parameters from the SERVO PACK SERVO OP This function reads the parameters saved in the SERVOPACK and saves them in one of the seven blocks in the sto...

Страница 202: ...the parameters from the SERVOPACK will start When the parameters have been read from the SERVOPACK Com pleted will be displayed After Completed is displayed the Parameter Block Selection Display will...

Страница 203: ...During the reading operation the current process will be displayed sequentially on the Digital Operator as shown below The reading operation requires approximately 10 seconds When the reading operatio...

Страница 204: ...r Key to select OP SERVO The currently selected function will flash 2 Press the Key The Parameter Block Selection Dis play will appear 3 Use the Key or Key to select the parameter block 00 to 06 in th...

Страница 205: ...ameters will not be written Completed will be displayed when the parameters have been read from the specified block in the Digi tal Operator and saved in the SER VOPACK Also A 941 Change of Parameters...

Страница 206: ...6 Press the Key The display will return to the Param eter Copy Mode Main Menu 7 Turn the power supply OFF and ON again A 941 Change of Parameters Requires Restart will disappear Continued from previou...

Страница 207: ...K with a dif ferent voltage or capacity Unmatched Parameters will be displayed and the parameters will not be written If writing parameters is prohibited Not Available will be displayed when the servo...

Страница 208: ...r Key to select VERIFY The currently selected function will flash 2 Press the Key The Parameter Block Selection Dis play will appear 3 Use the Key or Key to select the parameter block 00 to 06 in the...

Страница 209: ...n results will be displayed Note If any unmatched parameters were found the numbers of the unmatched parameters are dis played in a list If there are more than four unmatched parameters use the Key or...

Страница 210: ...y The Parameter Block Selection Dis play will appear 7 Press the Key The display will return to the Param eter Copy Mode Main Menu Continued from previous page Step Operation Result 0 0 S G D 7 S R 7...

Страница 211: ...the comparison operation the current process will be dis played sequentially on the Digital Operator as shown below The com parison operation requires approximately 10 seconds If you specify verifying...

Страница 212: ...Copy Mode Main Menu and then use the Key or Key to select LIST The currently selected function will flash 2 Press the Key The Parameter Block Selection Dis play will appear 3 Use the Key or Key to se...

Страница 213: ...ter block has been deleted Completed will be displayed After Completed is displayed the Parameter Block Selection Display will appear will be displayed for the deleted block to indicate that it is an...

Страница 214: ...he Digital Operator is disconnected from the SERVOPACK during the deletion operation the selected parameter block will become an empty block During the block deletion operation the current process wil...

Страница 215: ...y added Digital Operator Types and Connections 3 2 5 3 2 23 3 2 28 Revision Operating procedure 3 2 9 3 2 10 3 2 14 Revision Information on preparations February 2017 3 0 1 3 Revision Display terms 3...

Страница 216: ...wa co th YASKAWA ELECTRIC CHINA CO LTD 22F Link Square 1 No 222 Hubin Road Shanghai 200021 China Phone 86 21 5385 2200 Fax 86 21 5385 3299 www yaskawa com cn YASKAWA ELECTRIC CHINA CO LTD BEIJING OFFI...

Отзывы: