


Supported Custom Paper Sizes
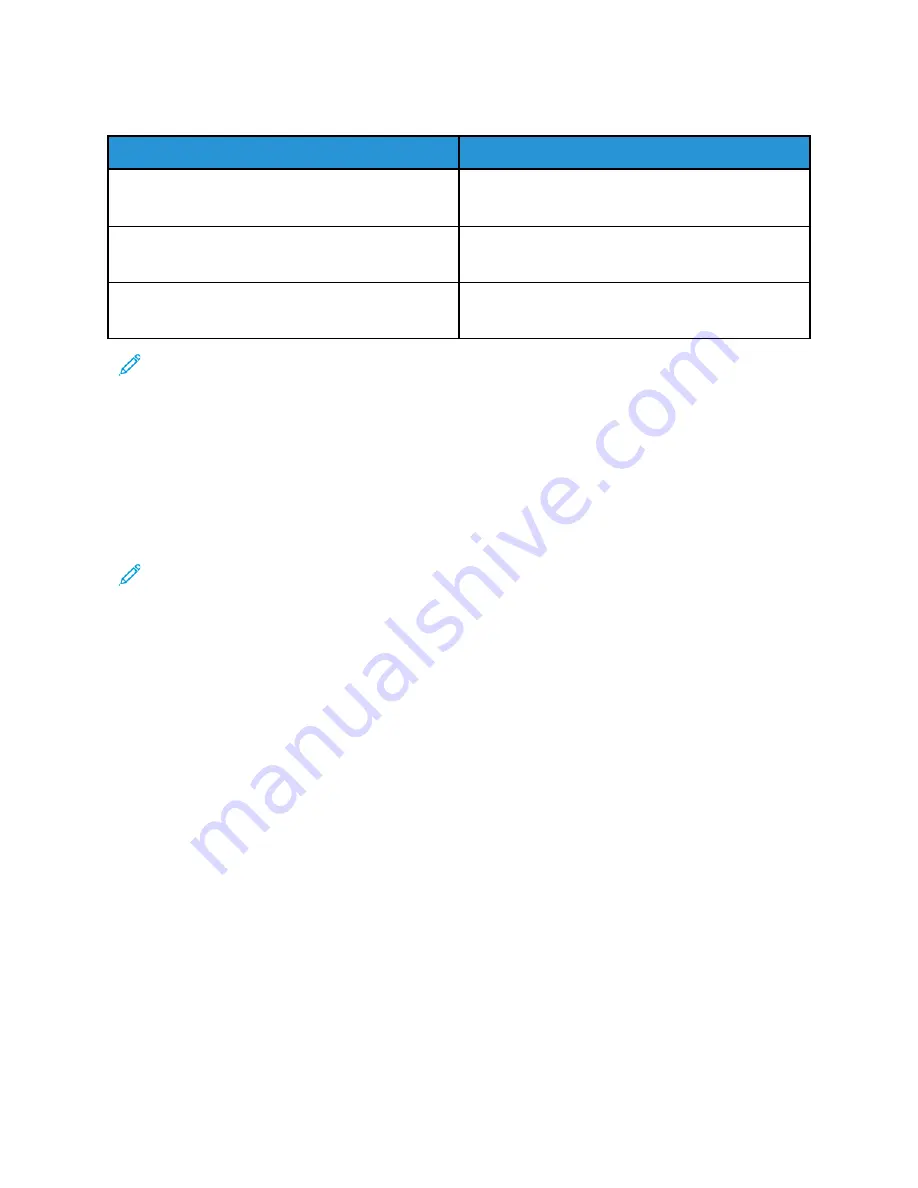
Tray Number
Paper Sizes
Trays 1 and 2 in all configurations
Trays 3 and 4 in the 3-Tray Module
Minimum: 139.7 x 182 mm (5.5 x 8.3 in.)
Maximum: 297 x 432 mm (11.7 x 17 in.)
Bypass Tray
Minimum: 105 x 135 mm (4.25 x 5.3 in.)
Maximum: 297 x 432 mm (11.7 x 17 in.)
Envelope Tray
Minimum: 148 x 98 mm (5.8 x 3.9 in.)
Maximum: 241 x 162 mm (9.5 x 6.4 in.)
Note:
Trays 3 and 4 in the Tandem Tray Module and Tray 6 do not support custom paper sizes.
PPaappeerr TTrraayy SSeettttiinnggss
Configuring Tray Settings
The system administrator can set Trays 1–4 of all configurations to Fully Adjustable mode or
Dedicated mode. When a paper tray is set to Fully Adjustable mode, you can change paper settings
each time that you load the tray. When a paper tray is set to Dedicated mode, the control panel
prompts you to load a specific paper size, type, and color.
Note:
To configure tray settings, log in as the system administrator. For details, refer to the
System Administrator Guide
at
www.xerox.com/office/VLB71XXdocs
To configure the tray settings:
1. At the printer control panel, touch
Device
.
2. Touch
Paper Trays
, then select the required tray.
• To set the mode, touch
Tray Mode
, then select an option.
• To specify the paper settings for a dedicated tray, ensure that Tray Mode is set to Dedicated,
then set the paper size, type, and color.
• To configure the printer to select the tray automatically, touch the
Auto Select
toggle button.
• To set the priority for each tray, touch the
Plus
icon (
+
) or the
Minus
icon (
-
). The printer uses
paper from the Priority 1 tray first. If that tray is empty, the printer uses paper from the
Priority 2 tray.
3. Touch
OK
.
4. To return to the home screen, press the
Home
button.
156


