Solving Other Problems
119
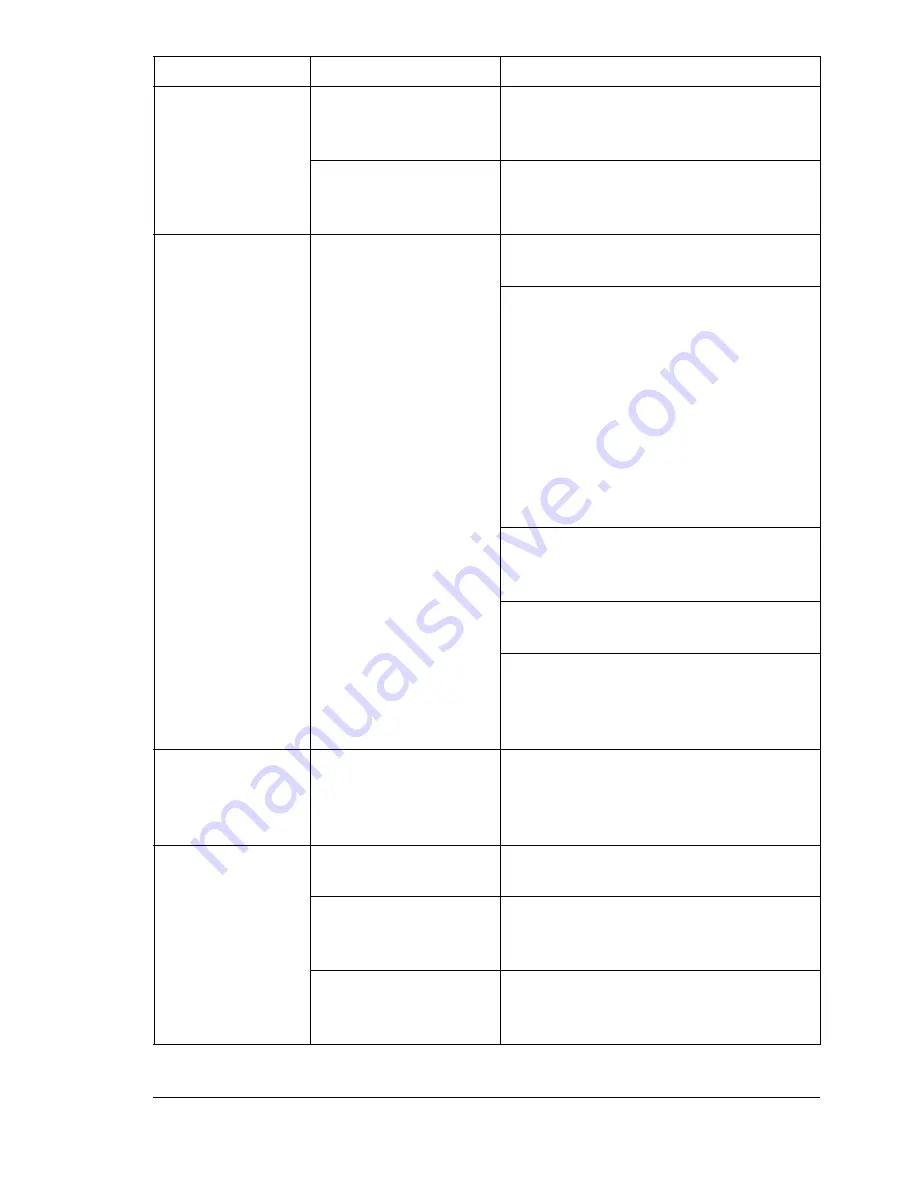
Printer resets or
turns off
frequently.
The power cord is not
correctly plugged into
the outlet.
Turn off the printer, confirm that the
power cord is correctly plugged into the
outlet, and then turn on the printer.
A system error
occurred.
Contact your local Xerox service
representative with the error
information.
You are
experiencing
duplex problems.
Media or settings are
not correct.
For autoduplexing, make sure that you
have a duplex unit installed.
Make sure that you are using correct
media.
See “Media Specifications” on page
45.
Do not duplex custom-sized media,
envelopes, labels, postcards, thick
stock, or transparencies.
Make sure that you have not mixed
media types in Tray 1.
Make sure the duplex unit is installed
and enabled in the Windows printer
driver (Properties/Configure tab).
In the printer driver (Layout/Print on
Both Sides), choose "Double-Sided".
For Pages/Sheet on duplexed pages,
choose Collate only in the driver’s
Basic Tab. Do not set collation in the
application.
With
Pages/Sheet
on multiple copies,
the output is
incorrect.
Both the driver and the
application have been
set for collation.
For Pages/Sheet on multiple copies,
choose Collate only in the driver’s
Basic Tab. Do not set collation in the
application.
You hear unusual
noises.
The printer is not level. Place the printer on a flat, hard, level
surface.
The tray is not
installed correctly.
Remove the tray that you are printing
from and reinsert it completely into the
printer.
There is a foreign
object stuck inside the
printer.
Turn off the printer and remove the
object. If you cannot remove it, contact
Technical Support.
Symptom
Cause
Solution
Содержание Phaser 6120
Страница 8: ...Introduction...
Страница 11: ...Getting Acquainted with Your Printer 4 Front View with Options Tray 2 Rear View with Options Duplex unit...
Страница 12: ...Network Printing...
Страница 20: ...About the Software...
Страница 31: ...Printer Control Panel and Configuration Menu...
Страница 51: ...Using Media...
Страница 70: ...Loading Media 63 8 Raise both green fuser separator levers 9 Carefully close the top cover...
Страница 72: ...Loading Media 65 b Lower both green fuser separator levers c Close the top cover...
Страница 75: ...Loading Media 68 Tray 2 Loading Plain Paper 1 Pull out Tray 2 as far as possible 2 Lift up Tray 2 to remove it...
Страница 78: ...Loading Media 71 7 Reinsert Tray 2 into the printer...
Страница 82: ...Replacing Supplies...
Страница 95: ...Maintaining the Printer...
Страница 101: ...Cleaning the Printer 94 4 Clean the laser lens by wiping them with a soft dry cloth 5 Reinstall the imaging unit...
Страница 102: ...Cleaning the Printer 95 6 Carefully close the top cover...
Страница 104: ...Cleaning the Printer 97 4 Carefully close the duplex cover...
Страница 108: ...Troubleshooting...
Страница 117: ...Clearing Paper Jams 110 5 Carefully close the top cover...
Страница 120: ...Clearing Paper Jams 113 6 Load the media in Tray 2 and attach the lid 7 Reinsert Tray 2...
Страница 142: ...Installing Options...
Страница 157: ...Appendix...
Страница 169: ...Appendix...


