


•
The Up or Down arrows
incrementally reduce or enlarge the percentage.
You can either touch the window containing the ratio and type in the required
ratio using the numeric keypad or scroll to a specific ratio.
•
Presets
are available that will increase/decrease from one size to another.
Example, 64% will reduce an 11x17” to 8.5x11”, and 129% will enlarge 8.5x11” to
11x17”.
Reduce/Enlarge
For non-standard reduction or enlargement you can select a ration between
25% and 400% if you are copying from the document glass or 25% to 200% if
using the Document Feeder.
When using the glass, position the document along the top of the glass in
the upper left corner where the black arrow is located.
Common Copy Features
The device will identify the size of the original during scanning.
•
Both Pages
scans both pages, the left page of the book first will be
scanned first. Use the
arrow
buttons to specify an amount from 0 to 2”
to be deleted from the center of the book in order to delete unwanted
marks reproduced from the gutter of the book.
•
Left Page Only
scans the left page only.
•
Right Page Only
scans the right page only.
Book Copying:
This feature enables you to specify which page or pages of a book are to be
scanned. The book original is placed face down on the document glass with
the spine of the book lined up with the marker at the center of the rear
edge of the document glass. Align the top of the bound original against the
rear edge of the document glass.
• All Edges
is used to erase an equal amount from all the edges. Use the
arrow buttons to adjust the
amount to be erased from 0.1” to 2.0”. All
marks or defects within the measurement set are deleted.
• Individual Edges
enables an individual amount to be erased from each of
the edges, on both the first and second sides. Use the
arrow buttons to
adjust the
amount to be erased from 0.1” to 2.0”.
Edge Erase
:
Enables you to specify how much of the image to erase around the edges of
your document. For example, you can remove the marks caused by punched
holes, a header/footer, page number or staples in your original.
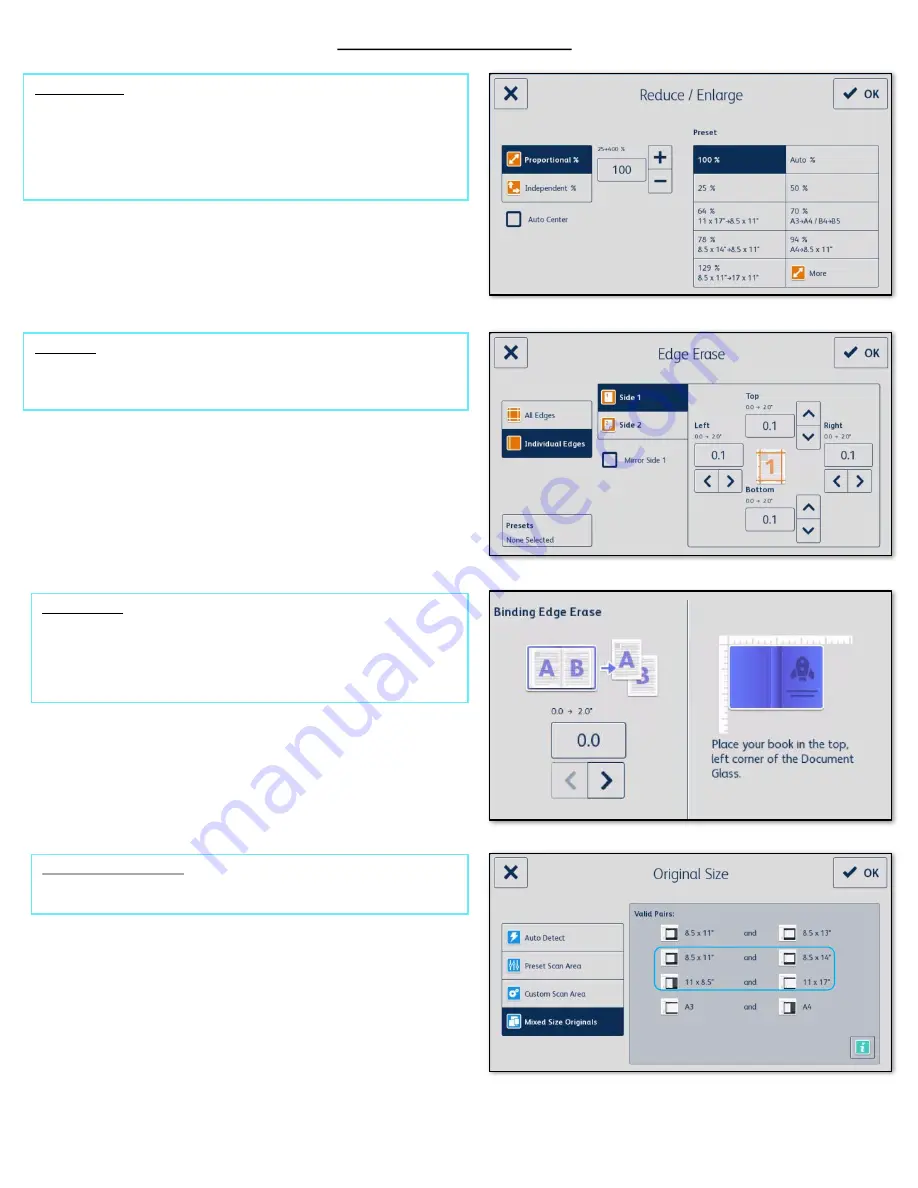
Original Size: Mixed Sizes
Original Size allows you to specify automatic size detection
of the originals,
run mixed size originals, or the specific size of the image to be scanned.
•
Auto Detect
is the default setting and enables automatic size sensing. The size
detected is matched to a standard size paper.
•
Preset Scan Areas
allows you to define the size of your
original from a list of
preset, standard original sizes.
•
Custom Scan Areas
is used to enter a specific area for scanning.
Measure
the area to be scanned
on the original and enter the X and Y axis measurements
into the fields provided. Only the area specified is scanned.
•
Mixed Size Originals
allows you scan documents containing different
size pages. The pages must be the same width, like (8.5x11” LEF and 11x17” SEF),
other combinations are shown on the screen. The device detects the size of the
documents and can produce the following output:
• If
Auto Reduce/Enlarge and a specific Paper Supply is selected
, all
the
images are reduced
or enlarged and copied onto the same size paper.
• If
Auto Paper supply is selected, the images are copied size for size and a
mix of paper sizes
will be printed. Example 8.5x11” and 8.5x14” SEF.
*Preset Scan Area and Custom Scan Area are helpful when copying
from odd sized books and/or reducing/enlarging.
Page 7


