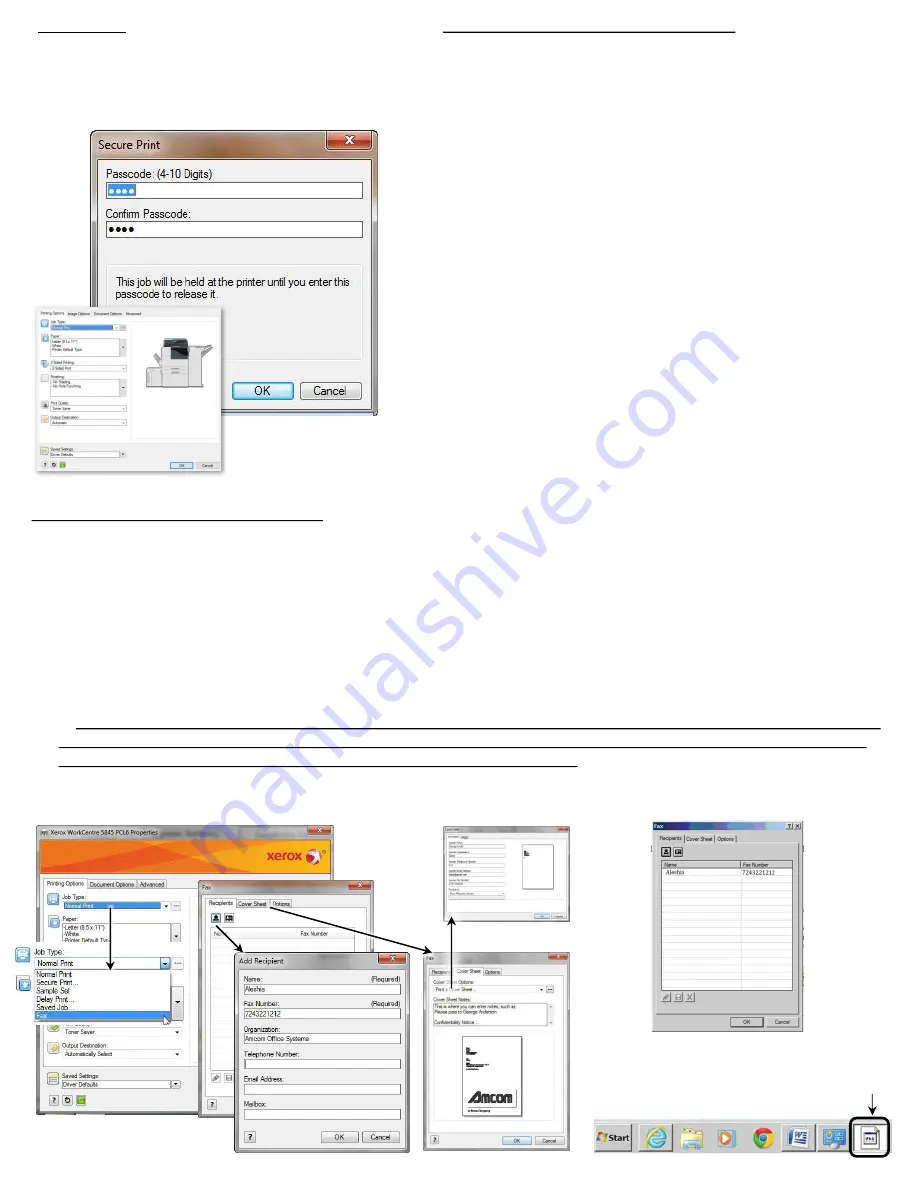
Xerox AltaLink B8000 Series Скачать руководство пользователя страница 18

Secure Print- 

With this feature you can send a document to the printer 
from your computer, and then go to the printer and release 
the document, so others cannot view the document before 
you arrive. 

Secure print to the Xerox printer from a PC  

1.  Click 

File.


2.  Click 

Print.


3.  Click 

Properties.


4.  Click 

Advanced.


5.  Under 

Job type

, select 

Secure Print.


6.  * It will ask you to type in a four digit code twice. YOU create   

 this, it does not have to be the same as your user code if you   
 have one. 

7.  Click Ok. 
8.  Change any settings needed, 2 sided, staple, etc. 
9.  Click Ok. 
10. Click Ok. 
****************************************************** 
1. At the printer control panel, press the Home button. 
2. Touch Jobs. 
3. To view Secure Print Jobs, touch Secure Jobs. 
4. Touch your folder. 
5. Enter the passcode number, then touch OK. 
6. Select and option. 
       -To print a Secure Print job, touch the job. 
       -To print all the jobs in the folder, touch Print All. 
       -To delete a Secure Print job, touch the Trash icon, at the   
          prompt, touch Delete. 
       -To delete all the jobs in the folder, touch Delete All. 


Faxing from your Computer (LAN FAXING): 

1. Click 

File

.  

2. Click 

Print

, like you were going to print the file.  

3. Click the 

Job Type

 dropdown menu. 

4. Click 

FAX

5. Either double click under Name, or click the icon of the person. 
6. Enter the contact name and fax number. 
7. If you would like to add a generic cover sheet, click the Cover Sheet tab then click Print a Cover Sheet. 
8. Fill in YOUR information that you want displayed on the coversheet. 
9. If you would like to add a JPEG of your logo, you may Import that under Cover Sheet Options.  
10. Enter notes if desired, then click Ok thru all necessary  screens. (You may have to click Ok up to five times!) 
        **You will get a a popup screen listing the recipient and fax number, confirming your job will be sent as a fax. You MUST click Ok 

on the popup screen or the job will never be sent. If you don’t get an automatic popup, check along the bottom of the task bar 
and see if there is an icon that doesn’t look like anything specific

. (Picture below.) 

11.  Instead of the file coming out on paper, it will be sent as a fax to the fax number you entered. By default the machine will print 

you a confirmation, letting you know the fax was completed or deleted. This can turned off if preferred. 


This is the popup screen that MUST be 
acknowledged to send the job to the copier.       
The flashing icon will look like this. 

Page 18 

Содержание AltaLink B8000 Series

Страница 1: ...address Fax Button Sends a scanned document via a fax number ID Card Copy Button Prints the front and back of a drivers license check onto the front side of the paper Workflow Scanning Button Scans a...

Страница 2: ...ne appears on the control panel To view a complete list of active error and alert messages 1 At the printer control panel press the Home button 2 Touch Device 3 Touch Notifications 4 Touch Faults Alte...

Страница 3: ...per jams can occur along the paper path WARNING Never touch a caution labeled area in the fuser You can get burned If a sheet of paper is wrapped around the inside of the fuser do not try to remove it...

Страница 4: ...eft Adjust the paper edge guides so they just touch the edges of the paper stack 2 Confirm the settings on the touch screen by verifying the Size Type and Color loaded in the tray and press Confirm Wh...

Страница 5: ...ree cloth Cleaning the Scanner and Control Panel To ensure optimum print quality clean the document glass regularly Cleaning helps avoid output with streaks smears and other marks that transfer from t...

Страница 6: ...upper right corner on the touchscreen Making a Copy Touch Reset to clear all settings back to default Swipe the Sample Job to allow a test print of a copy job to inspect before printing multiple copie...

Страница 7: ...0 1 to 2 0 All marks or defects within the measurement set are deleted Individual Edges enables an individual amount to be erased from each of the edges on both the first and second sides Use the arr...

Страница 8: ...h as a case number or client reference together with a page number applied to a document as it is being processed Note Some features cannot be used with the Page Layout feature and will be grayed out...

Страница 9: ...s Each segment of the job can have different settings After all the segments are programmed scanned and temporarily stored in the printer the job is processed and completed 1 Change the settings requi...

Страница 10: ...n the Enter Fax Number field enter the fax number then touch Add To add more recipients touch Add Recipient then repeat the procedure 4 Adjust fax settings as needed 5 Touch Send Sending a Fax Page 10...

Страница 11: ...the Home button 2 Touch Address Book 3 From the Address Book touch a contact name then touch Edit 4 To change contact information touch the information that you want to update edit as needed then tou...

Страница 12: ...5 Adjust the settings as required 6 Touch Scan 7 When scanning is finished lift the automatic document feeder Flip the original document then place it in the upper left corner of the document glass 8...

Страница 13: ...or group from the Address Book touch the Address Book icon Touch Favorites or Contacts then select a recipient 4 If scanning from 2 sided original documents touch 2 Sided Scanning then select an opti...

Страница 14: ...scanning originals using the glass and the document feeder into a single scan job Or scanning multiple originals from the glass into one complete file eliminating the need to merge single page scans i...

Страница 15: ...settings as needed To save the scanned document as a specific file name touch the attachment file name enter a new name then touch OK To save the scanned document as a specific file format touch the...

Страница 16: ...you are scanning a document from the automatic document feeder a prompt does not appear WARNING Do not remove the USB Flash drive while the device is scanning and processing the job If you remove the...

Страница 17: ...n the user specifies what time they want the job to print Ex Sending a large job to print during lunch or after hours so it s complete upon arrival Saved Job Stores commonly used preprinted documents...

Страница 18: ...e going to print the file 3 Click the Job Type dropdown menu 4 Click FAX 5 Either double click under Name or click the icon of the person 6 Enter the contact name and fax number 7 If you would like to...

Страница 19: ...Button Touch the job displaying Held Resources Required Touch Print on Alternate Paper Touch the alternate paper tray you would like to print from Touch the OK button the job will be scaled to that pa...

Страница 20: ...tion for any incorrect setting Select the size before the type 5 On the printer touch screen touch Confirm Page 20 Loading Labels Letterhead 1 Open tray 5 by rotating it outward 2 Load labels in the t...

Отзывы: