Xerox AltaLink B8000 Series Скачать руководство пользователя страница 2

Page 2  

1. At the printer control panel, press the 

Home 

button.  

2. Touch 

Jobs

, then touch the name of the desired print job.  

3. Do one of the following:   
    To pause the print job, touch 

Pause

. To resume the print job, touch 

Resume

.  

    To delete the print job, touch 

Delete

. At the prompt, touch 

Delete

.  

4. To return to the Home screen, press the 

Home 

button.  


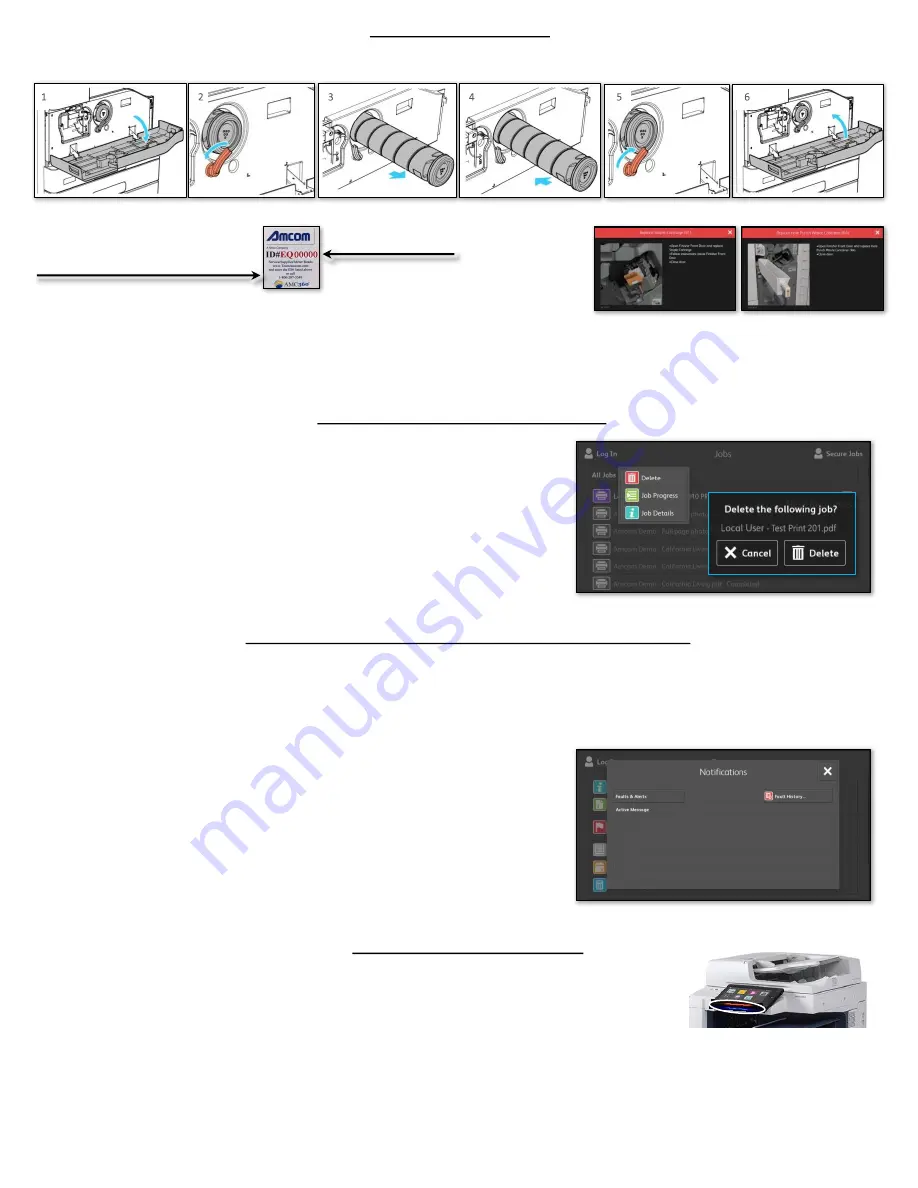
Deleting a Copy/Print/Scan/Fax Job 

Changing Toner Bottle 

Service ID number  
 

(your unique Service ID will be needed for 
every call into Amcom.) 

Toner  Cartridges 

Waste Cartridge 

Viewing Error and Alert Messages on the Control Panel  


When an error or warning condition occurs, the printer alerts you of a problem. A message appears on the control panel and the 
LED status light on the control panel flashes amber or red. Alerts inform you about printer conditions, such as low supplies or 
open doors that require your attention. Error messages warn you about printer conditions that prevent the printer from printing 
or degrade printing performance. If more than one condition occurs, only one appears on the control panel.  
 
To view a complete list of active error and alert messages: 
1. At the printer control panel, press the Home button. 
2. Touch Device. 
3. Touch Notifications. 
4. Touch Faults & Alters, Alerts, or Faults. 
5. To view details, touch a fault or alert. 
6. To exit the Notifications screen, touch X. 
7. To return to the Home screen, press the Home button. 

Control Panel Indicator Light 

Blue 

Blinks blue once to acknowledge a successful Authentication request. 

Blinks blue once slowly for a copy or print job initiated at the control panel. 

Blinks blue twice slowly for a fax or print job received from the network. 

Blinks blue rapidly while the printer is powering up, or to signal detection of a Wi-Fi Direct connection request. 


Amber 

Blinks amber o indicate an error condition or warning that requires your attention. For example, an out-of-toner condition, a 
paper jam, or out of paper for the current job. 

Blinks amber to indicate a system error, which typically is associated with an error code. 

Recycling Supplies 

For more information on the Xerox® Recycling program, go to 

www.xerox.com/gwa 

*Dependent upon current finishing configuration. 


Service/Supplies Phone number 
1-800-287-5549 

Содержание AltaLink B8000 Series

Страница 1: ...address Fax Button Sends a scanned document via a fax number ID Card Copy Button Prints the front and back of a drivers license check onto the front side of the paper Workflow Scanning Button Scans a...

Страница 2: ...ne appears on the control panel To view a complete list of active error and alert messages 1 At the printer control panel press the Home button 2 Touch Device 3 Touch Notifications 4 Touch Faults Alte...

Страница 3: ...per jams can occur along the paper path WARNING Never touch a caution labeled area in the fuser You can get burned If a sheet of paper is wrapped around the inside of the fuser do not try to remove it...

Страница 4: ...eft Adjust the paper edge guides so they just touch the edges of the paper stack 2 Confirm the settings on the touch screen by verifying the Size Type and Color loaded in the tray and press Confirm Wh...

Страница 5: ...ree cloth Cleaning the Scanner and Control Panel To ensure optimum print quality clean the document glass regularly Cleaning helps avoid output with streaks smears and other marks that transfer from t...

Страница 6: ...upper right corner on the touchscreen Making a Copy Touch Reset to clear all settings back to default Swipe the Sample Job to allow a test print of a copy job to inspect before printing multiple copie...

Страница 7: ...0 1 to 2 0 All marks or defects within the measurement set are deleted Individual Edges enables an individual amount to be erased from each of the edges on both the first and second sides Use the arr...

Страница 8: ...h as a case number or client reference together with a page number applied to a document as it is being processed Note Some features cannot be used with the Page Layout feature and will be grayed out...

Страница 9: ...s Each segment of the job can have different settings After all the segments are programmed scanned and temporarily stored in the printer the job is processed and completed 1 Change the settings requi...

Страница 10: ...n the Enter Fax Number field enter the fax number then touch Add To add more recipients touch Add Recipient then repeat the procedure 4 Adjust fax settings as needed 5 Touch Send Sending a Fax Page 10...

Страница 11: ...the Home button 2 Touch Address Book 3 From the Address Book touch a contact name then touch Edit 4 To change contact information touch the information that you want to update edit as needed then tou...

Страница 12: ...5 Adjust the settings as required 6 Touch Scan 7 When scanning is finished lift the automatic document feeder Flip the original document then place it in the upper left corner of the document glass 8...

Страница 13: ...or group from the Address Book touch the Address Book icon Touch Favorites or Contacts then select a recipient 4 If scanning from 2 sided original documents touch 2 Sided Scanning then select an opti...

Страница 14: ...scanning originals using the glass and the document feeder into a single scan job Or scanning multiple originals from the glass into one complete file eliminating the need to merge single page scans i...

Страница 15: ...settings as needed To save the scanned document as a specific file name touch the attachment file name enter a new name then touch OK To save the scanned document as a specific file format touch the...

Страница 16: ...you are scanning a document from the automatic document feeder a prompt does not appear WARNING Do not remove the USB Flash drive while the device is scanning and processing the job If you remove the...

Страница 17: ...n the user specifies what time they want the job to print Ex Sending a large job to print during lunch or after hours so it s complete upon arrival Saved Job Stores commonly used preprinted documents...

Страница 18: ...e going to print the file 3 Click the Job Type dropdown menu 4 Click FAX 5 Either double click under Name or click the icon of the person 6 Enter the contact name and fax number 7 If you would like to...

Страница 19: ...Button Touch the job displaying Held Resources Required Touch Print on Alternate Paper Touch the alternate paper tray you would like to print from Touch the OK button the job will be scaled to that pa...

Страница 20: ...tion for any incorrect setting Select the size before the type 5 On the printer touch screen touch Confirm Page 20 Loading Labels Letterhead 1 Open tray 5 by rotating it outward 2 Load labels in the t...

Отзывы: