Wohler AMP1-16-M Скачать руководство пользователя страница 34


Page


34


Select and Detect Options Menu 

This menu allows adjustment of various audio related settings related to the 
purposing of the Volume and Balance controls and to the sound of the front panel 
speakers. 
 

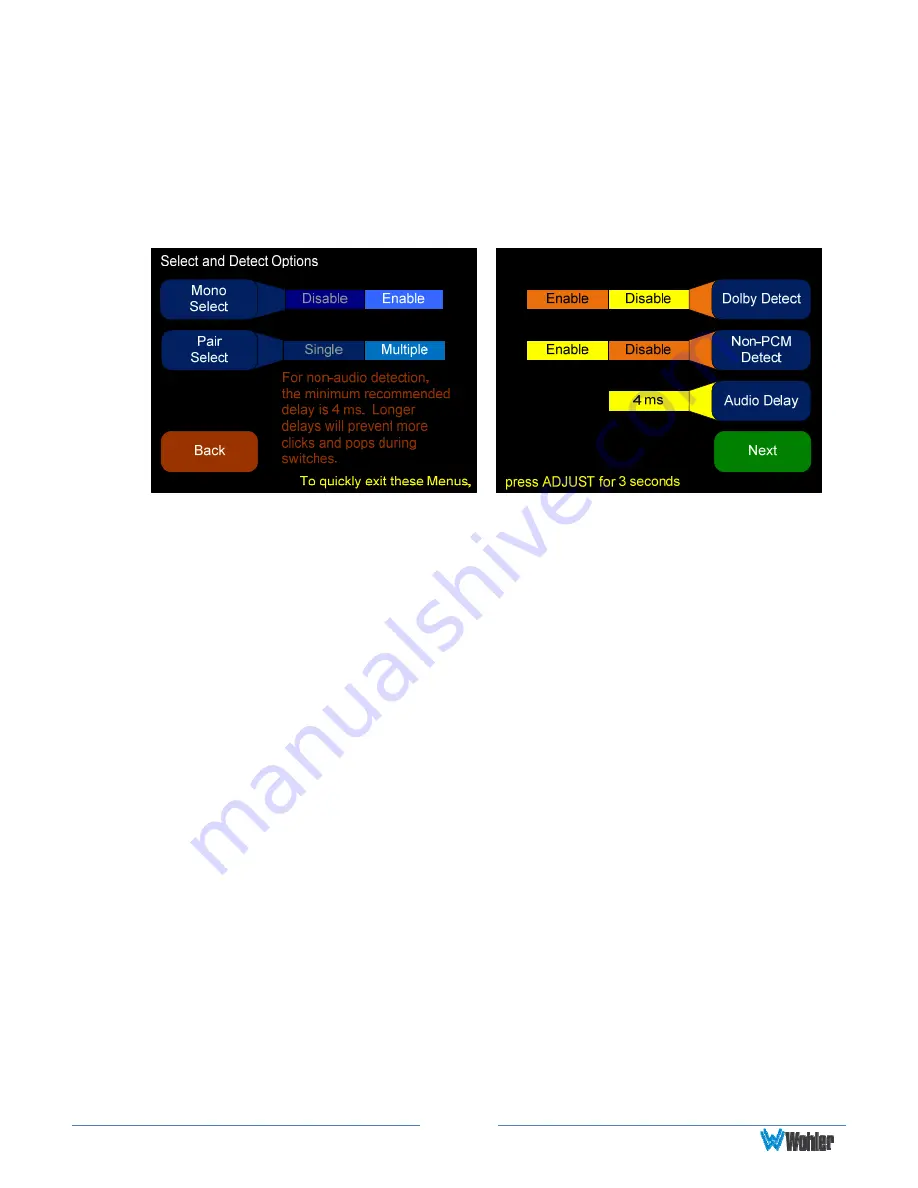
Figure 4–9: Select and Detect Options Menu 


1.


Mono Select: This control determines whether the Channel Pair Select 
buttons on the Main Screen can also select single channels, in addition to 
channel pairs. 

a.


Disable means only channel pairs may be selected or deselected by 

the Channel Pair Select buttons on the Main Screen. Press once to 
select a channel pair and press again to deselect the channel pair. 
Disable this option if you are not interested in selecting single 
channels. 

b.


Enable means either channel pairs or single channels may be selected 
by the Channel Pair Select buttons on the Main Screen.  Press once 

to select a channel pair, press again to hear the left channel of the 
pair, press again to hear the right channel of the pair, and press again 
to deselect the channel pair.  Use this option if you sometimes want to 
solo a channel. 

2.


Pair Select: Set this control to determine how the channel pair select 

buttons work in the Main Screen

a.


Single – Use his option if you only want to hear one channel pair at a 
time.  Pressing any Channel Pair Select will cancel all other selects. 
For example, if channel pair 1/2 is selected, and you press the 
Channel Pair 3/4 Select button, then channel pair 1/2 will be de-

selected, and channel pair 3/4 will be selected. If you press Channel 
Pair 3/4 Select
 again, then no channel pairs will be selected. 

b.


Multiple – Use this option if you want to hear multiple channel pairs 
at one time.  Pressing a Channel Pair Select will not cancel other 
selects. 

Содержание AMP1-16-M

Страница 1: ...AMP1 16 M 1RU 16 Channel 3G HD SD SDI Audio Monitor User Guide Software Release V5 xx Part Number 821189 Revision M...

Страница 2: ...ven though Wohler Technologies Inc has tested its equipment and software and reviewed the documentation Wohler Technologies Inc makes no warranty or representation either express or implied with respe...

Страница 3: ...Compliance 7 FCC 7 ICES 003 7 Front Panel 8 Rear Panel 9 CHAPTER 2 Operation 10 Introduction 10 Main Screen 10 Trim Screen 12 USB Port Functionality 13 Copying a Configuration from the AMP1 16 M 14 C...

Страница 4: ...pliance 43 Specifications 43 Audio Formats 44 Technical Functional Overview 45 APPENDIX A Connecting the AMP1 16 M to a LAN 46 Introduction 46 Requirements 46 Downloading the File 46 Installing the AM...

Страница 5: ...16 M Manager Safety Instructions 1 Read keep and follow all of these instructions heed all warnings 2 Do not use this equipment near water 3 Use only a dry cloth to clean the equipment 4 Do not block...

Страница 6: ...exceed 40 Celsius 104 Fahrenheit Adjacent devices can be rack mounted or stacked in proximity to the unit if this temperature is not exceeded Otherwise allow a 1RU 1 75 44 45mm space above and below t...

Страница 7: ...ernal circuitry ground is connected to the chassis Power The unit comes with a standard internal power supply and connects an A C mains power source 60W 100 to 240 VAC 10 50 60Hz through the IEC conne...

Страница 8: ...elow Table 1 1 Power Color Indication Descriptions LED Color Description Green The AMP1 16 M is functioning properly Red When the LED flashes green or yellow followed by a series of red flashes each f...

Страница 9: ...Inputs These two BNC connectors accept the 3G HD SD SDI input signals 3 3G HD SD SDI Outputs These BNC connectors output regenerated replicas of the two 3G HD SD SDI input signals 4 Selected 3G HD SD...

Страница 10: ...7 12 11 14 13 16 15 10 9 Speaker Indicators Left and Right Speaker Indicators Both Channels Speaker Indicators Bitstream Speaker Indicators No Audio Left and Right Level Meters Phase Indicators 1 Spe...

Страница 11: ...press selects both channels for listening b Second press leaves only channel 3 selected c Third press leaves only channel 4 selected d Fourth press leaves both channels 3 and 4 deselected 5 Audio Pair...

Страница 12: ...knob to increase or decrease the gain If the gain is decreased below 40 dB the channel is muted and an M is shown in a red square Multiple channel pairs can be adjusted simultaneously by first select...

Страница 13: ...ab section of Chapter 3 You can also use a flash drive to update the software in the AMP1 16 M Refer to Appendix D for instructions Immediately after connecting the flash drive to your AMP1 16 M the F...

Страница 14: ...the Flash Drive screen will display as shown in Figure 2 6 below Figure 2 6 Get From Flash Drive Screen 2 Using one of the bright yellow choices press the file number File 1 through File 7 of the file...

Страница 15: ...flash drive from the USB port Update Menu This button only appears if the inserted flash drive contains a software update files Press this button to proceed to the software updating menu Appendix D de...

Страница 16: ...P1 16 M configuration to perfectly suit your needs Note When a unit is selected in the Manager s Units Responding window a user at the front panel will be prevented from using the USB port These locko...

Страница 17: ...Channel Pair Naming In the blank fields at the middle of the screen you can add names for any channel pair Each name is comprised of the top and bottom field and each field allows up to seven charact...

Страница 18: ...ware and can be saved as user presets 1 to 7 either way Presets can be recalled from a front panel menu in the Presets tab of the AMP1 16 M Manager program or by pressing and holding a front panel Cha...

Страница 19: ...s for each of the level meter segments 3 Tone controls for the internal loudspeakers can be set in the front panel Speaker Control Options Menu or in the Wohler AMP1 16 M Manager PC program A certain...

Страница 20: ...c Trim Controlled The analog outputs are controlled by the Trim settings 7 In the Audio Muting and Delay area selects any combination of Non Audio or PA Header Note The AMP1 16 M detects PA headers th...

Страница 21: ...he menu system 13 Audio Pair Select and Mono Channel Select These two options control the method of channel selection on the Main Screen of the unit a Mono Channel Select When set to Disable both chan...

Страница 22: ...y are current 4 Programming Files Show Local File Versions Clicking this button displays the current versions of all the software components stored on the host computer and if a unit is selected in th...

Страница 23: ...der that they appear on the Ethernet tab Instead they are listed in the most likely order that you would use them 10 Get from Unit Clicking the Get from Unit button transmits the configuration file fr...

Страница 24: ...e flash drive If no Wohler folder exists the system will immediately create it when the flash drive is first connected Clicking on any one of the files or the empty file positions selects it for other...

Страница 25: ...nfiguration displayed in the Manager Note This button has exactly the same functionality as the Open button on the Ethernet tab It is repeated here for your convenience 7 Programming Files This pane r...

Страница 26: ...Trim button for at least three seconds Within any menu holding the Trim button for at least three seconds exits the menu system Navigate the menu tree as shown in Figure 4 1 with the Back and Next bu...

Страница 27: ...ons En Disable 1 Trim Mode 2 Dual Mode 3 Back 4 Reset Levels 5 6 7 Next 8 Speaker Control Options Vol Bal or L R 1 2 Tone Flat 3 Back 4 Bass 5 Low Cut 6 Treble 7 Next 8 Meter Type Reference Menu Scale...

Страница 28: ...el goes to Left Output only or Channel goes to Right Output only 1 Channel goes to Both Outputs Pressing this button sets the selected channel to go to both speakers and both analog outputs 2 Channel...

Страница 29: ...to the Recall a Preset screen as shown in Figure 4 4 Figure 4 4 Recall a Preset Screen Press a button corresponding to the preset you would like to recall Presets contain trim levels input selections...

Страница 30: ...e a Preset Screen Press a button corresponding to the preset you would like to save Presets contain trim levels input selections and channel assignments To leave this screen without saving a preset pr...

Страница 31: ...nable Disable button The Trim Screen can be accessed when the Trim control is pressed but any Trim adjustments only affect the speaker and headphone volume when the Trim Screen is showing 3 Dual Mode...

Страница 32: ...o the headphone jack This is the default setting 3 Always Mute Pressing this button selects the option that the internal speakers will always be muted This setting can be convenient to use when monito...

Страница 33: ...ttest acoustic response possible from the internal speakers 3 Bass and Treble options are provided for customer tuning of the speaker sound to fit your needs Select the menu button and use the Adjust...

Страница 34: ...e selected by the Channel Pair Select buttons on the Main Screen Press once to select a channel pair press again to hear the left channel of the pair press again to hear the right channel of the pair...

Страница 35: ...onds Longer delays will prevent more clicks and pops during switches 4 Non PCM Detect Enabling this Dolby detection method means the channel status bits are examined to determine whether they indicate...

Страница 36: ...inutes to 119 minutes in 1 minute increments and from 2 hours to 24 hours in 1 hour increments The default setting is 8 hours If the AMP1 16 M is in operation for the screen saver timeout period and n...

Страница 37: ...Limit Top Limit Default Reference Default Color Bounds Default Ballistics Lower Upper Float Bar AES 72 dBFS 0 0 dBFS 0 dBFS 0 dBFS 30 dBFS 20 dBFS IEC Type I VU VU 45 dBr 3 5 dBr 20 dBFS 0 dBr 3 dBr...

Страница 38: ...24 dB 2 8 sec None Bar or Floating Segment Not Displayed 3 Bar Pressing this button and then rotating the Trim knob steps through the available settings for the bar ballistics Refer to Table 4 1 4 Re...

Страница 39: ...Middle Segment Pressing this button and then rotating the Trim knob adjusts the division between the middle and lower segments You can adjust the color boundary in 1 dBr increments and it has the sam...

Страница 40: ...ire unit to its factory fresh condition The unit name is deleted the IP Address is set to DHCP and the Connect setting s reset to LAN 2 Set IP Address or IP Mask Pressing this button highlights the fi...

Страница 41: ...on closes this menu and returns to the Main Screen Important This enables a single address DHCP server Thus when a computer is connected directly both the unit and the host computer will be assigned a...

Страница 42: ...Re clocked output of the selected SDI input 8 Balanced stereo analog outputs on XLR M optionally Volume Balance controlled or fixed line output 9 Front panel headphone jack 10 Automatic frame rate de...

Страница 43: ...kg Space Required 1 RU rack unit Supplied Accessories AC Power Cord North America Display Type TFT LCD Number of Displays 2 Screen Size 2 4 diagonal per screen Screen Resolution 320 x 240 Inputs SDI 2...

Страница 44: ...c Range 100 dB SDI Input Termination 75 unbalanced Hum and Noise Better than 68 dB below full output Electrical Distortion 0 05 at any level below limit threshold Audio Formats All of the audio format...

Страница 45: ...nal Overview Figure 5 1 illustrates the overall functionality of the AMP1 16 M monitor Figure 5 1 AMP1 16 M Block Diagram Note Stereo phase indication measurement occurs in the signal chain before it...

Страница 46: ...lled Requirements 1 You must have a PC or laptop that a Is running Windows XP Vista or Windows 7 b Is connected to a LAN and c Has access to the Internet 2 An IP address from your network administrato...

Страница 47: ...act the file s to the folder you created in Step 1 on your desktop Installing the AMP1 16 M Manager Open the extracted folder and right click on the AMP1 16 M Manager exe file and choose Run as Admini...

Страница 48: ...Launch the AMP1 16 M Manager from the Desktop When the AMP1 16 M Manager appears it will display the SDI 1 Setup tab by default Figure A 1 AMP1 16 M Manager SDI 1 Setup Tab 2 Click the Ethernet tab F...

Страница 49: ...unit you wish to configure in the Units Responding list 4 Click Config IP Figure A 3 Enter AMP1 16 M Address Dialog 5 When the Enter AMP1 16 M IP Address dialog displays do the following a Click the U...

Страница 50: ...Units Responding box 7 If the unit is located on a different subnet than the host computer the Windows Manager may not be able to automatically locate it In this case use the Locate IP button a Enter...

Страница 51: ...be done in the Version and Ethernet Menu Connect Direct For more information see the Version and Ethernet Menu description in Chapter 4 Note If there are static values already entered for the IP Addr...

Страница 52: ...11 When finished be sure to disable the Direct Mode on the unit and return it to the previous Ethernet settings either through the Windows software and the Configure IP function or through the Version...

Страница 53: ...to update the software in the AMP1 16 M 1 Use a USB flash drive 2 Use the AMP1 16 M Manager to update the unit over Ethernet NOTE Option 1 is only available for units with software Version 4 00 or la...

Страница 54: ...k the Update All radio button in the File Update Options box please do so here Otherwise leave the Update as Needed box checked 4 Click Check for Updates At this point the system will respond with one...

Страница 55: ...nt manager download the latest manager and install it on your PC Figure C 3 FTP Success Dialog Figure C 4 FTP Success Dialog In any case click OK Note The firmware stored on the computer is now up to...

Страница 56: ...click the one you want to update from the Units Responding area 2 Click Update Note The AMP1 16 M will discontinue its normal operation while the software update is taking place This process may take...

Страница 57: ...tton will not appear See Figure D 1 below Figure D 1 Flash Drive Options Screen 3 Press Update Menu 4 All the firmware files on the USB drive will be read and validated This will take a few minutes an...

Страница 58: ...two update options a Press the Update Software as Needed button to install only newer software versions contained in the flash drive into the AMP1 16 M The next screen to appear will describe what to...

Страница 59: ...ion process which will automatically continue until its conclusion Alternatively you may press the Cancel Quit button to return to the Flash Drive Software Update menu and not perform the software upd...

Отзывы: