background image

Wieland 

podis

 system 


Manual V 1.03 / ref. no. 00.000.0059.0 / 28.03.2001


II 

Using this manual 


Before reading the manual, please familiarise yourself with the 
table of contents. This will provide you with an immediate 
overview of the manual. 
 
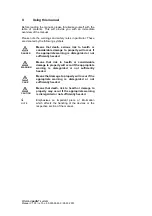
Please note the warnings and safety notes in particular. These 
are denoted by the following symbols. 


Means that death, serious risk to health or 
considerable damage to property will occur if 
the appropriate warning is disregarded or not 
sufficiently heeded. 


Means that risk to health or considerable 
damage to property will occur if the appropriate 
warning is disregarded or not sufficiently 
heeded. 


Means that damage to property will occur if the 
appropriate warning is disregarded or not 
sufficiently heeded. 


Means that death, risk to health or damage to 
property 

may 

occur if the appropriate warning 

is disregarded or not sufficiently heeded. 


Emphasises an important piece of information 
which affects the handling of the devices or the 
respective section of the manual. 


DANGER 

WARNING 

  CARE 

CAUTION 

i


NOTE 

Содержание podis

Страница 1: ...nual V 1 03 ref no 00 000 0059 0 28 03 2001 podis system manual Part 1 podis CON Energy bus Part 2 podis DRIVE Distributed motor control units Ref no 00 000 0059 0 Version 1 03 Issue date 08 01 2001 L...

Страница 2: ...the properties of podis CON components and enable the control of connected loads via the field bus coupler which is integrated in the motor control units The two parts of the podis system are describe...

Страница 3: ...if the appropriate warning is disregarded or not sufficiently heeded Means that risk to health or considerable damage to property will occur if the appropriate warning is disregarded or not sufficien...

Страница 4: ...ofing status of podis system manual part 1 Date Publication Version Proofing status Proofing status old Edited new 08 01 2001 podis manual part 1 1 draft 00 TK 18 01 2001 podis manual part 1 1 draft 0...

Страница 5: ...LAND ELECTRIC GmbH reserves the right to make changes for technical progress WIELAND ELECTRIC GmbH reserves all rights regarding the issue and protection of patents and designs Products from other man...

Страница 6: ...5 2 Loads three phase asynchronous motors 1 6 Flat cable outlet 1 7 Sealing ends 2 Fixing and exchange 2 1 Wiring instructions 2 2 Cable clips 2 3 Flat cable outlets 2 3 1 Round cable outlet 2 3 2 Ou...

Страница 7: ...five high capacity cores 2 5 mm 2 as the main circuit and two cores for the 24 V control electronics Energy can be supplied and drawn via supply terminals at any point on the flat cable three phase as...

Страница 8: ...n be used in all installations where three phase asynchronous motors must be supplied with energy and control voltage e g for conveyor belts A prerequisite for the operation of podis CON is the availa...

Страница 9: ...PVC according to CENELEC HD 21 1 S3 TI2 silicone free Auxiliary circuit colour coding red white Fuse 16 A with tripping characteristic C Number of cores x cross section 2 x 2 5 mm2 based on HD 359 an...

Страница 10: ...op impedance DIN VDE 0100 section 430 should be applied The 2 5 mm 2 flat cable must be fused to prevent overload and short circuits using a three phase miniature circuit breaker 16 A Inom with trippi...

Страница 11: ...solated When connecting motor contactor combinations from third parties ensure that they are electrically separated min isolation voltage 2 5 k V AC 1 5 2 Loads three phase asynchronous motors In prin...

Страница 12: ...rried out via the flat cable outlets provided Variants For round cable For connectors Corresponds to IEC 999 VDE 0600 T1535 Piercing contact according to IEC 998 3 Mechanical endurance Vibration test...

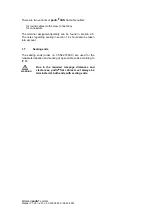
Страница 13: ...t polarity can be found in section 2 3 The notes regarding sealing in section 1 4 should also be taken into account 1 7 Sealing ends The sealing ends order no 05 562 7450 0 are used for the reliable t...

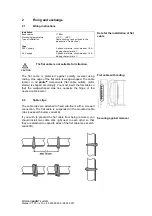
Страница 14: ...ding One edge of the flat cable is wedge shaped The cable locator in all podis components flat cable outlets motor starter is shaped accordingly You must insert the flat cable so that the wedge shaped...

Страница 15: ...cable outlet Please also note the specification of the flat cable outlet in section 1 7 2 3 2 Outlet for connectors Please also note the specification of the flat cable outlet in section 1 7 2 3 3 Att...

Страница 16: ...attach the integrally moulded plug or a cover and secure in position with the clips The plug may never be inserted or removed under load 5 You can now connect the cables for the flat cable outlet for...

Страница 17: ...ried out with live voltage 2 4 Loads The basic conditions for the number of motors that can be connected to a flat cable for operation are the current carrying capacity of 16 A at 50 C of the flat cab...

Страница 18: ...flat cable We recommend the Wieland flat cable stripper for removing the sheath further information can be found in the appendix under Components It has an end stop that has been specially designed fo...

Страница 19: ...rsonal injury to the user or a third party or damage to machines installations or other property may occur during usage The implementation of the energy bus systems must be technically correct accordi...

Страница 20: ...ct design installation and commissioning of energy bus systems in connection with the supply of machines and their controllers the safety conditions stipulated in the machine guideline 89 392 EEC must...

Страница 21: ...ncy stop An emergency stop should be enforced if hazardous operating conditions occur in particular during start up after a voltage dip or failure during start up of control systems after disruption o...

Страница 22: ...3 2 5 AC 500 V 16 A at 50 C 7 pole outlet box for round cables flat cable contact with pointed screws M3 tightening torque 0 8 1 Nm for wire ranges 1 5 2 5 mm 2 at screw terminals with Philips bi dire...

Страница 23: ...04 0020 0 Motor starter MC2M 1 2 1 1 83 104 0020 0 Motor starter MRC 1 2 1 1 83 104 0020 0 Motor starter MFI 1 2 1 2 83 104 0430 0 DP bus coupler 1 1 1 0 83 104 0130 0 Extension bus coupler 1 1 1 0 Pr...

Страница 24: ...LAND ELECTRIC GmbH reserves the right to make changes for technical progress WIELAND ELECTRIC GmbH reserves all rights regarding the issue and protection of patents and designs Products from other man...

Страница 25: ...eneral notes for connecting motors 5 2 3 podis MC2M 5 2 4 podis MRC 5 2 5 podis MFI frequency inverter 5 3 Bus coupler 5 3 1 PROFIBUS DP 5 3 2 Extension bus 5 3 3 Sensor technology 6 Commissioning and...

Страница 26: ...I 6 7 Derating 6 8 Diagnostics 6 8 1 Diagnostics on the bus coupler 6 8 1 1 LED displays on the bus coupler 6 8 1 2 7 segment display on the bus coupler 6 8 2 RESET button 6 8 3 Diagnostics under PROF...

Страница 27: ...parately with one direction of travel 2 MRC Motor Reverse Contactor for clockwise and anti clockwise rotation of the motors 3 MFI Motor Frequency Inverter with frequency inverter for operation of thre...

Страница 28: ...ed motor contactor is available for each motor The motors are protected against short circuits by an overload monitoring function The motor starter itself is protected by internal fuses that cannot be...

Страница 29: ...in contacts on device Digital I Os Connections of initiators actuators M12 circular connector 4 sockets each with 5 contacts on device Number of inputs and outputs 6 x IN and 2 x IN OUT Inputs Nomina...

Страница 30: ...tactor are integrated in the device The motors are protected against short circuits by an overload monitoring function The motor starter itself is protected by internal fuses that cannot be replaced D...

Страница 31: ...on modules max 4 Type of connection M12 circular connector Digital I Os Connections of initiators actuators M12 circular connector 4 sockets each with 5 contacts on device Number of inputs and outputs...

Страница 32: ...tion with variable speed To protect the motor a thermal resistor must be inserted in the motor and connected to the motor control unit In addition the motors are protected against short circuits by an...

Страница 33: ...tarter Diagnostic and extension bus Number of extension modules max 4 Type of connection M12 circular connector Digital I Os Connections of initiators actuators M12 circular connector 4 sockets each w...

Страница 34: ...optocoupler in motor starter Bus connection according to PROFIBUS norm Connection type M12 circular connector with metal housing socket contact on bus coupler Transmission type RS485 according to PRO...

Страница 35: ...frequency interference voltage Choke with current transformation 2 x 4 7 mH High frequency interference voltage Inductance 2 x 100 mH Supply electronics Input voltage UH 24 V DC 20 via base Extension...

Страница 36: ...inputs may only be provided via the 24 V supply that is applied internally at X10 X13 an external supply is not permitted The behaviour of the inputs is specified according to the PLC norm EN 61131 t...

Страница 37: ...n protocol DP enables a fast cyclical data exchange between the control CPU and the distributed peripheral devices Structure of a PROFIBUS DP network A PROFIBUS DP network is generally composed of a m...

Страница 38: ...ces the DP master must be configured with the individual device data For the formal description of podis DRIVE motor control units a so called GSD file is required GSD files Under PROFIBUS DP the perf...

Страница 39: ...on More detailed information about the parameter settings can be found in section 6 6 Parameterisation The item number for ordering the GSD file can be found in the appendix 4 4 2 Monitoring and prote...

Страница 40: ...be present at the connector during this period Never touch any live components when the module is connected Even if the motor is not being driven it remains electrically connected to the power supply...

Страница 41: ...ection of the loads and the energy supply or signal routing can be found in the descriptions of the individual types of motor control units All the electrical installations and connections may only be...

Страница 42: ...to attach the base plate and connect the flat cable 1 Screw the base plate onto the sub floor using the fixing screws 2 Attach the PE conductor with the screw in the space provided The connecting cab...

Страница 43: ...tle the base plate 2 Seal the damaged area of the flat cable with an approved sealing strip Scotch VM from 3M 3 Replace the flat cable connection of the base plate order no Z1 458 2953 0 Mount the bas...

Страница 44: ...using the four captive screws see diagram The torque may not exceed 4 Nm The motor starter may only be placed onto the base plate if it has already been installed It is not permitted to insert and re...

Страница 45: ...arter If a brake is present on the motor it must be rated for 400 V AC The core cross section of the motor connecting cables must be adapted to the respective environmental conditions The decisive fac...

Страница 46: ...tical for both sockets Pin Brief description Comment 1 L1 U Motor phase voltage 2 L2 V Motor phase voltage 3 L3 W Motor phase voltage 4 n c Unassigned n c Unassigned 10 n c Unassigned PE PE PE connect...

Страница 47: ...l in motor Brake rectifier Wiring jumper for d c brake circuit 4 core connecting cable 3 cores PE X30 podis motor feeder connector X31 podis motor feeder connector Motor without brake with thermistor...

Страница 48: ...igned In this variant the brake can be applied independently of the motor Hazardous voltage can thus also be present at the terminals of the brake even when the motor is stationary If a brake is prese...

Страница 49: ...istor X30 podis motor feeder connector Motor without brake without thermistor 4 core connecting cable 3 cores PE X30 podis motor feeder connector Motor with brake without high speed contact without th...

Страница 50: ...or feeder connector Motor with brake with high speed contact without thermistor Brake coil in motor Brake rectifier 8 core connecting cable 7 cores PE X30 podis motor feeder connector Motor without br...

Страница 51: ...RC Asynchronous motor with brake separate with high speed contact with thermistor X30 podis motor feeder connector Motor with brake without high speed contact with thermistor Brake coil in motor Brake...

Страница 52: ...W Phase voltage W 4 TU1 Temperature monitoring thermistor 5 TU2 Temperature monitoring thermistor 6 BR_AC1 Brake drive circuit AC 7 BR_AC2 Brake drive circuit AC 8 BR_DC1 Brake DC high speed contact 9...

Страница 53: ...or X30 podis motor feeder connector Motor without brake with thermistor 6 core connecting cable 5 cores PE podis MFI Asynchronous motor with brake with thermistor X30 podis motor feeder connector Moto...

Страница 54: ...0 28 03 2001 podis MFI Asynchronous motor with brake with high speed contact with thermistor X30 podis motor feeder connector Motor with brake with high speed contact with thermistor Brake coil in mot...

Страница 55: ...dress is set as follows Switches S1 to S8 are assigned values as in the sketch switch S8 is reserved Switch value Switch number You are looking for the position of the DIP switch for the address ADR T...

Страница 56: ...coupler onto the base plate with the two captive screws The torque may not exceed 1 2 Nm The bus coupler can be damaged if it is inserted or removed while connected to the supply Disconnect the 24 V p...

Страница 57: ...000 0226 5 5 Connecting cable from bus coupler to T connector 2 pole Wieland 0 3 m 08 000 0229 8 6 Connecting cable from bus coupler to T connector 4 pole Wieland 0 3 m 08 000 0229 9 Please note the f...

Страница 58: ...xtension bus couplers have a matching resistor which can be activated via a jumper Jumper inserted matching resistor activated Jumper removed matching resistor deactivated The jumper is already insert...

Страница 59: ...nsor technology connections X10 X13 Socket contacts are located on the device which are assigned as shown in the following table Pin Signal Description 1 24 V 2 IN B 3 0 V 4 IN A or OUT A 5 Shield Pin...

Страница 60: ...n b 3 Reference potential of supply GND 4 E1 A1 E2 5 PE PE Connecting plug Connecting sockets Base plate of I Os The inputs should only be connected via the internal 24 V DC supply applied at X10 X13...

Страница 61: ...er risk of death or personal injury of the user or a third party or damage to machines installations or other property may occur during usage The implementation of the podis DRIVE motor control units...

Страница 62: ...n the procedure to assess conformity The norm DIN EN 60204 1 should be observed machine safety general requirements for the electrical equipment of machines If the podis DRIVE motor control units them...

Страница 63: ...eration All safety related devices of the controlled machine should be designed so that they can function independently of the control system Emergency stop devices must remain effective according to...

Страница 64: ...ing and installation should be carried out according to the mechanical guidelines 6 2 Switching on The system is activated by switching on 1 the auxiliary supply for the electronics and 2 the main sup...

Страница 65: ...is DRIVE is called Podis GSD The current version can found on the internet under http www wieland electric com The integration of the GSD file is indicated in the following sections using the example...

Страница 66: ...D file into the directory SIEMENS STEP7 S7DATA GSD Select the menu item Extras Update GSD files in the Extras menu 4 The podis components are now included in the hardware catalog and are available for...

Страница 67: ...pply unit PS 300 Select the controller S7 CPU CPU 315 2 DP When this CPU is selected a dialog box appears in which you must specify a PROFIBUS network see diagram on right hand side Enter the bus addr...

Страница 68: ...E devices To do this click once on the DP master system thick black white line This line then becomes a thick transparent black line 6 4 2 Inserting the podis DRIVE devices into the PROFIBUS system Se...

Страница 69: ...US DP slave address must be set at the bus coupler and must match the address configured here After confirming with OK a podis DRIVE DP slave is displayed with 10 empty module locations The individual...

Страница 70: ...s configured first followed by the output range MRC OUT The remaining extension devices that are connected to the PROFIBUS slave via the local bus are inserted in the same way The configuration menu h...

Страница 71: ...ed 5 module locations 0 to 4 are defined The module location 0 always represents the motor control unit that is switched directly on the PROFIBUS Module locations 1 to 4 are the motor control units th...

Страница 72: ...0 Max 3 6 A 0 Nominal current 0 180 Max 3 6 A 50 Asymmetry 0 100 In 1 Operating time I2 t 1 255 10 MC2M Motor 1 Minimum current 0 180 Max 3 6 A 0 Motor 1 Nominal current 0 180 Max 3 6 A 50 Motor 1 Asy...

Страница 73: ...s applied 3 MINCRRNT_1 Value is below minimum current The bit is set if there is an underflow in the Min current when the motor is started This bit can be used to display the failure of all 3 phases o...

Страница 74: ...set if the event no longer exists 5 ENDSTUFE_2 Indicates the status of the control bit Output module ON 6 Not used always 0 7 Not used always 0 5 Reserved 6 ACTUAL_CURRENT_2 Actual current of motor 2...

Страница 75: ...current and Max time is exceeded the motor is disconnected and the brake is applied 3 Not used always 0 4 COMERR Communication error The bit is set if invalid commands are generated due to false input...

Страница 76: ...ger exists 5 ENDSTUFE Indicates the status of the control bit Output module ON 6 LADERELAIS Indicates the status of the control bit Charging relay 1 OK 7 RUN Bus coupler is running 2 0 WARN_TEMP Tempe...

Страница 77: ...ill same ramp as for acceleration E 1 0 1 5 0 Stationary Enable and anti clockwise rotation HIGH ramp preset motor is stationary as speed 0 has been reached and no new speed has been indicated F 1 0 1...

Страница 78: ...ise at a constant speed Speed is reached motor speed remains unchanged P 1 0 0 5 150 Gradually slows down until it reaches given speed Motor brakes with preset ramp until it reaches a standstill in th...

Страница 79: ...amp The decimal parameter value is calculated as follows dec t 0 674 0 465 t time in seconds dec parameter value decimal Example 1 The motor should reach its nominal speed after 70 seconds Parameter v...

Страница 80: ...001 Example 2 Which ramp value X must be set so that a motor rotates with a nominal speed idling of 1850 U min 63 Hz after 50 sec with 925 U min 25 Hz Parameter value dec 50 0 674 0 465 x 1850 925 212...

Страница 81: ...ters of the podis DRIVE devices are defined on the following pages using the configuration software The parameterisation is carried out via the input ranges of the podis DRIVE devices MRC IN MC2M IN M...

Страница 82: ...racteristic curve is used to convert a current value in the range 0 to 3 5 A into a decimal value in the range 0 to 180 It is required to preset the minimum current and nominal current for the types M...

Страница 83: ...range If the values are left at Min current 1 0 or Min current 2 0 no error message appears in the display or in the status byte if the cable is removed or the motor is not connected when it is switc...

Страница 84: ...our is reached with the parameter value 50 dec Current asymmetry 1 Current asymmetry 2 Adjustable value 1 100 Value range physical variable 100 1 Factory setting 1 Recommended values 1 Percentage valu...

Страница 85: ...ariation in the PWM frequency is used to change either the power or noise generation Lower frequencies enable a higher temperature limited output power in connection with greater noise generation see...

Страница 86: ...25 Factory setting 10 Recommended values 5 64 Used to increase the rotational torque by increasing the voltage at low speeds U f characteristic curve for podis MFI U Unom Boost factor 0 25 of nominal...

Страница 87: ...0 75 140 Adjustable value range decimal 1 255 Value range physical variable internal variable Recommended values see table Used to protect the motor by setting the maximum current Mains frequency Adj...

Страница 88: ...ror displays in the status byte and LED display on the bus coupler Error flag Overcurrent is set during the start up increase boost increase ramp time Overcurrent disconnection set motor saturated dis...

Страница 89: ...7 Derating The maximum output power of the MFI is dependent on the ambient temperature The following derating curve shows this dependency factor Derating curve for frequency inverter podis MFI Shaft o...

Страница 90: ...operating and fault diagnostics of the connected devices can be represented visually The respective meaning of the symbols can be found in the following table 6 8 1 1 LED displays on the bus coupler...

Страница 91: ...or configuration ERR OFF Motor starter OK ON See additional fault information of the 7 segment display following table Rectify error and press reset button change motor starter if necessary X10 to X13...

Страница 92: ...om the master or in the event of an error Byte Bit Short code Description 0 0 non_exist Slave does not exist sets master 1 station_not_ready Slave is not ready for data exchange 2 cfg_fault Configurat...

Страница 93: ...slot location 0 Basic module 10 Status of module slot location 0 11 Status of module slot location 1 Extension module 1 12 Status of module slot location 1 13 Status of module slot location 2 Extensio...

Страница 94: ...interface and the electrical installation of the podis motor control unit the system can be put into operation After switching on the operating voltage the bus coupler checks all the connected functi...

Страница 95: ...ading out the programming data from the flash memory Test of all LEDs and the 7 segment display Test of all LEDs and the 7 segment display Test of the display elements RUN flashing DIA on RUN flashing...

Страница 96: ...pply 400 V mains voltage is missing phase failure or unbalance Caution after restart If the 400 V supply is still not present the error code 1 is also displayed After switching on the 400 V supply vol...

Страница 97: ...urrent setting Reset error with control byte value 80hex Comerr M1 Communication error 1001 0000 0000 0000 Display if faulty communication to the motor starter occurs due to faulty telegrams or incorr...

Страница 98: ...tion after restart If the 400 V supply is still not present the error code 1 is also displayed After switching on the 400 V supply voltage however the error is automatically acknowledged Check mains v...

Страница 99: ...crimp contacts for wire range 1 5 mm 2 1 screwed gland M25 x 1 5 with NPR sealing insert for cable diameters 9 16 mm 1 NPR sealing insert for cable diameters 13 18 mm Motor connector for MFI 75 011 01...

Страница 100: ...up to 1 5 MBaud Connecting cable PUR 0 3 m for extension bus 08 000 0226 4 1 2 x M12 socket connectors 5 pole shielded Connecting cable PUR 1 0 m for extension bus 08 000 0226 5 1 2 x M12 socket conne...

Отзывы: