background image

VeriPulse IOS User Manual

20

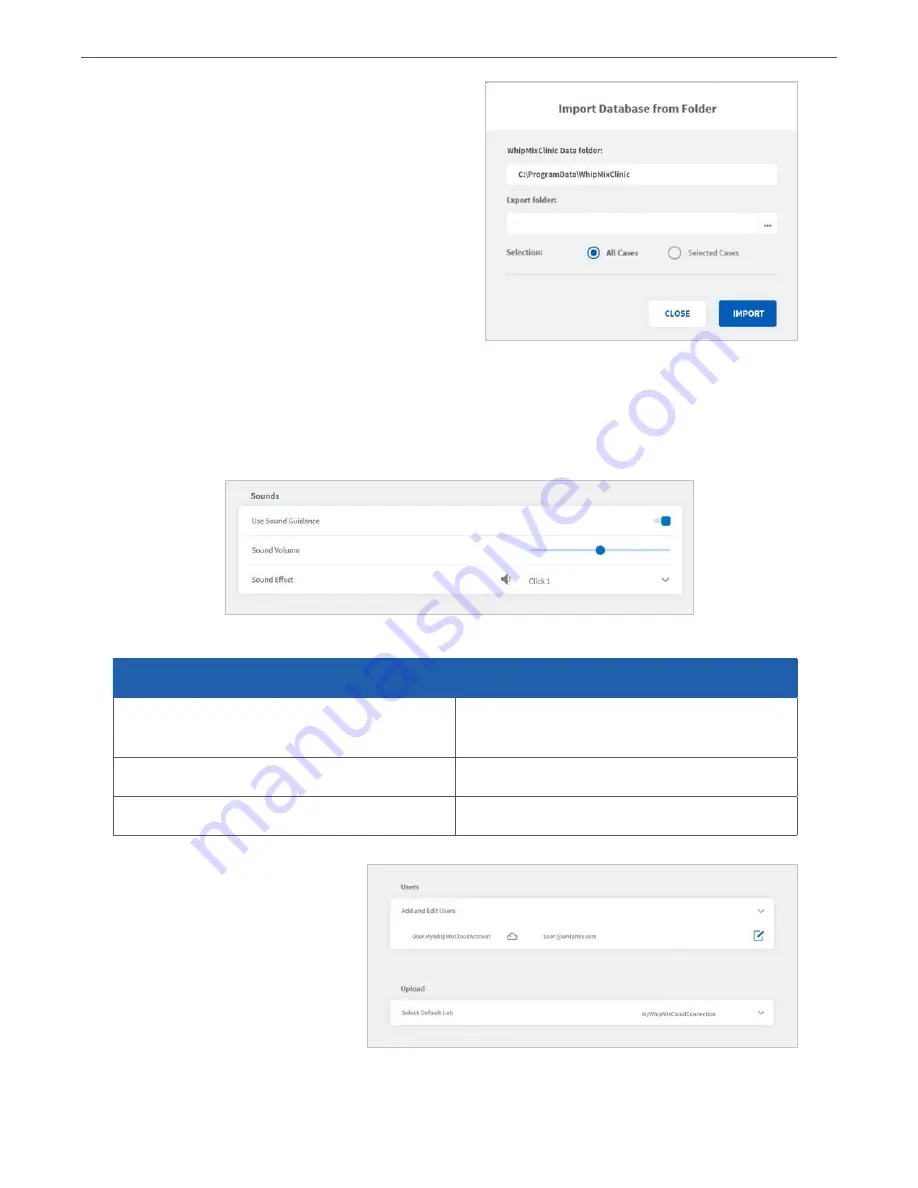
Import Database 

Click on the 

IMPORT

 button to select the 

WhipMixClinic Data folder

 and 

Import folder

You can import 

All

 or 

Selected Cases

.

Sound Settings 

Sound settings enable you to activate/deactivate the Sound Guidance feature during 
scanning, and to preselect sound effects and volume. The sound setting configure the sound 
from the computer. Note: if the computer’s volume is deactivated or muted the user will not 
hear the sounds.

Description 

Sound Setting

Description

Use Sound Guidance

Activate to use Sound Guidance during 
scanning (Recommended)

Sound Volume

Preselect volume

Sound Effect

Preselect sound effect

User Settings 

In User settings you can 
Add or Edit Users using the 
administrator account (WC). 

User dossiers can be password 
protected, and linked to a 
WhipMixCloud account. 

Содержание VeriPulse IOS

Страница 1: ...User Manual ...

Страница 2: ...VeriPulse IOS User Manual Precision you expected Simplicity you didn t ...

Страница 3: ...dpiece 10 3 7 Calibration 10 3 8 Wall Mount Installation Instructions Optional 11 4 Setting up the VeriPulse IOS Solution 4 1 Connecting VeriPulse IOS 12 4 2 Launching WhipMixClinic 13 4 2 1 Setting Up a WhipMixClinic User Account 14 4 2 2 Connecting VeriPulse IOS to WhipMixCloud 14 4 3 Getting Started With WhipMixClinic 15 4 4 Configuring WhipMixClinic Settings 17 5 Using WhipMixClinic 5 1 Managi...

Страница 4: ...ip 46 7 3 Disposal 47 7 4 Calibration 47 8 Safety Guidelines and Warnings 8 1 Warnings and Symbols 48 8 2 General Guidelines 48 8 3 General Warnings 48 8 3 1 System Modification 48 8 3 2 Approved Software 49 8 3 3 Equipment Failure 49 8 4 Mechanical Hazards 49 8 4 1 Moving Parts 49 8 4 2 Dropped Equipment 49 8 4 3 Base 49 8 5 Electrical Safety 50 8 5 1 Electrical Shock 50 8 5 2 Stress on Cables 50...

Страница 5: ...natomical Abutment Screw Retained Crown Indirect Bonding Clear Aligners Night Guard Maxillary Deprogrammer Maxillary Repositioning Splint Full Denture Removable Partial Denture RPD Flexi Denture Copy Denture Guided Surgery Planning Tooth Supported Guide Bone Supported Guide Smile Design Digital Model Verify with your dental lab or service provider about their capabilities to produce particular ind...

Страница 6: ...n the order of a Dentist WARNING Unintended use of the system can result in physical injury to the patient and operator and damage to the system 1 6 Classifications The VeriPulse IOS system has the following classifications Protection against electrical shock Type B Applied Part Protection against harmful ingress of water Ordinary equipment IPX0 Safety of application in the presence of a flammable...

Страница 7: ... DC Power Adapter 79279 Save the Box It is highly recommended that you store the box in a safe place and do not throw it away The box is optimal for any necessary transportation or shipment of the VeriPulse IOS 2 1 Components Overview The VeriPulse IOS comprises the following components 1 Docking Base 2 Tip 3 Scan Button 4 Scanner Handpiece 5 USB 3 0 Cable 6 AC DC Power Adapter ...

Страница 8: ...anner Tip Reusable sterilize using steam autoclave Heating Element Prevents formation of fog on the optics Acquisition Method Intraoral camera active stereo imaging Color Scanning 24 bit 8 bit per channel 3 1 2 Scanning Process Tooth Preparation No powder or spray required Scanning Principle Continuously scanning and accumulating stitching depth and color data Distance Scanner Tooth 0 16mm Possibl...

Страница 9: ...sk Space 100 GB of free disk space or greater Ports 1 x USB 3 0 port SuperSpeed Required Hardware CPU Type Intel i7 4 Cores or greater e g i7 8700 CPU Clock 2 8 GHz clock or greater Memory 16 GB of RAM or greater DDR4 or better GPU NVIDIA GeForce Graphics Processor 10 Series GTX 1070 or greater At least 6 GB video memory RTX2000 Series 2060 or greater At least 6 GB video memory Quadro RTX3000 and ...

Страница 10: ...ser maintenance is required and no user service is allowed Please contact technical support in case of problem Cleaning Do not try to clean the inside of the device Refer to section 7 1 Cleaning the Headpiece 3 4 Power Input The power adapter input is 5V DC 100 240V AC 50 60Hz 3 5 Reusable Tips Scanner tip is autoclavable up to 250 times in a steam autoclave when used with 132 C 134 C 4 mins cycle...

Страница 11: ...t It is recommended to use wall anchors and threaded screws with a 8mm 5 16th inch head diameter A 4 5mm 3 16th in distance between wall and bottom screw head is recommended CAUTION If the docking base is not properly installed there is a possibility of the base falling and damaging the scanner IMPORTANT Whip Mix is not responsible for accidents or damage caused in the event the scanner falls ...

Страница 12: ... Connect the provided USB 3 0 cable to the docking base the connector socket is located underneath the base NOTE Using a USB cable other than the one provided may result in system malfunction or reduced performance 4 Connect the other end of the USB cable to the computer NOTE It is strongly recommended to plug the USB cable to a USB port located at the back of the computer not doing so may result ...

Страница 13: ...RTANT If using a laptop computer make sure the power supply is connected to an outlet and not running on battery power Failure to do so will mean that the scanner will not have sufficient power to produce images 4 2 Launching WhipMixClinic Once you have connected the VeriPulse IOS you are ready to launch the WhipMixClinic software installed on your computer On the computer click on the WhipMixClin...

Страница 14: ...Users and enter modify User information email name and photo User dossiers can be password protected and linked to a WhipMixCloud account 4 2 2 Connecting VeriPulse IOS To WhipMixCloud The VeriPulse IOS Solution enables users to connect to its dedicated cloud platform WhipMixCloud to easily and efficiently setup and manage file transfers and connections with labs Click on Add New User in the User ...

Страница 15: ...pMixClinic the Patients or Cases default view is displayed selected in settings A B C D E A Patients Cases View You can toggle between Patients and Cases views and Filter or search desired Patients Cases Filter Search Search by term or Click on the Filter icon to open the Filters dialog box You can filter by Gender and or Date ...

Страница 16: ...s required Enter Patient details and any useful medical notes Click to Create C Create new case Click on the Create New Case click bar to directly access the Order Form window in the VeriPulse IOS Scanning module menu See the VeriPulse IOS Scanning Workflow below It is recommended you add a new Case by first selecting a Patient See Adding a new Case to a Patient below D User Logout Click here to l...

Страница 17: ...cking the System icon located in the top right hand corner of the WhipMixClinic interface Settings General Data Sounds Users Upload Order Form PDF To access a specific Settings group you can select from the left hand Settings Menu filter by search or scroll down Note System settings are automatically applied to all users ...

Страница 18: ... colored ROI overlay during Bite Alignment Activated by default This triggers a green red overlay during scan phase to indicate actively gather data Enable High Resolution Finalization Select to enable default high resolution finalization View Software version copy function to right Select to view copy scanning module software version UI Version copy function to right Select to view copy user inte...

Страница 19: ...ixClinic Data folder and Export folder and to export All or Selected Cases Import Database Click on the IMPORT button to select the WhipMixClinic Data folder and Import folder and to import All or Selected Cases Case Export Path Click to specify the Case Export folder Share Database With All Users Activate this feature to share or restrict Database access Export Database Click on the EXPORT button...

Страница 20: ... and volume The sound setting configure the sound from the computer Note if the computer s volume is deactivated or muted the user will not hear the sounds Description Sound Setting Description Use Sound Guidance Activate to use Sound Guidance during scanning Recommended Sound Volume Preselect volume Sound Effect Preselect sound effect User Settings In User settings you can Add or Edit Users using...

Страница 21: ...n implant and patient requirements Description Order Form Setting Description Teeth Numbering System Select order form teeth numbering system Shade System Select order form Shade System Hide Patient s Name Activate this feature to anonymize patient identity This can be useful to protect patient privacy and to use anonymous case examples for training and presentation purposes Edit Restorations The ...

Страница 22: ... Implants Editor enables users to customize the Manufacturers Systems and Connection types that are available when filling out order forms Add To Delete From Implants Library Elements may be added to or deleted from the Implants library by clicking on the icons at the base of each column Click Reset to reset to default values Order Form PDF Settings These System settings enable users to customize ...

Страница 23: ...y selecting Hide Patient s Name in system Order Form settings This can be useful to protect patient privacy and to use anonymous case examples for training and presentation purposes Merging a Scan with a Patient profile A Direct Scan can be linked to an existing Patient profile by clicking Merge and selecting a case Adding a New Case to a Patient Click Add Case in a selected Patient preview window...

Страница 24: ...ault To activate click Enable Direct Scan Workflow in System Settings 5 2 The WhipMixClinic Scan Workflow The following walkthrough shows the typical steps and options available in the WhipMixClinic Scan Workflow 1 Create a New Case Click Create New Case in the WhipMixClinic Start screen or select a patient and in the Preview window click Add Case Create New Case This opens the WhipMixClinic Order...

Страница 25: ... required Relevant Scan Flow steps will be automatically removed from the Scan Flow menu To select a lab a connection must first be set up with the lab via the WhipMixCloud platform See Connecting VeriPulse IOS To WhipMixCloud You can select a default lab from those connected to your WhipMixCloud account in system Upload Settings Before sending an order make sure the correct Patient ID and Lab are...

Страница 26: ...nother restoration type Available restoration options for the selected Restoration Types are displayed in the right hand Order Form menu 6 Select Restoration Options Select Restoration options for the chosen Restoration type in the right hand Order Form menu This is an example for Implant custom abutment Restoration options Description Manufacturer Manufacturer Name Type Manufacturer Restoration s...

Страница 27: ... carry out a scan of the Maxillary arch 3 Scan body Maxillary Integrates a scan body step of the maxillary arch in the scan workflow 4 Mandibular Scan To carry out a scan of the Mandibular arch 5 Scan body Mandibular Integrates a scan body step of the mandibular arch in the scan workflow 6 Bite Alignment This step enables the user to carry out an automatic or manual bite alignment To begin scannin...

Страница 28: ...t pause scan Reset Reset will delete the current scan and associated files Adjust Zoom level You may change the zoom level Center Scan on Screen Moves the scan to the center of the screen for ease of use Color Based Quality Map Toggles between color grayscale display and Quality Map The Quality Map feature enables the user to assess in real time if enough data was collected in the area of the scan...

Страница 29: ...fortable IMPORTANT To avoid scanning errors make sure the scanner tip clicks securely into place 4 For ease of use hold the VeriPulse IOS handpiece as shown 5 3 3 The Scanning Live View The Live View window in the lower left displays what the VeriPulse IOS Scanner is actually seeing 3D reconstruction of the scan is displayed in the middle of the screen If the scanner loses connection with the reco...

Страница 30: ...rectly connected to the computer via the USB 3 0 cable and the WhipMixClinic software is running Make sure the computer on which the WhipMixClinic software is installed is connected to an external power source IMPORTANT Make sure the computer on which the WhipMixClinic software is installed is connected to an external power source before starting to scan with the VeriPulse IOS Do not scan using a ...

Страница 31: ... Scan Path When scanning the Maxillary arch we recommend you scan in the following order 1 Occlusal 2 Buccal 3 Palatal IMPORTANT Before use the scanner s removable tip must be sterilized using an autoclave See below Section 7 2 Cleaning and Sterilization of Tip 1 Scan the Maxillary Occlusal area Occlusal Surface First scan the OCCLUSAL surface from molar to molar ensuring full occlusal surface is ...

Страница 32: ...ar area on LEFT side iii Scan BUCCAL area from molar to center line on RIGHT side ensuring the connection of surfaces Scan with 45 angle to get part occlusal part buccal Scan with 90 angle to get last part of buccal iv Scan gum 3 4mm in molar pre molar area on RIGHT side 3 Scan the Maxillary Palatal area Scan the PALATAL area from molar to molar ensuring the connection of the surfaces overlap Scan...

Страница 33: ...2 Scanning the Mandibular Arch Repeat the same scanning strategy as above for the Mandibular arch Due to the specific environment of the mandibular arch it is recommended you follow the following scan path Recommended Mandibular Scan Path When scanning the Mandibular arch it is recommended you scan in the following order 1 Occlusal 2 Lingual 3 Buccal When the scan is completed the Mandibular icon ...

Страница 34: ...t again if the result is not satisfactory 5 4 5 Bite Alignment The VeriPULSE IOS enables you to carry out Automatic Bite Alignment based on the previously scanned Maxillary and Mandibular arches Note When you select Bite Alignment allow a few seconds for the arch scans to load 1 Carrying Out An Automatic Bite Alignment The Automatic Bite Alignment feature enables the 3D software to automatically r...

Страница 35: ... The Automatic Bite Alignment may take a minute or two to process When the Automatic Bite Alignment is completed the 3D reconstructed image is displayed as shown 2 Carrying Out A Manual Bite Alignment The Manual Bite Alignment tool enables you to manually select specific location points on the Maxillary and Mandibular arches This can be useful if the Auto Alignment is unsuccessful due to insuffici...

Страница 36: ...prompted to select the corresponding paired point on the mandibular scan 6 As before click Select Point HOLD Ctrl and click a yellow dot will indicate the selected mandibular paired point 7 Click Confirm Point You will be prompted to select a maxillary paired point on the bite scan B Align Maxillary Paired Points Note The VeriPulse IOS software calculates the matching position based recognizable s...

Страница 37: ...gnment for the LEFT side C Scan a molar pre molar bite segment on the opposing side When you have finished manually aligning one side of the bite you will be prompted to scan the opposing side 14 Scan a 3 4 teeth and 3 4mm gum segment on the RIGHT side molar pre molar region in Occlusion 15 Carry out the same procedure as described above in steps 1 13 5 4 6 Auto Realignment Once you have carried o...

Страница 38: ... the maxillary and mandibular arch scans i Click on the Occlusion Distance Map icon in the Bite Alignment Tool menu ii Adjust the color map by dragging the visual slider to the desired value Open Jaws You can use this tool to open the jaws after the bite alignment to better inspect your scans Swap Jaws Allows the user to swap jaw scans in case lower was scanned instead of upper or vice versa 5 4 8...

Страница 39: ...for this lab The lab will receive an automatic email notification from WhipMixCloud 2 Verify Patient and Restorations information and select the desired lab connection you have already configured in WhipMixCloud 3 Enter the desired delivery date if connected the lab s interactive calendar will display here to provide available dates You can preview 3D models and any 2D images taken in the preview ...

Страница 40: ...ud platform you will have to 1 Link your WhipMixClinic account to the WhipMixCloud 2 Configure a connection with the lab in WhipMixCloud Note In WhipMixClinic you can also communicate directly with labs by exporting files to your computer and transferring them via a third party platform 6 1 Linking a WhipMixClinic account to WhipMixCloud Creating A WhipMixCloud User Account To link your WhipMixCli...

Страница 41: ...Sign In page 6 Select a language in the scroll down menu 7 Enter your Admin account email address and password to login to the WhipMixCloud platform 6 2 Configuring a Connection with a Lab in WhipMixCloud When you have created a WhipMixCloud account and are logged in you can now configure connections with the labs of your choice Adding a lab connection To create a connection with a lab 1 Click Con...

Страница 42: ...onnection in WhipMixClinic to transfer files to via your WhipMixCloud account 1 Click WhipMixClinic Settings icon 2 Scroll to Upload Settings 3 Click Select Default Lab 6 3 Managing Case Details in WhipMixCloud To access a patient case in WhipMixCloud 1 Click Cases in the WhipMixCloud Startscreen 2 Click on the Case Title from the list of cases The Case window displays Patient Case details and pro...

Страница 43: ...1 Click the Settings icon in the WhipMixCloud Start screen The following options are available in the scroll menu WhipMixCloud Settings Description Edit Profile Opens the Account Management window where you can enter and edit your WhipMixCloud account details Change Password Opens the Change Password window Manage Group Enables you to setup and manage Shared Groups Settings Enables you to configur...

Страница 44: ...Cases Drafts filter above case list Show Assignee column in case list Use auto refresh Push Notification Settings Receive notification email when new case is published Receive notification email when case is modified Receive notification email when comment is added Receive notification email when comment is modified 4 Select the desired options 5 Click Save to save selected View Notification setti...

Страница 45: ... Do not use disinfectant on the nozzle NOTE All components of the scanner excluding the tips must be wiped down and not sprayed Avoid getting any moisture alcohol or disinfectant inside the open scanner chamber Recommended and approved surface disinfectants Birex Wipes TB Claim 10 minutes Phenolic Dual Water Based Prospray Wipes TB Claim 10 minutes Phenolic Dual Water Based Cavicide Wipes TB Claim...

Страница 46: ...surface The mirror should be free of any noticeable debris or water spots Step 3 Insert and seal the tip into a sterilization pouch Make sure the seal is airtight Each tip should be packaged individually Step 4 Sterilize the wrapped tip in a steam autoclave using the following parameters 132 C 270 F at 4 minutes or 134 C 273 F at 4 minutes 121 C 250 F at 45 minutes Step 5 Ensure the dry cycle is c...

Страница 47: ...s inside and should be disposed of in accordance with local environmental laws and regulations 7 4 Calibration The VeriPulse IOS is calibrated in the factory and therefore does not require calibration when installed WARNING General prohibition indication The functionality of the system can be destroyed in the case of incorrect use If unauthorized changes have been made to the delivered system and ...

Страница 48: ...ality of the system can be destroyed in the case of incorrect use If unauthorized changes have been made to delivered system and accessories the warranty by Whip Mix Corporation becomes void Whip Mix Corporation will not accept any responsibility or liability for the improper functioning of the product in such a case If any of the following conditions occur unplug the device from the electrical ou...

Страница 49: ...ntact the Whip Mix technical support team 8 4 Mechanical Hazards 8 4 1 Moving Parts NOTE All moving parts are inside the handheld scanner so do not open the unit 8 4 2 Dropped Equipment WARNING If the scanner tip is dropped ensure that the mirror is not damaged and that it is not detached if the tip is damaged it should be disposed of immediately If the scanner handpiece is dropped or bumped ensur...

Страница 50: ... power adapter supplied as a part of the system 8 6 Eye Safety WARNING During operation the system emits a bright flashing light from its tip Although the system complies with standard IEC 62471 Photobiological safety of lamps and lamp systems prolonged exposure to flashing light may result in discomfort seizure or eye irritation 8 7 Hygiene WARNING In order to maintain safety for the patient wear...

Страница 51: ...ing peripherals such as antenna cables and external antennas should not be used within 30 cm of any part of the VeriPulse IOS including cables specified by the MANUFACTURER Otherwise performance degradation of this equipment may occur WARNING Use of this equipment adjacent to or on other equipment must be avoided as it may result in improper operation If this use is necessary it is advisable that ...

Страница 52: ...ply network that supplies buildings used for domestic purposes Electromagnetic Immunity Immunity Test Test Level Compliance Level Electromagnetic Environment Guidance Electrostatic discharge 8 kV Contact 8 kV Contact Surface should be wood concrete or ceramic tile If floors are covered ESD IEC 61000 4 2 2 kV 4 kV 8 kV 15 kV air 2 kV 4 kV 8 kV 15 kV air with synthetic material the relative humidity...

Страница 53: ... in IEC 60601 1 2 2014 Table 9 in IEC 60601 1 2 2014 Portable and mobile RF communications equipment should be used no closer to any part of the VeriPulse IOS system including cables than the recommended separation distance calculated from the equation applicable to the frequency of the transmitter Recommended separation distance where P is the maximum output power rating of the transmitter in wat...

Страница 54: ... 3 8 3 8 7 3 100 12 12 23 For transmitters rated at a maximum output power not listed above the recommended separation distance d in meters m can be estimated using the equation applicable to the frequency of the transmitter where P is the maximum output power rating of the transmitter in watts W according to the transmitter manufacturer NOTE 1 At 80 MHz and 800 MHz the separation distance for the...

Страница 55: ...datory action manual General prohibition indication User Manual Reference Directive on Waste Electrical and Electronic Equipment Authorized Representative in the European Community Warning label for LED Non ionizing electromagnetic radiation Direct Current Type B Level of protection against electric shock Consult operating instruction for use European Conformity mark Prescription symbol Non steril...

Страница 56: ...ou have external power to the VeriPULSE IOS and that the USB cable is connected to a USB 3 Port Scanning is very slow Check that the Laptop is connected to an external power source The corners are cut in the live view window Check that the Tip is correctly mounted and when rotating it is locking in place with a click There is a red square in the scan window Go back to a tooth that is scanned and s...

Страница 57: ...ieu of all other warranties expressed or implied 9 3 Repair Service In the event of a hardware malfunction contact the Whip Mix technical support team for repair or replacement based on the End User Terms and Conditions you have at the time of purchase Some testing might be needed in order to verify the Hardware Software error or malfunction The company reserves the right to cease providing repair...

Страница 58: ...or technical support please contact us via productsupport whipmix com or phone number 800 626 5651 extension 1437 For additional material and user information go to https www whipmix com veripulse 3D Imaging Simulation Corp Americas 365 Herndon Pkwy 18 Herndon VA 20170 U S A PIR21 0001 VUM Rev A ...

Отзывы: