21
If no devices are listed, verify the correct IP address is shown above the
Select NIC…
button. If the wrong NIC is listed, click
Select NIC…
to open
the
Network Setup
window to select the correct NIC. If the NIC is
correct, confirm that the PC, Mix Engine, and DMX Surface are all
connected to the
Mix Engine’s
Ethernet switch then click
Refresh
to re-
query the network for WNIP devices.
If no NIC with an IP address in the default subnet (192.168.87.0) is
listed then close the DMX Surface Setup app and use the Windows Control
Panel to assign a fixed IP address, like 192.168.87.21 to the NIC, then
restart the DMX Surface Setup app.
Click on a device row in the
Locator
pane (a Razor Interface is shown
selected in Figure 3-2 on the last page) to show details for the selected
device in the
Set One Selected Device Properties
panel. The default
settings for devices can be manually edited to change the assigned IP
address, Host Device, Name, and Location when networking multiple DMX
consoles and Razors together.
Note:
When multiple WNIP devices (DMX consoles, Razors,
Blades, etc.) are being networked together, use Navigator Locator
tab (page 39) to edit their default entries in its
Device Properties
pane. You would do this for each new WNIP device to change them
from their factory default settings so that networking additional
new devices in the future is simplified since
you won’t have
to
contend with conflicting IP addresses, Names, or ID numbers.
Setting the Surface Host
At this point the DMX Surface Setup app is simply
showing the WNIP
devices it’s detected on the network.
Before the DMX Surface can be configured the WNIP
system must be scanned to add the devices and signal
information to the DMX setup app. Once this is done the
Mix Engine that Hosts the DMX Surface can be assigned.
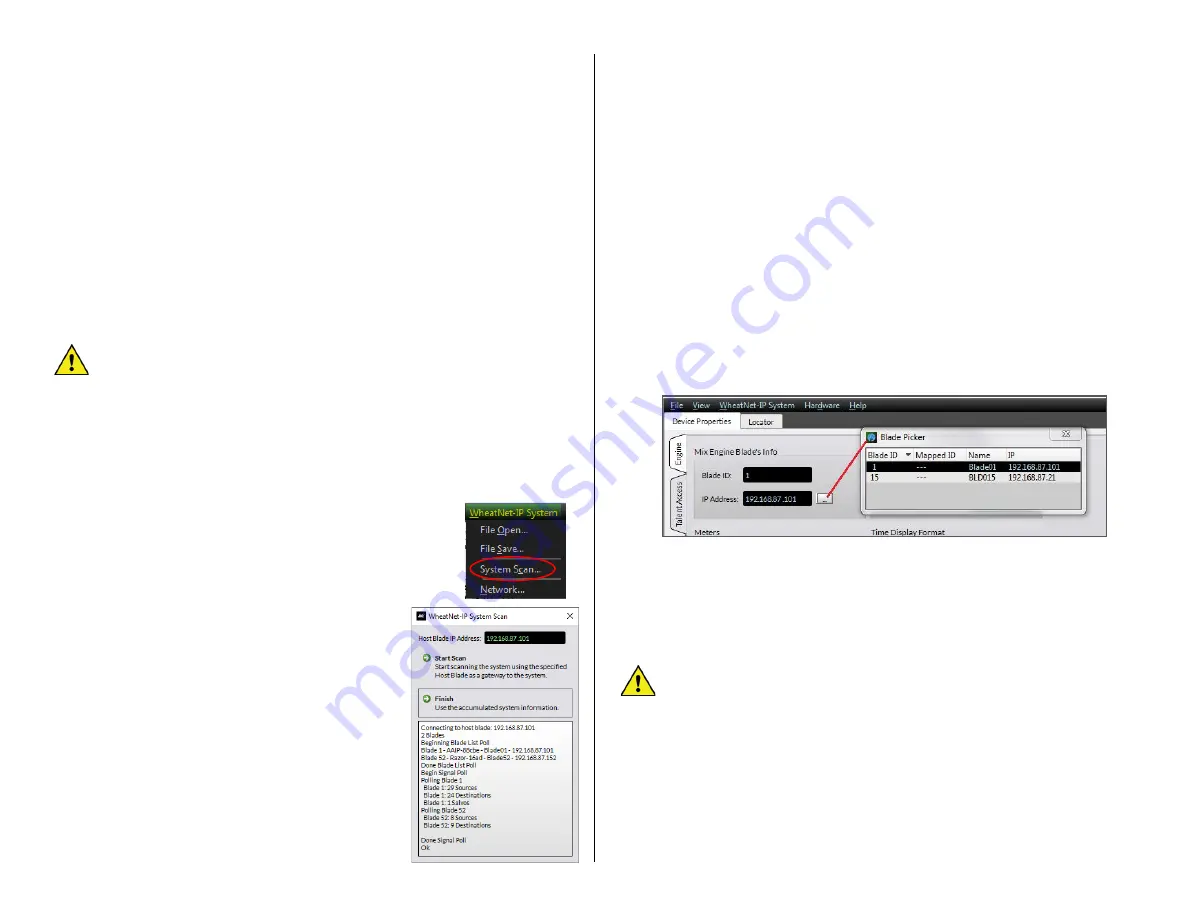
The first step in this process is to click the
menu item:
WheatNet-IP System
and select
System Scan
to open the
System Scan
window,
shown at right. The
Host Blade IP Address
should show 192.168.87.101 (the
Mix Engine’s
default IP address on a new DMX console). If no
address is shown, manually enter that IP
address into the entry box.
Click
Start Scan
. The app queries that Blade
(the generic network identity of a Mix Engine)
and shows various messages in the log window.
Once
Finish
appears in lieu of
Cancel
, click it to
close the System Scan window.
A “save system
info?” dialog pops up. Click
Yes
to save the
system information. A Save File dialog box opens
showing the default save location. Click
Save
then
Yes
to save the
sysinfo.wnsi3
data file, which saves your system information to the PC.
The
System Info
pane, at the right side of the app window, will now be
populated with
Source
names, as shown in Figure 3-1 on the last page.
Clicking on the other tabs:
Destinations,
Salvos,
and
Blades
will show the
scanned Destination names, that no
Salvos
have been created yet, and
that the Mix Engine is
Blade ID 1
with the default name of
Blade01
.
Click on the
Device Properties
tab to return to show that tab. It has six
Page Tabs
(Engine, Talent Access, VDips, Monitor Config, Buttons, and
Visibilities) along the left side of the tab (Figure 3-1 on the last page). The
page tabs allow various DMX parameters to be viewed and edited to
configure the DMX Surface for your application. Click on each page tab to
see what each has to offer then reselect the
Engine
page tab.
Each page tab is separated into
sections
which list similar parameters.
In the
Mix Engine Blade
’s
Info
section (Figure 3-3) click the
Picker
icon
(the small rectangular icon) to open the
Blade Picker
, which lists the
detected blades. Double-click the
Blade01
row to select it. This closes the
Picker and transfers the Blade ID and IP address into the two entry boxes.
Figure 3-3 Setting the Mix Engine as the Surface Host
This action sets that Mix Engine as
the “host” for
the DMX Surface. Next,
the DMX Surface that
’
s being hosted by this Mix Engine must be selected
so that the Surface Setup app can communicate directly with it. This is
done using the
Devices
pane at the bottom of the app window. When the
app is first used this pane will be empty.
Note:
If this pane is not displayed select the menu item
View
then
check
Devices
to display the
Devices
pane, as shown at the bottom
of Figure 3-2.
Click the
Add
button to open the Add Device dialog box (Figure 3-4 on
the next page). In the Add Device window click
Locate…
to open the
Locate window. If
Surf01
is not listed, click
Rescan
. Once
Surf01
is
shown, click on its name to highlight it then click
OK
. The new DMX
Surface name (
Surf01
) and its IP address (
192.168.87.201
) are then
entered into the
Add Device
dialog box (the
Device Type
is automatically
set as
DMX
). Click
OK
to transfer the settings to the
View Devices
pane.
Содержание AUDIOARTS ENGINEERING DMX Series
Страница 1: ...1 Networked AoIP Broadcast Console Manufactured by Wheatstone Corporation ...
Страница 4: ...4 ...


