background image

Chapter

7

7 Enclosure Unpacking

This chapter provides the steps that are necessary to properly unpack the 4U60 G2 Storage Enclosure. The
unpacking process also includes inspection recommendations to ensure that the enclosure has not been
damaged or tampered with.

7.1

Packaging Inspection

There are steps in the unpacking process where the unpacker will have to check for damage to the packaging
and the enclosure components. This section provides descriptions of what to look for when inspecting the
packaging during the unpacking process.

7.1.1

Damaged Packaging

The following are the most common ways a package can be damaged.

• Crushed Corners - indicative of a package having been dropped.
• Split Seams - often these are caused by excessive shearing forces being placed on the container.
• Punctures - caused by a sharp object striking the packaging.
• Water Damage - the package has come into contact with a water source or has been stored in an overly

humid environment.

20

7

Enclosure Unpacking

Installation Guide

7.1

Packaging Inspection

Содержание HGST 4U60

Страница 1: ...Installation Guide 4U60 G2 Storage Enclosure Rev 1 9 June 2017 1ET0398 Long Live Data www hgst com...

Страница 2: ...or on the Internet at HGST Support HGST may have patents or pending patent applications covering subject matter in this document The furnishing of this document does not give you any license to these...

Страница 3: ...ada 11 3 3 Europe CE Declaration of Conformity 11 3 4 VCCI Japan 11 3 5 BSMI Taiwan 12 Chapter 4 Disclaimers 13 4 1 Regulatory Statement 13 4 1 1 Restricted Access Location 13 4 1 2 Safety Compliance...

Страница 4: ...7 2 Unpacking the Enclosure Pallet 21 Chapter 8 Installing the 4U60 G2 Storage Enclosure 24 8 1 Recommended Torque of Machined Fasteners 24 8 2 Installing the Rail Kit 24 8 3 Installing the Cable Mana...

Страница 5: ...rface 43 10 3 3 Command Line Interface Commands 43 10 3 4 Verifying the Firmware Version 45 Chapter 11 System Upgrades 46 11 1 Daisy Chaining Enclosures 46 11 1 1 Daisy Chaining Enclosures 46 11 1 2 D...

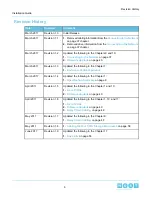
Страница 6: ...ure Partial Population Updated the following in the Chapter 1 Revision 1 4 March 2017 1 Specification Summary on page 8 Updated the following in the Chapter 1 and 10 Revision 1 5 April 2017 1 List of...

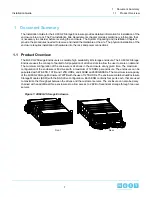
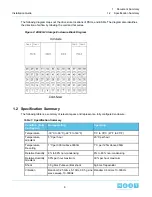
Страница 7: ...full population of all drive slots to allow the user to scale on demand The minimum configuration of the enclosure is 24 drives in the enclosure at any given time The maximum configuration of the enc...

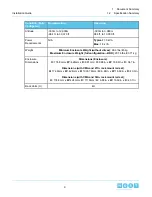
Страница 8: ...ng Non operating Condition Fully Configured 5 C to 35 C 41 F to 95 F 30 C to 60 C 22 F to 140 F Temperature 20 C per hour 5 C per hour Temperature Gradient 1 C per 125m above 950m 1 C per 300m above 3...

Страница 9: ...full configuration HDD 207 6 lbs 93 71 kg Weight Dimensions Enclosure H 174 8mm x W 424mm x D 881mm H 6 88in x W 16 69in x D 34 7in Enclosure Dimensions Dimensions with CMA and 27in rack mount rail se...

Страница 10: ...the following information serial number S N product name model number and a brief description of the issue Telephone Support Hours and Additional Information Telephone Numbers Region 24 hours a day 7...

Страница 11: ...U60 G2 Storage Enclosure User Guide it may cause harmful interference to radio communications 3 2 ICES 003 Canada Cet appareil num rique respecte les limites bruits radio lectriques applicables aux ap...

Страница 12: ...tic environment it may cause radio interference Install and use the equipment according to the instruction manual 3 5 BSMI Taiwan English translation of the notice previous This is a Class A IT produc...

Страница 13: ...document The document applies to any product that bears the regulatory model and type names including marketing names other than those listed in this document 4 1 1 Restricted Access Location The 4U6...

Страница 14: ...4 5 Surge EN 61000 4 6 RF Common Mode EN 61000 4 8 Power Frequency Magnetic Field EN 61000 4 11 Voltage Dips and Interruptions 4 1 4 Country Certifications Table 2 Country Certifications Authority or...

Страница 15: ...5 2 Safety Warnings and Cautions To avoid personal injury or property damage before you begin installing the product read observe and adhere to all of the following safety instructions and information...

Страница 16: ...both power cords must be removed from the power supplies to completely remove power from the unit There is no switch or other disconnect device 5 5 Power Cords Use only tested and approved power cords...

Страница 17: ...escribed in the product documentation All other servicing should be referred to a 4U60 G2 Storage Enclosure authorized service technician To avoid shock hazard turn off power to the unit by unplugging...

Страница 18: ...enclosure plus the space necessary to fit a person servicing the rack equipment The rear space requirements is based on space a technician would need to service all of the CRU parts at the rear of th...

Страница 19: ...and rear of the 4U60 G2 Storage Enclosure stay clear of any materials that may block or disrupt the airflow in any way Disrupting the airflow can cause the enclosure to overheat which may affect perfo...

Страница 20: ...components This section provides descriptions of what to look for when inspecting the packaging during the unpacking process 7 1 1 Damaged Packaging The following are the most common ways a package c...

Страница 21: ...1 box and the drives 3 boxes Figure 4 Pallet Layout Accessory Boxes Chassis Box Drive Boxes Table 5 Pallet One Contents Contents Carton Rail Kit box and Cable Management Assembly box Accessory Tray C...

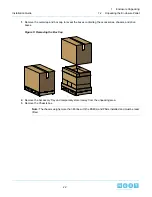
Страница 22: ...e 5 Removing the Box Cap 2 Remove the Accessory Tray and temporarily store it away from the unpacking area 3 Remove the Chassis box Note The chassis weighs more than 80 lbs with the ESM s and PSUs ins...

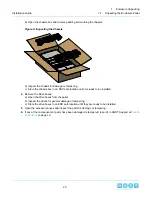
Страница 23: ...Open the drive boxes from the pallet b Inspect the drives for general damage or tampering c Store the drive boxes in an ESD safe location until they are ready to be installed 5 Open the accessory box...

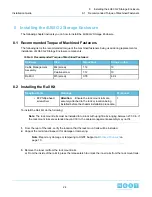
Страница 24: ...the rack or location being installed before the chassis installation procedure 2 Phillips head screwdriver To install the Rail Kit do the following Note The rack mount rails must be installed into a r...

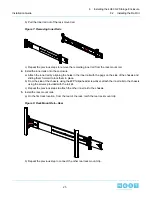
Страница 25: ...them in place b From the side of the chassis using the 2 Phillips head screwdriver attach the inner rails to the chassis using the screws provided with the rail kit c Repeat the previous steps to att...

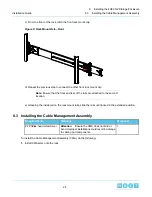
Страница 26: ...rails slide the rails until locked in the extended position 8 3 Installing the Cable Management Assembly Personnel Warnings Required Tools 1 Attention Ensure the CMA does not bind or bend Improper ins...

Страница 27: ...e pressing the CMA mounting bracket to the top of the U location Figure 11 Tightening the Captive Screw c Install the M4 screw in the lower hole in bracket Figure 12 Installing the Bottom Screw d Repe...

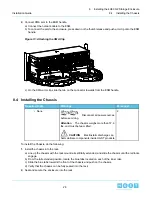
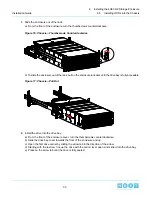
Страница 28: ...be team lifted None CAUTION Electrostatic discharge can harm delicate components inside HGST products To install the Chassis do the following 1 Install the chassis into the rack a Line up the chassis...

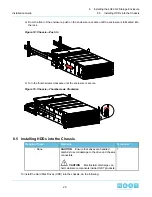
Страница 29: ...kwise 8 5 Installing HDDs into the Chassis Personnel Warnings Required Tools 1 CAUTION Ensure that drives are handled carefully to avoid damage to the drive and chassis connectors CAUTION Electrostati...

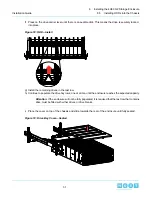
Страница 30: ...nto the drive bay a From the front of the enclosure cover turn the thumbscrews counterclockwise b Slide the drive bay cover towards the front of the enclosure and up c Open the first drive carrier by...

Страница 31: ...ntil the enclosure reaches the expected capacity Attention If the enclosure will not be fully populated it is required that the last row that contains drive must be filled with either drives or drive...

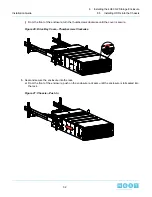
Страница 32: ...er Thumbscrews Clockwise 3 Seat and secure the enclosure into the rack a From the front of the enclosure push on the enclosure rack ears until the enclosure is full seated into the rack Figure 21 Chas...

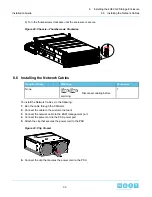
Страница 33: ...bles do the following 1 Run the cable through the CMA arm 2 Connect the cable to the customer network 3 Connect the network cable to the ESM management port 4 Connect the power cord to the PSU power p...

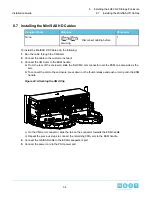
Страница 34: ...ctor over the ESM on same side as the arm b To connect the arm to the enclosure press down on the thumb release and push arm clip onto the ESM handle Figure 24 Attaching the CMA Clip c On the CMA arm...

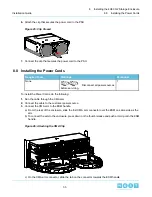
Страница 35: ...the CMA arm 2 Connect the cable to the customer power source 3 Connect the CMA arm to the ESM handle a From the rear of the enclosure slide the first CMA arm connector over the ESM on same side as the...

Страница 36: ...SU Figure 27 Clip Closed 6 Connect the clip that secures the power cord to the PSU 8 9 Cabling Storage Enclosure Table 7 Cabling Storage Enclosure Redundant Cable Type Destination Device Source Device...

Страница 37: ...ff ff 00 c0 a8 00 01 Command Output Format 60 01 00 14 00 00 00 00 flags 4 bytes IP 4 bytes Netmask 4 bytes Gateway 4 bytes Table 8 ESM A Default Value Dec Byte Count Byte Offset Dec Hex Name Default...

Страница 38: ...isabled static IP 9 2 Changing Network Configurations via SES To change the network configurations do the following 1 From a Linux or Windows enabled machine ensure you have sg3_utils installed and op...

Страница 39: ...values returned look similar to this example sg_wr_mode dev sgx dbd page 20 02 contents e0 02 00 14 00 00 00 00 ff ff ff fe c0 a8 00 0b ff ff ff 00 c0 a8 00 01 Note The result of this example is disa...

Страница 40: ...ecommends attaching the 4U60 G2 Storage Enclosure to a host that does expose the Enclosure Services Processor so that the upgrade may be performed root testhost1 sg_scan i grep i 4u60 B 1 The system s...

Страница 41: ...4U60 G2 Storage Enclosure to a standard SAS HBA or a RAID SAS HBA hosted on the Windows Server that presents the Enclosure Services Processor to the operating system The Enclosure Services Processor i...

Страница 42: ...ould turn off 6 Follow the same steps to upgrade ESM B 10 3 Enclosure Management Interface and Confirmation of Code Load The following section provides instruction on how to verify the upgraded firmwa...

Страница 43: ...describes the commands utilized in the Telnet CLI instance Table 11 Command Line Interface Commands Details Command The help command may be used before any of the other commands to get information on...

Страница 44: ...r turn of the disk in the case of a thermal event iomConfiguration Dual Set the enclosure to single or dual mode and allow LED functionality according to the mode it is in Dual mode means 2 ESMs which...

Страница 45: ...ion similar to the following example root cos lab test10 telnet 192 168 0 10 Trying 192 168 0 10 Connected to 192 168 0 10 Escape character is Firmware Version B0860 x00000000 0000 3 In the CLI type s...

Страница 46: ...o the host server 11 1 1 Daisy Chaining Enclosures Personnel Warnings Required Tools 1 Disconnect cabling before servicing None To install the scale out the enclosure do the following 1 From a compute...

Страница 47: ...Customer HBA Connection Cable Type Destination Device Source Device MiniSAS HD Cable ESM1A H1 HST1 P1 ESM1A H2 HST1 P2 ESM1B H1 HST2 P1 ESM1B H2 HST2 P2 ESM1A H3 ESM2A H1 ESM1A H4 ESM2A H2 ESM1B H3 ES...

Страница 48: ...r HBA across two servers The high bandwidth connection to the customer network utilizes eight connections across two servers Both sets of connections allow the customer host to view data streams from...

Страница 49: ...ays the each of the ports used per component to cable the system Figure 28 Daisy Chaining Single Server Figure 29 Daisy Chaining Redundant Servers 49 11 System Upgrades Installation Guide 11 1 Daisy C...

Страница 50: ...rage Enclosure to a host server Follow the information to connect to a host server Table 15 Two Storage Enclosures One Host with One Customer HBA Connection Cable Type Destination Device Source Device...

Страница 51: ...tions necessary for daisy chaining the 4U60 G2 Storage Enclosure to a host server For redundancy follow the information to connect to two host servers Table 17 Two Storage Enclosures Two Hosts with On...

Страница 52: ...G2 Storage Enclosure to a host server Follow the information to connect to a host server Table 19 Three Storage Enclosures One Host with One Customer HBA Connection Cable Type Destination Device Sourc...

Страница 53: ...host servers Table 21 Three Storage Enclosures Two Hosts with One Customer HBA Connection Cable Type Destination Device Source Device MiniSAS HD Cable ESM1A H1 HST1 P1 ESM1B H1 HST2 P1 ESM1A H3 ESM2A...

Страница 54: ...he connections necessary for daisy chaining the 4U60 G2 Storage Enclosure to a host server Follow the information to connect to a host server Table 23 Four Storage Enclosures One Host with One Custome...

Страница 55: ...er on page 49 This section provides information on the connections necessary for daisy chaining the 4U60 G2 Storage Enclosure to a host server For redundancy follow the information to connect to two h...

Страница 56: ...n Device Source Device MiniSAS HD Cable ESM1A H1 HST1 P1 ESM1A H2 HST1 P2 ESM1B H1 HST2 P1 ESM1B H2 HST2 P2 ESM1A H3 ESM2A H1 ESM1A H4 ESM2A H2 ESM1B H3 ESM2B H1 ESM1B H4 ESM2B H2 ESM2A H3 ESM3A H1 ES...

Страница 57: ...or more information on this configuration see Figure 29 Daisy Chaining Redundant Servers on page 49 11 1 2 5 Cabling for Four Non Redundant Storage Enclosures This section provides information on the...

Страница 58: ...Kits The 4U60 G2 Storage Enclosure has the option to function as a partially populated enclosure that can be increased on demand This allows the user to control how much capacity they need with the op...

Страница 59: ...mputer connect to an sg_utils enabled server 2 From a Linux machine launch a Terminal 3 Verify that the enclosure is connected to the Host a To identify the SES target type lsscsi g into the terminal...

Страница 60: ...e 30 Chassis Thumbscrews Counterclockwise b To slide the enclosure out of the rack pull on the enclosure rack ears until the drive bay is fully accessible Figure 31 Chassis Pull Out 6 Install the driv...

Страница 61: ...ox and inspect it for damage or tampering Note Report any damage or tampering to HGST Support at Points of Contact on page 10 d Open the drive carrier by sliding the arrow tab in the direction of the...

Страница 62: ...ill not be fully populated it is required that the row following the last drive populated row be filled with drive blanks j Place the cover on top of the chassis and slide towards the rear of the encl...

Страница 63: ...ts appear b Identify the 4U60G2_STOR_ENCL appears near the top of the results 9 Verify the number of drive added are seen by the firmware are the same amount that are populated in the physical slots a...

Страница 64: ...daisy chaining 46 Damage 20 Delivery Route 18 discharge 15 disclaimer 13 document summary 7 download 40 drive kits 58 59 E electromagnetic 13 electrostatic 15 enclosure 20 24 46 enclosure management 4...

Страница 65: ...nded 24 regulatory 11 13 required equipment 18 requirements 13 restricted 13 revision history 6 S safety 13 15 17 SATA 58 service 17 Site Requirements 18 Space 18 specification 8 statement 11 13 summa...

Отзывы: