www.weaverleathercraft.com
22
You’ll need to pre-punch a 3/16" hole in your material to accommo-
date the stem of the 2206 Snap. Please note: The top of snap always
has the nice cap that is to be placed on the finished side of the
leather. Take a few minutes to check all your components to ensure
they will snap the way you desire for your project. To achieve the best
results, we recommend testing a few snaps in some scrap leather.
FIGURE 89
FIGURE 95
FIGURE 90
FIGURE 96
FIGURE 92
FIGURE 98
FIGURE 93
FIGURE 94
FIGURE 99
FRONT VIEW
BACK VIEW
FIGURE 100
Setting 2206 (#20 Line) Snaps
FIGURE 91
FIGURE 97
1B
1
2
3
4
1T
2T
2B
3) For bottom of snap, insert the 2B anvil into the anvil adapter
and secure with the set screw using a 5/32" Allen wrench
(Figure 95)
. Adjust the driver up by turning adjustment
wheel clockwise or down by turning counterclockwise
(Figure 96)
. Insert the 2T driver into the driver shaft and
secure with the thumb screw
(Figure 97)
.
4) Place hardware component 4 into the 2B anvil
(Figure 98)
and hardware component 3 into the 2T driver
(Figure 99)
.
Insert leather or material using. Pull the handle forward
until set
(Figure 100)
.
5) Snap it to verify that all the components are placed so they
snap correctly for your project.
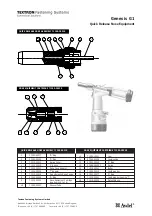
1) For top of snap, insert the 1B anvil into the anvil adapter and secure
with the set screw using a 5/32" Allen wrench
(Figure 89)
. Adjust
the driver up by turning adjustment wheel clockwise or down by
turning counterclockwise
(Figure 90)
. Insert the 1T driver into the
driver shaft and secure with the thumb screw
(Figure 91)
.
2) Place hardware component 1 into the 1B anvil
(Figure 92)
and
hardware component 2 into the 1T driver
(Figure 93)
. Insert leather
or material using. Pull the handle forward until set
(Figure 94)
.