background image


House creation

See house creation section. 


Radio pairing. 

See radio pairing section. 


Delete a device: 

Select device type and then the device. 
 

Delete all devices: 

All devices installed in the system will be deleted (rooms 
will be maintained). 
 

Identify a device 

 
To identify a device of the installation, 

go to Menu,then “Identify 

a Device”  


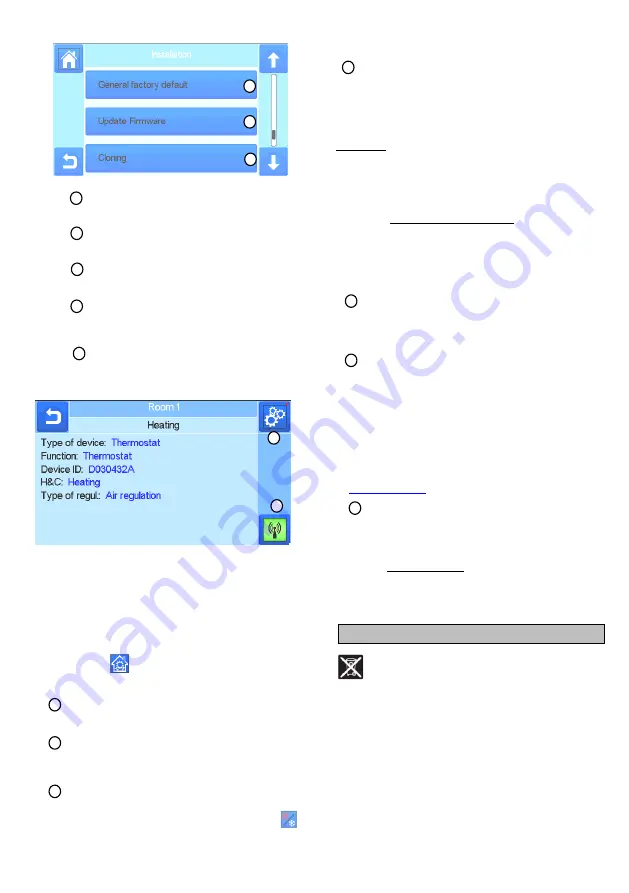
    a- To put the menu in reception mode.  
    b- To access to the device parameters. 

Process:


Press on ‘a’ to make the Central listening 

Press on the device receiver and wait a few seconds until radio 

communication frame is transmitted. 


Note:  ID-number is displayed on the screen, please repeat to be 
sure to have the same ID. 

- Long press on 

 to change device parameters (name, 

power …).   
 

Antifreeze setpoint: 

You can set the antifreeze setpoint as reference for the whole 
installation.


Heating setting: 

You can fix setpoint limitations (min/max) per zone and the offset 
assigned to devices working in floor sensor regulation


Heating/cooling settings: 

You can set the installation in heating mode, in cooling mode or 

in manual mode. If you set the device in manual mode, the 


icon appears on the main menu.


WIFI settings: 

To set the WIFI configurations (SSID/Protected Access Key 
Type/ Password). You can do it manually or scan the active 
networks. 
 
Configuration requesting a registration on a web page is not 
supported. 
WIFI Status: 
0/2 : Central unit not connected to  the wifi router and server 
1/2 : Central unit connected to the Wifi router 
2/2: Central unit connected to the wifi router and to the server 
(Pairing of the central to an account is required) 
 
n.b.: The connection to Internet is recommended with Certified 
WiFi routers (http://www.wi-fi.org/certification). 
n.b.: Automatic pairing time to WiFi router with WEP key: 3-4 
min, with WPA2 key: 1 min.  
n.b.: For the network scan, Repeat at least twice the operation if 
your desired WiFi network  is not displayed. If your desired WiFi 
network is still not displayed, enter the WiFi settings manually 


General factory default: 

To reset the system with the factory values, but the software 
version will remain the same. 


Update Firmware: 


To update the software, with the SD-card. 

The system is 

qualified to work with SD-cards less than or equal to 16GB. 
Select 

 to proceed. 


Please wait the end of the update procedure (The Wifi icon 
should be available for the Wifi central unit) before removing the 
microSD from the central unit. 

 
The SW and the procedure to update the central unit is available 
on 

www.wattswater.eu

.


Cloning: 

The menu allows to transfert a configuration from central 1 to 
central 2. If you change the central, you do not have to 
reconfigure your system. 
Put update.bin file on SD card (Special software for cloning 
available on www.wattswater.eu. 
Insert the SD card in central 1 and make an update firmware 
Insert the same SD card in central 2 and launch the cloning. 
After the cloning, you need to reconfigure the Wifi and the 
langage. 
 

Displosal and recycling information 


Correct disposal of this product. This marking shown  on 

the products indicates that it should not be disposed with other 
household waste at the end of its worlking life. 
 
Disposal of waste batteries: This product contain batteries. If so, 
use the separate collection for battery recycling. Do not ut them 
with other household waste. 
 
This device is suitable for use by children 8 years of age or older, 
and for persons with reduced physical, sensory or mental 
abilities or lack of experience or knowledge, if they are properly 
supervised, or if instructions on the safe use of the device have 
been given to them and the risks involved have been addressed. 
Children should not play with the device. Cleaning and 
maintenance by the user should not be performed by unattended 
children. 


Содержание BT-CT02-RF WiFi

Страница 1: ...TE 11 18 INSTALLATIE EN GEBRUIKERSHANDLEIDING 19 26 NL IT EN MONTAGE UND BEDIENUNGSANLEITUNG 27 35 DE MANUEL UTILISATEUR ET GUIDE D INSTALLATION 35 44 FR INSTALLATIONS OG BRUGERVEJLEDNING 45 53 DA INS...

Страница 2: ...II Temperature precision 0 1 C Setting Temperature Range Comfort Reduced Anti freeze 5 C to 30 C in 0 5 C steps 5 C to 30 C in 0 5 C steps 5 C to 10 C Power Supply 85 265V 50 60 Hz Radio Frequency 868...

Страница 3: ...les between locking unlocking Error flag press to access RF limits alarms battery anomalies The device is working on battery only for settings and pairing Rooms access if Central is locked cannot chan...

Страница 4: ...circuit receiver will operate and activate the pump and or boiler First step define on which circuit a device belongs to With the plan of your installation define which devices are on circuit 1 Then...

Страница 5: ...d to the WiFi network with an IP address WiFi status should read 1 2 Press the home key to go back to front screen If after several attempts connection is unsuccessful connect the central unit to WiFi...

Страница 6: ...validate and set the desired temperature on main screen Anti freeze Mode Use this mode to put your room in anti freeze mode the temperature is set in the Installation menu OFF Mode To switch OFF the...

Страница 7: ...rograms If you want to program the lighting devices please set the devices as ON OFF ON OFF DEVICES MANAGEMENT Press on in the main screen and on Device type choice heating cooling lighting On Off The...

Страница 8: ...Date Manual Automatic Time zone UTC if the device is in automatic time update mode Time and date if the device is in manual time update mode Summer Winter Manual Automatic Temperature unit C F Backgro...

Страница 9: ...ork scan Repeat at least twice the operation if your desired WiFi network is not displayed If your desired WiFi network is still not displayed enter the WiFi settings manually General factory default...

Страница 10: ...10 Contact Us Watts Electronics S A S B P N 10 Z A des Tourettes 43800 ROSIERES France T 33 0 471 57 40 49 F 33 0 471 57 40 90 www wattsindustries com...

Страница 11: ...one elettrica 85 265VAC 50 60Hz Radiofrequenza 868 MHz 10mW Distanza 40m interno 100m campo aperto Versione Software Interfaccia utente mostrata nel menu principale V xx xx Comunicazione WiFi mostrata...

Страница 12: ...l elenco anomalie RF limiti allarmi problemi alle batterie L unit sta funzionando a batteria Uso consigliato per impostazioni ed associazione dispositivi durata batterie 1h Accesso ai locali se la Cen...

Страница 13: ...ianto definire quali elementi sono sul circuito 1 Quindi configurare su Smartvision tutti gli elementi dispositivi di riscaldamento raffreddamento sul circuito 1 Per farlo premere nella schermata prin...

Страница 14: ...nit da 120 a zero Accertarsi che la centralina sia collegata alla rete WiFi con un indirizzo IP stato WiFi dovrebbe essere 1 2 Premere il pulsante Home per tornare alla schermata principale Se dopo di...

Страница 15: ...iazione temporanea Impostare il timer giorni ore minuti premendo il pulsante quindi confermare ed impostare la temperatura desiderata sulla schermata principale Modalit Antigelo Antifreeze Usare quest...

Страница 16: ...i desidera programmare i dispositivi di illuminazione necessario impostarli come dispositivi ON OFF GESTIONE DEI DISPOSITIVI ON OFF Premere nella schermata principale e premere su Scelta del tipo di d...

Страница 17: ...a Ora Manuale o Automatico Zona Fascia Oraria UTC se il dispositivo impostato in modalit di aggiornamento automatico Data ed ora se se il dispositivo impostato in modalit di aggiornamento manuale Esta...

Страница 18: ...zioni che richiedono la registrazione a pagine web Stato WiFi 0 2 Centralina non collegata al router WiFi e al server 1 2 Centralina collegata al router WiFi 2 2 Centralina collegata al router WiFi e...

Страница 19: ...40 C 0 C to 40 C 30 C to 50 C Elektrische isolatie Elektrische isolatie IP30 Klasse II Nauwkeurigheid temp 0 1 C Instelbereik temperatuur Comfort Verlaagd Vorstbeveiliging 5 C tot 30 C in stappen van...

Страница 20: ...ssen vergrendeld en niet vergrendeld Storingsmelding voor het systeem RF limieten alarmen onregelmatigheden met batterij Open de lijst door op dit symbool te drukken Het apparaat werkt op batterijen u...

Страница 21: ...tallatie welke apparaten zich bevinden op circuit 1 Als dit is gedaan moet u op Smartvision alle apparaten configureren die op circuit 1 zitten Om dit te doen drukt u in het hoofdmenu op kies een zone...

Страница 22: ...om terug te gaan naar het vorige scherm Als na een aantal pogingen de verbinding mislukt is sluit u de centrale op Wi Fi handmatig aan zie WiFi instellingen pag 26 2 Download de app naar uw apparaat...

Страница 23: ...eiliging Gebruik deze modus om de kamer in de modus voor vorstbeveiliging te zetten de temperatuur wordt ingesteld in het Installatiemenu UIT stand Het apparaat UIT schakelen Let goed op In deze inste...

Страница 24: ...ratuur wilt programmeren zet u de apparaten als Aan Uit BEHEER VAN AAN UIT APPARATEN Druk op in het hoofdscherm en druk op Keuze type apparaat verwarmen koelen verlichting Aan Uit Deze knoppen worden...

Страница 25: ...ch Tijdzone UTC als het apparaat in de autmatische tijdsynchronisatie staat Tijd en datum als het apparaat in de handmatige tijdinstelling staat Zomer Winter Handmatig Automatisch Temperatuureenheid C...

Страница 26: ...agt om registratie op een webpagina wordt niet ondersteund WIFI status 0 2 Centrale eenheid niet verbonden met de wifi router en server 1 2 Centrale eenheid verbonden met de wife router 2 2 Centrale u...

Страница 27: ...eratur 30 C bis 40 C 0 C bis 40 C 30 C bis 50 C Schutzart Schutzklasse IP30 Class II Temperaturgenauigkeit 0 1 C Einstellung Temperaturen Komfort Absenkung Frostschutz 5 C bis 30 C in 0 5 C Schritten...

Страница 28: ...e Au entemperatur Anzeige falls Au enf hler angeschlossen Bildschirmsperre durch langes dr cken kann zwischen Sperren und Entsperren gewechselt werden Warnhinweis Durch Ber hren des Symbols werden Det...

Страница 29: ...ng erfolgreich war siehe Anleitung des Ger ts HINWEIS die Dauer der Funk Initialisierung an der Zentraleinheit betr gt max 10 Sekunden 7 Nach Abschluss der Funk Paarung aller Ger te mit der Zentralein...

Страница 30: ...n den Einstellungen Nur Heizung oder Nur K hlung oder Reversibel MANUELL ausw hlen Mit der letzten Option wird auf dem Hauptbildschirm die Taste angezeigt mit welcher Sie einfach Heiz oder K hlbetrieb...

Страница 31: ...ebsite angezeigt werden Danach k nnen Sie Ihre Installation von berall aus bedienen Watts bernimmt keine Verantwortung f r die Funktionen der verbundenen Produkte und m gliche Sch den die durch unsach...

Страница 32: ...welcher Sie die Programmierung starten Verwenden Sie die Taste Komfort um den Zeitraum festzulegen in der die Komfort Temperatur eingehalten wird orangefarbener Bereich im Beispiel 6 12 Uhr und die T...

Страница 33: ...m zwischen Automatikmodus und Normalmodus zu wechseln farbig wenn aktiv Wird nur angezeigt wenn sich das Ger t im Auto Modus befindet Dr cken Sie um auf das Ger teprogramm zuzugreifen und es zu bearbe...

Страница 34: ...tes Eine Ger teart Heizen Licht EIN AUS Externer Sensor Hydraulikkreis ausw hlen anschlie end Ger t aus Liste ausw hlen und l schen Alle Ger te l schen Alle Ger te aller Ger tearten werden gel scht R...

Страница 35: ...gezeigt wird geben Sie die WiFi Einstellungen manuell ein Allgemeine Werkseinstellungen Setzt das System auf die Werkeinstellungen zur ck Die aktuelle Software Version bleibt bestehen ACHTUNG die kpl...

Страница 36: ...ommande lectronique Temp rature d exploitation connect Temp rature d exploitation batterie Temp rature de stockage et d envoi de 30 C 40 C de 0 C 40 C de 30 C 50 C Protection lectrique Isolation lectr...

Страница 37: ...vendu s par ment Raccordez le r gulateur central au mini c ble USB 5 V 1 A puis fixez y le pied et mettez l interrupteur en position ON Marche Il est alors pr t l emploi IC NES DE L CRAN PRINCIPAL Dat...

Страница 38: ...avez termin d appairer tous les appareils v rifiez que la port e assure une bonne communication Pour ce faire r glez la temp rature de consigne sur le r gulateur central et veillez ce que l informatio...

Страница 39: ...ger le mode Chauffage Rafra chissement Remarques En mode Rafra chissement les modes conomie et Hors gel sont d sactiv s l ic ne est affich e la place de ou de Dans le thermostat l utilisateur peut con...

Страница 40: ...ise utilisation des appareils connect s 6 GESTION ET PROGRAMMATION DES APPAREILS DE CHAUFFAGE ET DE RAFRA CHISSEMENT Appuyez sur sur l cran principal puis apr s avoir s lectionn la pi ce appuyez sur C...

Страница 41: ...ifier un programme existant p Information Pour visualiser le programme en cours P1 matin soir et week end P2 matin midi soir et week end P3 journ e et week end P4 soir et week end P5 matin soir salle...

Страница 42: ...nt si l cran est verrouill MENU PRINCIPAL Appuyer sur pour acc der au menu principal Menu des statistiques de consommation nerg tique Langue le drapeau de la langue param tr e appara t Huit langues so...

Страница 43: ...e maison Voir la section Cr er votre maison Appairage radio Voir la section Appairage radio Supprimer un appareil S lectionner le type d appareil puis l appareil Supprimer tous les appareils Tous les...

Страница 44: ...pour l unit centrale Wi Fi avant de retirer la carte microSD de l unit centrale Vous trouverez le logiciel et la proc dure de mise jour de l unit centrale sur le site www wattswater eu Copie Le menu...

Страница 45: ...isolering IP30 Klasse II Temperaturpr cision 0 1 C Indstillingsomr de for temperatur Komfort Reduceret Frostbeskyttelse 5 C til 30 C i trin p 0 5 C 5 C til 30 C i trin p 0 5 C 5 C til 10 C Str mforsyn...

Страница 46: ...rml s Tryk l nge for at skifte mellem l s l s op Fejlflag tryk for at bne RF gr nsev rdier alarmer batterifejl Enheden k rer p batteristr m NB kun ved indstillinger og parring Rumadgang hvis centrale...

Страница 47: ...prette og styre op til fire hydrauliske kredsl b Hvert enkelt kredsl b skal have en fjernstyret RF kredsl bsmodtager opkoblet der aktiverer den relevante pumpe og kedel Hvis mindst n varmemodtager ell...

Страница 48: ...parres f rst med den relevante UFH1 og derefter parres UFH1 erne med centralenheden Under parringen opretter centralenheden automatisk rum i henhold til antallet af termostater rum for UFH er 5 OPS T...

Страница 49: ...e rum For at vise enten omgivelses eller indstillingstemperatur eller fugtighed i 4 Styreledningsstatus Gulvtemperatur i tilf lde af gulvvarmeregulering Vises kun hvis sk rmen er l st Tryk p 3 i foreg...

Страница 50: ...lysningsenheder der er installeret i rummet Angiver b de nummeret p den aktuelle belysningsenhed antallet af belysningsenheder i rummet Angiver belysningsstatus Tryk for at skifte belysningsstatus Gen...

Страница 51: ...enu kan du angive Klokkesl t dato manuelt automatisk Tidszone UTC hvis enheden er i automatisk tidsopdateringstilstand Klokkesl t og dato hvis enheden er i manuel tidsopdateringstilstand Sommer vinter...

Страница 52: ...certification NB Automatisk parringstid til wi fi router med WEP n gle 3 4 min med WPA2 n gle 1 min NB For netv rksscanning Gentag processen mindst to gange hvis dit nskede wi fi netv rk ikke vises Hv...

Страница 53: ...53 Kontakt os Watts Electronics S A S B P N 10 Z A des Tourettes 43800 ROSIERES Frankrig Tlf 33 0 471 57 40 49 Fax 33 0 471 57 40 90 www wattsindustries com...

Страница 54: ...eskyttelse Elektrisk isolering IP30 Klasse II Temperaturn yaktighet 0 1 C Innstilling av temperaturomr de Komfort Senket Frostsikring 5 C til 30 C i trinn p 0 5 C 5 C til 30 C i trinn p 0 5 C 5 C til...

Страница 55: ...rmen Utetemperaturf ler Skjerml s Langt trykk veksler mellom l st ul st stilling Feilsymbol trykk for vise RF grenser alarmer batterifeil Enheten drives med batteri kun for innstilling og parkobling R...

Страница 56: ...Hver av kretsene er tilknyttet en ekstern RF mottaker som aktiverer den nskede pumpen eller varmtvannsberederen Hvis det er varmebehov p minst n varmemottaker eller termostataktuator aktiverer og sty...

Страница 57: ...stallasjonsmenyen langt trykk Velg WiFi innstillinger Velg Research Networks S k etter WiFi nettverk Velg WiFi nettverket ditt i listen Angi det vanlige WiFi passordet Legg merke til at enheten teller...

Страница 58: ...f tilgang til denne modusmenyen Komfortmodus Sett rommet i komfortmodus Hvis funksjonen er aktiv opprettholdes komforttemperatur til enhver tid Redusert modus Sett rommet i redusert modus Hvis funksj...

Страница 59: ...sstatus Trykk n gang for endre belysningsstatus Generell styring av alle lys i rommet Gjeldende rom Hurtigtilgang til nsket rom Vises bare hvis antall enheter er h yere enn 1 Brukes til velge enhetene...

Страница 60: ...v klokkeslett Klokkeslett og dato hvis enheten er innstilt p manuell oppdatering av klokkeslett Sommer vintertid manuell automatisk Temperaturenhet C F Bakgrunnsfarge Farge p knappene Bakgrunnsbelysni...

Страница 61: ...ed nettverksskanning gjentar du skanningen minst to ganger Hvis nsket WiFi nettverk fortsatt ikke vises angir du WiFi innstillingene manuelt Generell fabrikkstandard For tilbakestille systemet til fab...

Страница 62: ...annhet 0 1 C Temperaturinst llningsomr de Komfort Reducerad Frostskydd 5 C till 30 C i steg om 0 5 C 5 C till 30 C i steg om 0 5 C 5 C till 10 C Str mf rs rjning 85 265 V 50 60 Hz Radiofrekvens 868 MH...

Страница 63: ...ur Sk rml s V xla mellan l sning uppl sning med en l ng tryckning Felflagga tryck f r att f tkomst till RF begr nsningar larm batteristatus Enheten drivs med batteri endast f r inst llningar och parni...

Страница 64: ...p till 4 hydraulkretsar En RF fj rrkretsmottagare r l nkad till varje krets och aktiverar avsedd pump och v rmepanna Om minst en v rmemottagare eller ett termostatiskt st lldon p kretsen har ett krav...

Страница 65: ...ditt tr dl sa n rverk Detta g r du p f ljande s tt G till installationsmenyn l ng tryckning V lj WiFi settings WiFi inst llningar V lj Research Networks S k efter n tverk s ker efter ditt tr dl sa n...

Страница 66: ...a l gesmeny Comfort Mode St ll i rummet i comfort mode l get komfort Om l get f rblir aktivt uppr tth lls komforttemperaturen Reduced Mode St ll i rummet i reduced mode l get reducerad Om l get f rbli...

Страница 67: ...dikerar belysningsstatus Tryck p knappen f r att visa belysningsstatus Allm n hantering f r all belysning i rummet Aktuellt rum Snabb tkomst till nskat rum Visas endast om antalet enheter r fler n 1 a...

Страница 68: ...matiskt Tidszon UTC om enheten r inst lld i l get f r automatisk tidsuppdatering Tid och datum om enheten r inst lld i l get f r manuell tidsuppdatering Sommar vinter manuellt automatiskt Temperaturen...

Страница 69: ...ed WPA2 nyckel 1 min Obs F r skanning av n tverk upprepa f rfarandet minst tv g nger om nskat WiFi n tverk inte visas Om nskat WiFi n tverk fortfarande inte visas ange WiFi inst llningarna manuellt Al...

Страница 70: ...70 Kontakta oss Watts Electronics S A S B P N 10 Z A des Tourettes 43800 ROSIERES Frankrike T 33 0 471 57 40 49 F 33 0 471 57 40 90 www wattsindustries com PPLIMW15398Ab...

Отзывы: