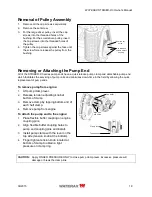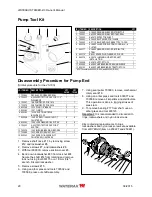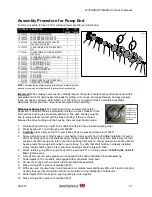
WATERAX
STRIKER-2/3 Owner's Manual
09/2015
17
Procedure
1. Place the rear cover on engine. Make sure
the rear cover is properly positioned and
lying flat against the engine face. Securely
tighten the four cap screws and lock
washers.
If the drive assembly is installed
horizontally (see Fig. 2), start by installing
the transfer plate on the rear cover. Then
install the transfer plate with the rear cover
on the engine by securely tightening the
four cap hex socket head cap screws and
lock washers.
Important:
The drive hub assembly has a
drain hole. Ensure that the drain hole is
facing down.
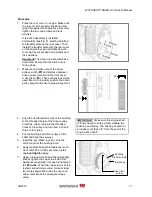
2. Measure and make note of the driver
pulley’s width (
W
) and distance between
driven pulley (small) and the front cover
mating face (
D
F
). These dimensions will be
used later on to properly position the driver
pulley (large) and ensure proper alignment.
W
D
F
3. Align the non-threaded holes of the bushing
to the threaded holes of the driver pulley.
Insert the cap screws into the threaded
holes of the pulley and turn them by hand
three to four turns.
4. Put the bushing and driver pulley on the
shaft and align the keyways.
IMPORTANT:
Make sure the engine shaft
is long enough to safely accommodate the
bushing and pulley. The bushing should not
protrude more than 3/8” from the end of the
engine drive shaft.
5. Insert the key. Make sure key runs the
entire length of the bushing bore.
6. Apply medium-strength threadlocker such
as Loctite
®
243 on the set screw. Install
and
hand tighten only
.
7. Using a torque wrench and the appropriate
socket, tighten the cap screws with lock
washers sequentially until each is tightened
to
180 in-lbs
. When the cap screw is at the
recommended torque value, make at least
two more sequential rounds to ensure all
cap screws are at the adequate torque
value.
Partially
thread screws
Insert key
Insert set
screw
Содержание STRIKER-2/3
Страница 1: ...STRIKER 2 3 Owner s Manual Publication Date 09 2015 Publication Number 701223 Rev 3...
Страница 28: ...WATERAX STRIKER 2 3 Owner s Manual 26 09 2015 Notes...
Страница 29: ...WATERAX STRIKER 2 3 Owner s Manual 09 2015 27...
Страница 30: ...WATERAX STRIKER 2 3 Owner s Manual 28 09 2015...


