background image

WATERAX 

STRIKER-2/3 Owner's Manual 


20 


09/2015   

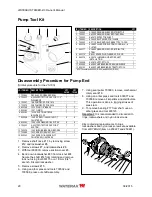
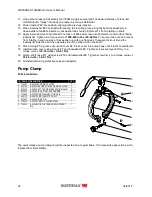
Pump Tool Kit 


1

2

3

4

6

5

7

8

10

9

11

12


ID  ITEM NO  DESCRIPTION 

QTY 

1  700540 

A-1884 PRESSING SLEEVE DISTRIBUTOR 

2  700531 

A-4329 PRESSING SLEEVE ROTARY SEAL 

3  700532 

A-4097 PROTECTOR SHAFT 

4  700090 

A-7644 SEAL PULLER FOR 12-28NS 

5  700642 

A-7711 SEAL REMOVAL PRESS TOOL, 12-28N 

6  600079 

A-1888 PULLER FOR SUCTION COVER, ALU. & 

PLATED 

7  600077 

A-1886 PRESSING PIN FOR DISTRIBUTOR, 

STEEL 

8  600175* 

R-904L SPARK PLUG WRENCH C/W ROD 

9  600078 

A-1887 ALUMINUM GUIDE FOR SHAFT 

INSTALLATION 

10  700588 

A-5297 SUPPORT TOOL 

11  600052 

B-4084 PUMP BEARING PRESSING SLEEVE 

12  600123 

B-4085 PUMP BEARING EXTRACTOR TOOL 

* 600175 contains 800084 (R-904) and 800082 (R-905)

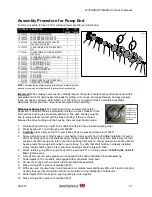
Disassembly Procedure for Pump End 

(Similar procedure for the 25-16S) 


ID  ITEM NO  DESCRIPTION 

QTY 

25-16S 

QTY 

18-16S 

1  700994 

DECAL-35 NO GREASE DECAL 

2  700023 

A-5536 PROTECTIVE CAP FOR 1-1/2" 
DISCHARGE 

3  700041 

18-8 PUMP BODY FOR 18-16 

3  700076 

25-8 PUMP BODY FOR 25-16 

4  800366 

12-73 PLUG, 1/8" BRASS 

5  800363 

12-27 O-RING 

6  600380 

12-12A SUCTION NOZZLE-

INCLUDES 12-40 

7  800359 

12-39  SCREW 1/4-28X9/16 SLOT 

FILLISTER SS 

8  800360 

12-38 LOCKWASHER 1/4 SPLIT SS 

9  700022 

A-5537 PROTECTIVE CAP FOR 2" 

SUCTION 

10  700029 

12-40 BUSHING BEARING, BRONZE 

11  700069 

12-13 NOSE FOR SHAFT, ALU. 

12  800343 

12-42 SCREW 1/4-28X3/4 SLOT 
FILLISTER NYLONLOCK SS 

1.  Remove shaft nose #11, by removing screw 

#12 and lockwasher #8. 

2.  Remove screws #7, and lockwashers #8. 
3.  With tool 600079, remove suction cover #6. 
4.  Bend down lockwasher #23 from lock nut #24. 

Secure the shaft #14 from rotating and remove 
lock nut using tool 600175 or a 19 mm (3/4") 
wrench. Discard lockwasher. 

5.  Remove screws #15. 
6.  Using an arbor press and tools 700532 and 

700588, press out shaft assembly. 

7.  Using seal puller 700090, remove mechanical 

rotary seal #18. 

8.  Using an arbor press and tools 600077 and 

700588, remove all impellers and distributors. 
This operation is done in jogging strokes of 
press ram. 

9.  To remove bearing #17 from shaft, use an 

arbor press and tool 600123. 

Important:

 It is recommended to discard all O-

rings, lockwashers and nylon lock screws.  
 
Kits containing replacements O-rings, 
lockwashers and nylon lock screws are available 
from 

WATERAX

 (item no 250227 and 250241).  


1

2

3

4

5 (26)

6

7

8

9

11

12

10

(1/2)


Содержание STRIKER-2/3

Страница 1: ...STRIKER 2 3 Owner s Manual Publication Date 09 2015 Publication Number 701223 Rev 3...

Страница 2: ...WATERAX Inc assumes no responsibility for any omissions or errors that may appear in this document or for any damages that may result from the use of information contained herein The following are tr...

Страница 3: ...c Starters and Control Panels 7 Operating STRIKER 2 3 Series Pumps 8 Pre Operation Checklist 8 Flooded Suction 8 Drafting 9 Priming the Pump 10 Startup and Discharge 11 Shutdown 11 Cold Weather Operat...

Страница 4: ...llow all Personal Safety Advisories Warnings Always wear eye and ear protection when operating the pump unit Do not operate if mentally or physically fatigued Always inspect hoses and piping to avoid...

Страница 5: ...Always check for sufficient oil quantity in the engine crankcase before use see engine manual for details on checking the oil level as well as for the type of oil to use If applicable always check for...

Страница 6: ...uct guide technical notes links to the engine manufacturer s manuals news and other updates about WATERAX and its goods and services Abbreviations and Terms The following terms and abbreviations are u...

Страница 7: ...s include Quick release clamp and swappable pump ends for minimal equipment downtime and inventory Sealed bearing to eliminate pump end greasing in the field Belt drive system for reliable low mainten...

Страница 8: ...or from third party vendors for example control panels batteries and fuel lines You will also require hoses and nozzles as well as other fire apparatus plumbing which can be purchased through your WA...

Страница 9: ...as any other part of the pump or engine that is frequently accessed or inspected valves panels primers filters etc Make note of components that become hot when operating such as mufflers and engine bl...

Страница 10: ...t the equipment requires repair Remember that damaged equipment can expose you to safety hazards Flooded Suction Use this procedure if you are taking water from a hydrant another pump or a closed tank...

Страница 11: ...s ability to efficiently draft water The following limitations should be taken into account Water temperatures above 35 C 95 F can cause noticeable loss in pump performance Barometric pressures below...

Страница 12: ...n the priming cap and fill pump with water manually 2 Firmly tighten priming cap 3 Pump can also be primed by jerking the suction hose until water flows from the pump s discharge port Guzzler Priming...

Страница 13: ...ine left slightly open to allow fresh water to continue to enter the pump 3 Discharge water Once the pump is primed and with the engine running you can begin to discharge water a Slowly open the disch...

Страница 14: ...on WARNING Before doing any maintenance to the pump always ensure that the equipment cannot be accidentally started Follow any apparatus and or departmental procedures or guidelines in regards to lock...

Страница 15: ...akage is in the pump Air Trapped in Suction Pump Intake Line Check that no part of the suction hose or piping is higher than the pump intake Pump suction hose and piping must be laid out with a contin...

Страница 16: ...hose was purchased check that they provide adequate supply to the pump to meet the performance desired If the pump was purchased used check that the actual configuration will achieve the desired perfo...

Страница 17: ...4 SHAFT 1 12 600151 PART 6 KEY 3 16 SQUARE S S 1 13 600124 B 7544 DRIVE CARRIER ASSEMBLY COMPLETE 1 14 800527 FAST 2 SCREW 3 8 16X1 HEX CAP ZINC DICHROMATE 4 15 600063 212 170P CLAMP ASSEMBLY ALU PAIN...

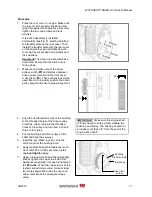
Страница 18: ...AIN HOLE TO BE FACING DOWN Figure 2 Exploded view of drive hub assembly item no 600124 Installing the Drive Assembly Before Installation Read and follow all instructions thoroughly and carefully Ensur...

Страница 19: ...d ensure proper alignment W DF 3 Align the non threaded holes of the bushing to the threaded holes of the driver pulley Insert the cap screws into the threaded holes of the pulley and turn them by han...

Страница 20: ...g hole on the front cover and partially insert the front cover onto the dowel pin 12 Using the top dowel pin as a pivot point swing the front cover and align the second dowel pin with the correspondin...

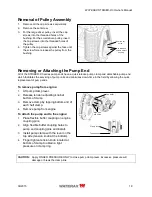
Страница 21: ...s the servicing of pump units and minimizes down time in the field by allowing the quick replacement of pump ends To remove pump from engine 1 Lift pump clamp lever 2 Release tension adjusting knob at...

Страница 22: ...6 600380 12 12A SUCTION NOZZLE INCLUDES 12 40 1 1 7 800359 12 39 SCREW 1 4 28X9 16 SLOT FILLISTER SS 8 8 8 800360 12 38 LOCKWASHER 1 4 SPLIT SS 9 9 9 700022 A 5537 PROTECTIVE CAP FOR 2 SUCTION 1 1 10...

Страница 23: ...roperly installed slowly rotate shaft by hand rotary seal drive bushing should rotate with shaft 5 Attach retaining ring 16 to pump body with six screws 15 to a torque value of 22 25 in lbs 2 5 2 8 Nm...

Страница 24: ...lled slot in the shaft 17 Place O ring 5 in groove of suction cover 6 Press cover into pump body until it rests on distributor 18 Install suction cover using screws 7 and lockwashers 8 Tighten screws...

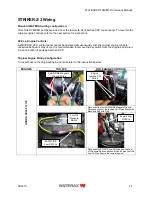
Страница 25: ...remove the key switch from the engine and store it in a safe location if equipped with an XCP Original Engine Wiring Configuration To revert back to the Original Engine Controls refer to the instruct...

Страница 26: ...WATERAX STRIKER 2 3 Owner s Manual 24 09 2015 FastWire Wiring Diagrams WIRING FOR GASOLINE PUMPS Pins 7 8 connected on GX630 engine only...

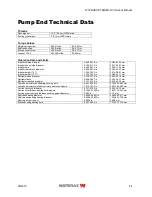
Страница 27: ...38 91 mm Impeller height 12 11 1 334 1 343 in 33 88 34 11 mm Distributor vane diameter 3 740 3 770 in 95 00 95 76 mm Distributor bore 0 938 0 957 in 23 83 24 31 mm Distributor rear hub diameter 2 127...

Страница 28: ...WATERAX STRIKER 2 3 Owner s Manual 26 09 2015 Notes...

Страница 29: ...WATERAX STRIKER 2 3 Owner s Manual 09 2015 27...

Страница 30: ...WATERAX STRIKER 2 3 Owner s Manual 28 09 2015...

Страница 31: ...the Seller s product manuals and supplemental instructions and guidelines as set out in full at www waterax com eng warranty d failure due to compliance with a specification or design provided or requ...

Страница 32: ...contained in this document including drawings is proprietary to WATERAX and may not be copied reproduced or used in whole or in part without our prior written permission The information in this docume...

Отзывы: