


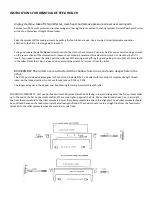


The
“0”
on
your
head
se ng
scale
references
the
top
of
the
½”
sub
‐
plate
supplied
with
your
machine.
For
example,
if
you
were
milling
a
¾”
piece
of
stock
you
would
set
the
machine
head
at
the
¾”
se ng.
Adjus ng
your
machine
head
to
this
scale
se ng
will
give
you
a
full
pass
cut
and
a
completely
fi
nished
pro
fi
le.
This
is
a
mul
‐
pass
machine
and
with
mul
‐
pass
you
can
add
3/16”,
in
this
example,
to
the
3/4”
dimension
for
a
fi
rst
pass
se ng
of
15/16”.
In
this
example
you
may
set
the
machine
head
to
any
scale
se ng
between
3/4”
and
15/16”
for
a
fi
rst
pass.
These
se ngs
allow
you
to
achieve
proper
roller
tension
for
holding
the
stock
and
provid
‐
ing
a
safe
opera on.
Be
sure
to
check for su
ffi
cient feed roller contact
before
proceeding
to
use
this
setup
and
be
sure
to
rotate
your
molding
knives
to
check for knife rota on clearance with the chip extractor installed
and
the
power
o
ff
before
star ng
the
machine.
Turn
the
knife
arbor
by
turning
the
motor
pulley
at
the
inner
guard
opening.
Other
molding
ps
Stock
height
should
be
within
3/16”
of
fi
nished
molding
size.
If
making
one
pass
only
it
should
be
within
1/32”.
Stock
width
should
be
uniform
and
to
fi
nished
molding
size.
Saw
ripping
to
width
will
not
make
the
stock
uniform
enough
for
smooth
fl
ow
through
the
guides,
and
thus,
will
not
result
in
a
sa sfactory
molding.
We
recommend
that
all
stock
be
planed
in
both
width
and
height
to
fi
nished
molding
size
before
se ng
up
to
do
the
pro
fi
le.
When
ghtening
the
knives,
push
them
fi
rmly
against
the
lip
and
sideways
against
the
bolts
in
the
direc on
of
the
tube
side
of
the
machine
for
an
exact
pro
fi
le
match
up.
Hold
secure
while
ghtening
bolts.
Set
the
head
height
to
within
3/16”
of
your
stock
height.
This
will
give
you
proper
roller
tension
on
your
molding
stock.
This
is
the
correct
way
to
mold.
It
is
acceptable
to
leave
3/16”
of
the
cut
for
mul ple
passes.
But
for
safety
reasons
leave
no
more
than
3/16”.
On
some
extremely
deep
or
wide
cuts,
some
prior
stock
removal
will
be
required
before
molding.
You
may
remove
this
stock
using
one
of
the
rabbet/dado
knives
found
in
our
catalog.
You
may
also
use
a
dado
blade
on
a
table
saw.
Failure
to
set
your
head
height
within
3/16”
of
the
stock
height
will
create
an
extreme
safety
hazard
in
that
possibly
not
enough
roller
pressure
will
be
applied,
or
that
no
roller
pressure
at
all
will
be
applied.
Do
not
cut
a
wider
stock
area
than
the
knife
was
designed
to
cut.
This
will
cause
excessive
heat
in
the
knife,
burn
your
stock
and
puts
a
harmful
load
on
the
feed
system.
The
roll
pressure
screws
are
set
at
maximum
molding
pressure
from
the
factory.
They
are
screwed
into
the
head
as
far
as
possible
and
the
check
nut
is
ghtened.
When
you
use
the
machine
for
planing
you
will
need
to
reduce
the
roller
pressure.
Loosen
the
pressure
screw
lock
nut
and
screw
out
each
pressure
to
a
se ng
¼”
higher
than
the
fully
seated
posi on
and
re ghten
the
lock
nut.
To
change
the
molding
knives,
remove
the
chip
extractor.
Set
one
knife
at
a
me
in
place
with
the
bevel
edge
toward
the
in
‐
feed
end
of
the
machine.
Firmly
push
the
knife
down
against
the
arbor
lip
and
sideways
against
the
bolts
in
the
direc on
of
the
tube
side
of
the
machine.
Hold
secure
while
ghtening
bolts
with
a
7/32”
allen
wrench
or
drive.
Содержание 20210492060001
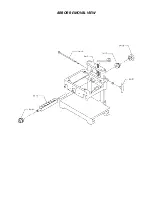
Страница 19: ...ARBOR REMOVAL VIEW...
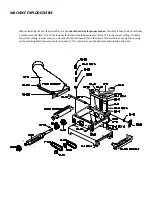
Страница 20: ...Stand exploded diagram...
Страница 22: ...Notes Maintenance Records...


