background image

GUIDES


Guiding your stock


Your


machine


comes


with


the


GS

2


guide


system,


which


includes


a


fl

ex


guide


and


a


solid


guide


to


guide,


your


stock.


To set these 

guides

,


fi

rst


a ach


your


knives


to


the


knife


arbor


in


the


posi on


you


have


chosen,


o en


a


place


where


you


can


get


the


most


out


of


your


roller


surfaces.


Panel


knives


would


go


to


the


far


right.


Smaller


knives


to


the


post


side


half


of


the


moun ng


area


and


larger


knives


to


the


central


posi ons.


Roll


one


knife


down


poin ng


to


the


machine


bed


and


place


a


sample


piece


of


stock


you


are


going


to


mold


on


the


bed.


Align the 

stock


to


the


knife


pro

fi

le


and


carefully


lower


the


machine


head


un l


the


roller


puts


pressure


on


your


stock


to


hold


it


securely.


A ach your 

fl

ex guide


to


the


side


of


the


pro

fi

le


that


will


cut


the


least


deep


into


your


stock.


This


will


give


the


longest


possible


life


to


your


fl

ex


guide.


The


beveled


por on


of


the


guide


should


be


facing


the


stock.


Put


about


a


1/32”


amount


of


pressure


on


the


fl

ex


part


of


the


guide.


This


will


keep


you


stock


from


wandering


within


the


glide


path.


Pull


the


handles


up


and


away


from


the


stock


path.


A ach your solid guide 

on


the


other


side


of


the


stock.


Push


it


up


fi

rmly


against


the


stock


and


ghten


the


handles


angling


them


away


from


the


stock


path.


Remove your set up piece of stock 

by


raising


the


machine


head,


and


pulling


the


stock


out


from


the


bed.


Your knives will usually cut into one or both guides.


This


is


normal


and


expected.


The


guides


are


e

ec ve


and


last


a


long


me


a er


being


cut


into


many


mes.


As


you


become


more


familiar


with


the


machine


and


its


use,


you


will


want


to


make


wooden


guides to suit speci

fi

c jobs.


Always


make


a


com

plete


sample


(top


and


bo om)


of


crowns


and


keep


sample


to


set


up


on.


Make


your


bo om


cut


fi

rst


when


milling


bed and crown moldings

.


You


may


want


to


add


a


key


cut


as


a


guiding


mechanism


for


your


top


pro

fi

le.


When planing the edge of stock

,


a


high,


square,


relieved


guide


is


needed


in


order


to


have


the


edge


reasonably


square


and


to


pro

vide


stability.


The


center


reliefs


are


to


reduce


fric on.


Some


pro

fi

les


are


too


deep


to


make


on


the


W&H.


In


some


cases


you


can


rotate


the


pro

fi

le


into


a


fl

a er


posi on


to


e

ec vely


re

duce


the


depth


of


cut.


A


“V block”


guide


would


be


made


to


guide


your


stock.


The


pro

fi

le


knives


would


have


to


be


custom


made


to


use


in


this


V


block


posi on.


When


making


tongue


and


groove


stock,


a


serious


and


detailed


approach


is


needed


in


order


to


achieve


a


uniform


fi

t.


Carefully


pre

inspect


your


stock


for


cupping


and


warping.


You


need


to


plane


all


your


stock


to


one


uniform


size.


The


guide


thickness


should


be


3/8”


thinner


than


your


stock


or


your


roller


will


scu

ff 

on


the


guides


when


the


stock


has


le


the


ma

chine


and


the


rollers


are


in


their


rest


posi ons.


When


running


thin


stock,


you


will


need


to


fasten


a


sub

plate


between


the


guides


to


maintain


a


thick


enough


guide


to


control


your


stock.


Содержание 20210492060001

Страница 1: ...entative maintenance and other pertinent data to assist you in assuring long life and dependable service from your machine Molder Model 206 208 230 1 v2 0 206 208 230 3 v2 0 For Serial numbers 2021049...

Страница 2: ...ect and cau on Following stated and inherent safety precau ons will considerably lessen the possibility of personal injury If normal safety measures are not taken or are overlooked the possibility of...

Страница 3: ...ock The 0 on your scale is set to the top of your GS 2 guide system sub plate This means you would set the machine head reference to the scale at in order to take a full profile pass on a piece of sto...

Страница 4: ...side covers Cut the zip tie around the motor Remove the motor shipping boards Remove the lag bolts holding the machine to the pallet Lift the machine off of the pallet Re install the sides Before elev...

Страница 5: ...lure to do so will damage the control panel If you facility does not have a wild leg connect as per diagram If your machine is rota ng the incorrect way switch only the black and red wires green is gr...

Страница 6: ...ll start and stop the cu er head Speed Dial will control the speed of the feed rollers 0 is stop 10 is fastest E Stop Start Stop Speed Dial Magne c Starter assembly Double pole fuse holder and Line fu...

Страница 7: ...under the out feed roller before engaging a higher feed rate This reduces the inci dence of a large chip out a cha er mark or snipe on the first few inches of your stock You have the same advantages e...

Страница 8: ...um edge loss return your knives to the factory for re sharpening Have your knives re sharpened when you first no ce some dullness This gives op mal performance and maximum life span out of the knives...

Страница 9: ...e bolts in the direc on of the tube side of the machine for an exact profile match up Hold secure while ghtening bolts Set the head height to within 3 16 of your stock height This will give you proper...

Страница 10: ...g the stock out from the bed Your knives will usually cut into one or both guides This is normal and expected The guides are e ec ve and last a long me a er being cut into many mes As you become more...

Страница 11: ...the angle needed to cut the wood sec ons in order to stay within the selected radius Lay out the wood sec ons by marking the angles while being careful to select cuts for grain structure and color Cu...

Страница 12: ...ht Rotate the blade arbor by hand to insure nothing is interfering with its rota onal path Mould the panel cross grain ends first Stand somewhere between the open side and in feed side RAISED PANEL IS...

Страница 13: ...planing the edge of stock to ensure the edge will be reasonably square A relief in the ver cal wall of the guide reduces fric on See the guide sec on for a picture of the edge guides THREAD LOCKING IN...

Страница 14: ...generally an unwanted undercut in the stock It occurs in the first and last few inches of the stock length It causes a di erent height di mension than what was selected for the stock Causes The stock...

Страница 15: ...lers to see if they have a glossier than normal build up Clean the gloss or pitch build up o the rollers Make sure adequate spring pressure is being ap plied to the rollers Check the base or bed for r...

Страница 16: ...he roller Reset the roller in a vise and use a small pipe wrench to remove it from the roller REASSEMBLY The rollers are constructed with a shallow hole in one end and a deeper hole in the other The P...

Страница 17: ...a small amount of slack in it and the long out feed chain should have plenty of slack This is the correct se ng To obtain the correct se ng in most cases you would push the unit toward the in feed end...

Страница 18: ...olt holding the chain guard to the machine head As you pull the unit free pull off the in feed chain sprocket you loosened To remove the motor from the motor mount and chain guard remove the two motor...

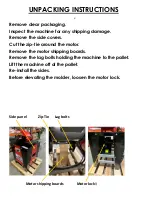
Страница 19: ...ARBOR REMOVAL VIEW...

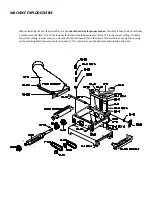
Страница 20: ...Stand exploded diagram...

Страница 21: ...age due to modifica ons misuse improper maintenance normal wear wood jams or using a knife motor with a horsepower ra ng over 2HP WHO IS COVERED The warranty covers the ini al purchaser only LIMITATIO...

Страница 22: ...Notes Maintenance Records...

Страница 23: ...ine replacement parts For parts please call customer service or log onto our website Printed in the USA Williams Hussey 04 2021 Molder update 4 21 2021 Update model numbers 5 3 21 update9 30 21 added...

Отзывы: