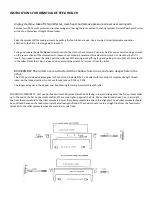
Always
check
your
knife
clearance
to
the
guide.
Clear
away
any
interfering
por on
of
the
guide
by
gently
lowering
your
knife
down
into
the
guides
to
just
below
your
running
posi on.
MOLDING
PICTURE
FRAMES
Decide
whether
the
rabbet
or
pro
fi
le
cut
should
be
done
fi
rst.
If
you
are
going
to
make
the
rabbet
on
the
W&H
Molder,
do
the
rab
‐
bet
fi
rst.
In
order
to
u lize
the
W&H
Molder
for
rabbets,
a
rabbet
knife
with
a
depth
of
cut
equivalent
to
the
depth
you
need
should
be
ordered.
If
we
do
not
have
a
standard
knife
with
the
depth
you
seek,
we
can
make
a
special
knife
to
suit
your
needs.
ROUND
TOP
CASINGS
CONSTANT
RADIUS
SIZE
ARCS
We
manufacture
knives
with
the
pro
fi
le
cu ng
the
deepest
por on
of
the
cut
on
the
open
side
of
the
ma
‐
chine.
No fy
us
when
you
order
a
knife
if
you
want
the
deep
side
of
the
cut
on
the
ver cal
tube
side
of
the
machine.
The
set
up
and
opera on
of
the
W&H
machine
for
a
round
top
molding
job
is
very
similar
to
the
straight
molding
set
up.
One
main
di
ff
erence
is
the
molding
stock
will
ride
piggybacked
on
a
template
to
enable
the
knife
to
clear
the
jig
guiding
hardware.
Our
EJ92
Ellip cal
Jig
is
not
needed
for
a
fi
xed,
constant
radius.
Stock
prepara on
can
be
done
in
many
ways.
The
following
is
one
example.
First
determine
the
angle
needed
to
cut
the
wood
sec ons
in
order
to
stay
within
the
selected
radius.
Lay
out
the
wood
sec ons
by
marking
the
angles
while
being
careful
to
select
cuts
for
grain
structure
and
color.
Cut
the
sec ons
and
biscuit
join
them
together
with
glue.
We
made
a
fi
xture
to
band
saw
the
inside
and
outside
radii
consis ng
of
a
pivot
bar
and
bracket.
We
mounted
the
pivot
bar
to
the
stock
on
the
scrap
por on
of
the
inside
radius.
The
pivot
bar
is
drilled
with
numerous
holes
to
accommodate
any
radius
sizes.
You
may
also
want
to
design
a
fi
ne
adjuster
to
allow
you
to
make
any
radius
in
between
your
adjus ng
holes.
Make
sure
the
outside
radius
is
cut
fi
rst.
The
guides
should
be
20”
long,
which
is
the
length
of
the
GS2
guide
system,
or
14”
long
if
you
are
just
using
the
bed
of
the
machine.
The
guides
may
be
made
using
the
band
saw
set
up.
We
make
one
guide
for
the
in
‐
side
radius
and
one
for
the
outside
radius.
We
use
MDF
board.
ROUND
TOP
SETUP
1.
Make
sure
power
supply
is
disconnected
2.
Raise
the
machine
head
and
set
the
stock
on
the
bed.
3.
Align
the
stock
with
molding
pro
fi
le.
4.
Lower
the
head
to
pinch
the
stock.
5.
Set
the
guides
and
clamp
them
in
place.
Raise
the
machine
head,
remove
the
stock,
and
reset
the
head
to
within
3/16”
of
stock
size.
Check
to
see
that
the
rota ng
knife
will
not
hit
anything
you
don’t
want
it
to
on
start
up.
NEVER
a empt
closed
loop
molding.
It
is
an
unsafe
procedure;
you
will
not
have
enough
roller
pressure
ini ally.
Содержание 20210492060001
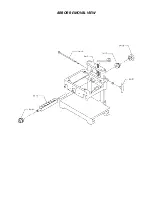
Страница 19: ...ARBOR REMOVAL VIEW...
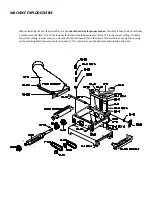
Страница 20: ...Stand exploded diagram...
Страница 22: ...Notes Maintenance Records...


