NVR Quick Start Guide - Version: NVR-Q320
26
5. Left-click
on the screen to start drawing the Tripwire line.
Left-click again
to finish
the line (optionally, you can add additional corners to the line by continuing to left-
click).
Right-click
to finish placing the line.
6. When using select functions such as Tripwire, In the top left window, you can alter
the Direction that the line must be passed from to activate the event, as indicated
by the arrow going across the line (A to B, B to A, or both ways).
7. (
NOTE:
This step requires an AI camera.)
AI Recognition
enables Perimeter
Protection when using Tripwire or Intrusion functions. This will recognise and
differentiate between people, vehicles and other moving objects. Turn the option
On
to enable this function.
8.
Click OK to finish.
9. Click the
Trigger Button
to bring up the
Trigger menu,
configuring what
actions are taken once the IVS event is triggered. (Refer to
7.4 AI Trigger Actions
).
10. Click the
Enable box
to turn on the IVS rule.
11. Click
Apply
to save changes. If done correctly, you will see the Tripwire in live view.
6.4 Tripwire & IVS Setup
6.4.1 Tripwire Setup
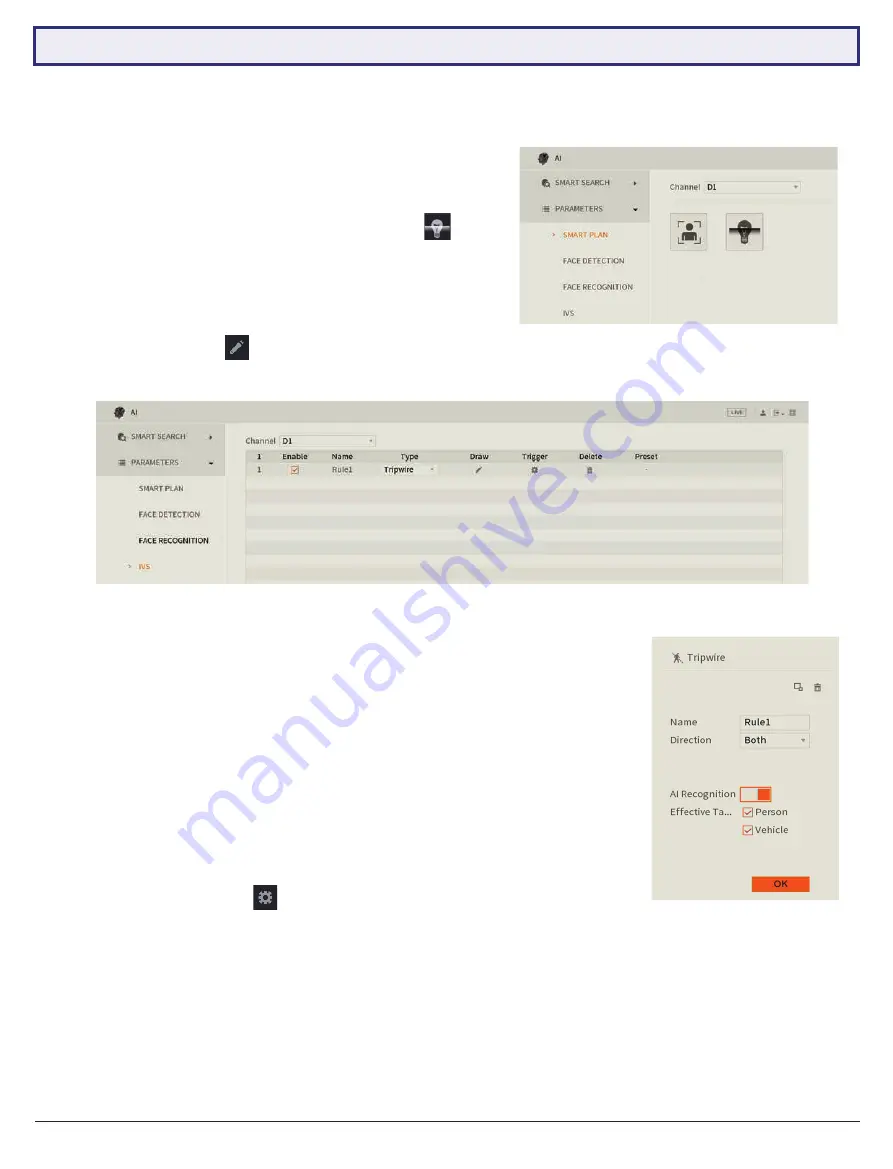
1. From the Main Menu, select
AI -> Parameters -> Smart Plan
.
2. Select a channel with IVS functionality. Click the
icon
then
Apply
to enable the IVS.
3. Select the
IVS
tab. Select the same camera channel, then click
Add button
at the bottom. This will create a new IVS setting
(Tripwire by default).
4. Click the
Draw button
to open the Draw screen (Fig. 6.10).
Fig. 6.10:
IVS setup screen.
Fig. 6.9:
Parameters Smart Plan screen.
Fig. 6.11:
Tripwire Draw
menu.
6.3.2 Intrusion/Abandoned/Missing Setup
Intrusion, Abandoned Object and Missing Object are all set up in similar ways to Tripwire - simply select which IVS you
want to set up from the
Type dropdown menu
(Fig. 6.10).
NOTE:
Before enabling Tripwire or another IVS feature, ensure that you have configured IVS recording schedules (refer to
3.1.7 Configuring Recording Schedules
).


