background image

NVR Quick Start Guide - Version: NVR-Q320

16

4. Footage Playback

4.1 Accessing Stored Footage

To access footage playback, select the 

Playback

 button from the 

Main Menu

. Stored footage can be accessed by 

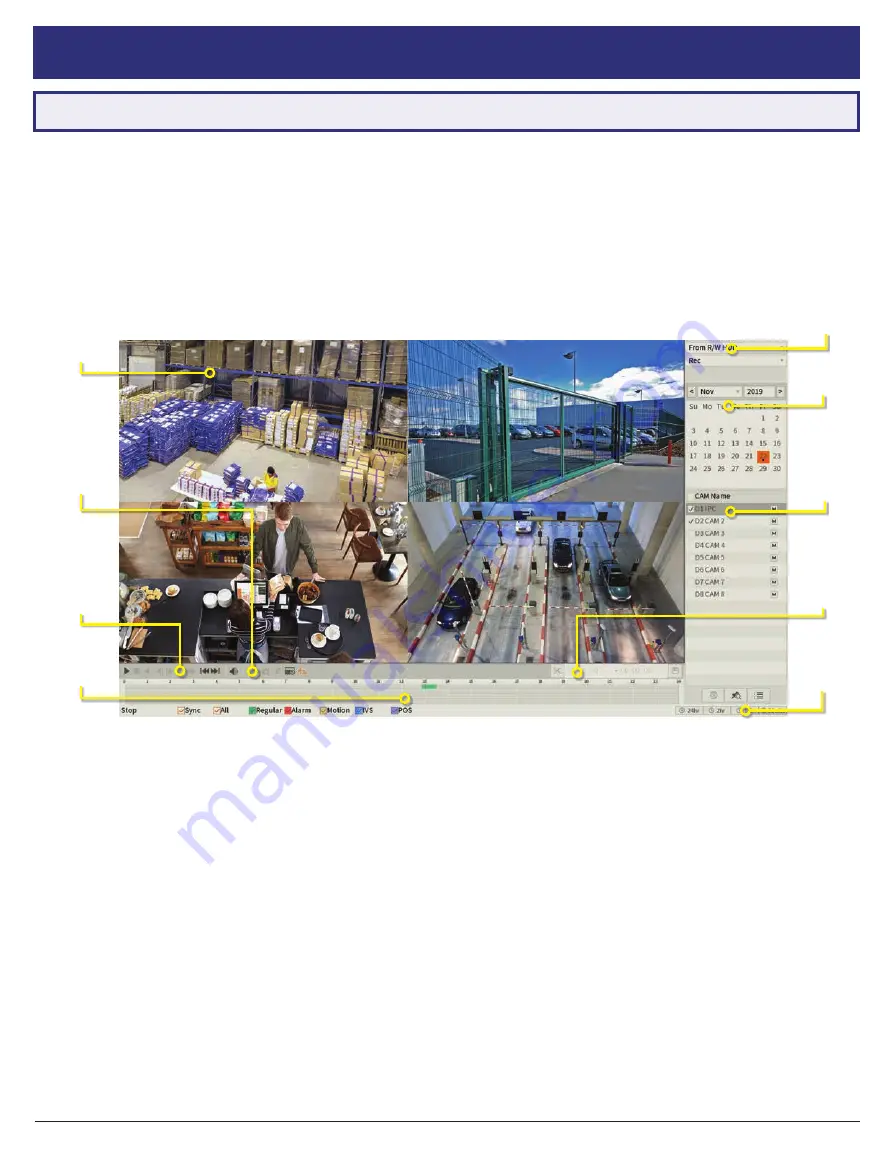
searching by date and refined by footage type (Regular, Motion Detection, Alarm, etc). The below image details the 

playback interface with footage selected.

After locating desired footage, you can immediately backup the video by using the playback menu. See Section 5.1.1 
for more information.  

Fig. 4.1: 

Four camera view simultaneous footage playback.

Source 

Select

Date 

Select

View 

Select

Timeline

Zoom

Footage 
Timeline

Playback
Controls

Smart
Search

Camera
Display

Backup

Controls

Содержание Watchguard NVR-Q320

Страница 1: ...Network Video Recorder Installation Manual Supports models from NVR Q320 ...

Страница 2: ...ear of the NVR 1 2 Connecting your NVR and Cameras The following section will detail connecting the NVR and surveillance cameras It is recommended that cameras and connections are tested before mounting If there is no image an error message or dark screen when first connecting cameras see Troubleshooting in Section 8 in this guide Refer to 1 3 NVR Rear Panel Setup Diagram for full NVR system diagr...

Страница 3: ...mouse or backup device 100 240VAC Power input Audio 1x channel RCA input 2x channel output for microphone loudspeaker VGA Video output for older monitors Alarm External alarm trigger input output Fig 1 1 NVR Rear Panel Diagram 1 3 NVR Rear Panel Setup Diagram PoE LAN Fig 1 2 System Setup Example Monitor Router IP Cameras Direct PoE IP Cameras via PoE Switch PoE Network Switch NVR or Mouse Power In...

Страница 4: ...etween the camera and the targeted area Do not place camera or cabling near high voltage wires or other sources of electrical interference 2 Installing Cameras 2 2 Mounting Surveillance Cameras 1 Loosen the camera mount assembly by adjusting the locking screw with the included wrench 2 Mark the screw position on the mounting surface 3 Drill mounting holes for the wall plugs 4 Drill a larger hole a...

Страница 5: ...ew Allen key Pedestal Fig 2 4 Tri axis fixed dome adjustment Fig 2 2 Tri axis fixed bullet adjustment Locking screw Locking screw Cables NOTE Diagrams shown below assume camera to be mounted on masonry Cameras mounted on drywall gyprock plasterboard etc will require special mounting screws or toggles not included Diagrams are examples only screws and other physical components may vary depending on...

Страница 6: ...our NVR 1 Enter a strong admin user password using letters numbers symbols Confirm this password 2 Recommended Enter a Prompt Question password hint 3 Optional Draw an Unlock Pattern for quick unlocking 4 Recommended Enter an email address to be used for password resets 5 Recommended Enter security questions answers to be used if the admin password is forgotten Note that answers are case sensitive...

Страница 7: ...onnection 3 Users in NSW VIC SA TAS and ACT will need to enable DST Daylight Saving Time Adjust Start Time End Time settings according to your region and the year 3 1 3 Automatic Updates Here you can choose whether you want your system to Auto check for updates This feature will notify you whenever a new firmware update is available and downloads it For compatibility with future cameras and to rec...

Страница 8: ...tup we recommend using DHCP to connect to the Internet You will then be prompted to configure P2P for remote view on your device Fig 3 6 TCP IP setup section settings example only Fig 3 7 P2P setup section with QR codes example only 1 In the TCP IP section see Fig 3 6 The IP address of the NVR will be shown 2 Select and enable DHCP Dynamic Host Configuration Protocol 3 Should you wish to use a sta...

Страница 9: ...he password is what was set in Section 3 1 2 8 Tap Save The following details remote view configuration via the DMSS app Apple iOS Android on your device Depending on the device or app version menus may function or appear slightly different to those explained below Remote View Adding NVR via QR Code 1 Go to the Home screen 2 Select the Button on the device to add push notifications for 3 Select De...

Страница 10: ...ng MD Alarm IVS to all channels to accompany your regular recording 3 1 6 Configuring Surveillance Cameras After configuring remote view the Startup Wizard will take you to the Camera List menu This menu will display all detected cameras Users can also add cameras manually Cameras that are connected will automatically be displayed Device search Search all network cameras in the same network segmen...

Страница 11: ...nt recording tripwire face detection etc 6 Click Apply to the confirm recording schedule changes and move on to Snapshot Schedule 3 1 First Boot and Startup Wizard cont Fig 3 10 Recording Schedule Fig 3 11 Snapshot Schedule Setting Snapshot Schedule The Snapshot Storage Schedule is configured similarly to the Recording Schedule For consistency between recording and snapshots we recommend using the...

Страница 12: ...iew setup Before mounting cameras familiarise yourself with the user interface and menu layout Right click Menu Main Menu Search Playback PTZ Focus Control Viewing Options Sequence Smart Tracking Custom Split Camera List Manual Record Preview Mode Auto Focus Image Snapshot 3 1 First Boot and Startup Wizard cont 3 2 1 Camera Quality Bit Rate After the Startup Wizard has been completed you can make ...

Страница 13: ...ngs Bit rate The rate at which video data travels from the camera to the recorder measured in Kilobits per second This directly determines the quality of the video stream and how much capacity footage will occupy on the hard drive Bit Rate Type How bit rate is controlled By setting CBR constant bit rate the camera bit rate is pre defined and camera quality is constant no matter what is being captu...

Страница 14: ...ou wish to initialise then click the Initialize button 4 You will be brought to an Enter Password screen Tick Using current device password and email info then click Next 5 Enter the IP Address Subnet Mask and Default Gateway then click Next NOTE When initialising more than one camera the last section of the IP address will be incremented by the Incremental Value 6 Click Finished 7 Select the Came...

Страница 15: ... delete the old files or not If yes also determines how many days of footage are deleted Click Apply to save settings Fig 3 16 Storage Settings 3 4 Configuring Storage Settings 3 4 1 Configuring Basic Storage Settings Here you can configure the settings for situations when the HDD is full file size time length of recorded video and the settings for auto deleting old files To configure basic storag...

Страница 16: ...otage type Regular Motion Detection Alarm etc The below image details the playback interface with footage selected After locating desired footage you can immediately backup the video by using the playback menu See Section 5 1 1 for more information Fig 4 1 Four camera view simultaneous footage playback Source Select Date Select View Select Timeline Zoom Footage Timeline Playback Controls Smart Sea...

Страница 17: ...tored Footage cont By configuring your recording schedule for motion detection and by using Smart Search you can quickly find the footage you require For Footage Backup proceed to Section 5 4 1 1 Playback Footage by Date 4 1 2 Playback Footage by Smart Search NOTE Smart search requires motion detection to be recorded to function You can only Smart Search playback footage one camera at a time If Sm...

Страница 18: ...compatible with most video players on Windows or Mac PCs Each file type is covered in Section 5 2 There are two different ways to backup footage to USB via the Playback menu through searching playback footage and by performing a direct backup via the Backup menu Both are accessed via the Main Menu File selection DAV MP4 is only available in the Backup menu Backup in Playback Menu outputs DAV files...

Страница 19: ...dows Media Player VLC Media Player Fig 5 3 Footage playback using the included Smart Player Lite for Windows 1 To view DAV footage in Smart Player Lite either click the Add Files button and select the file from your USB or drag drop the file onto a selected play window 2 Using the DAV file Smart Player Lite adds functionality similar to your NVR in footage playback such as synchronous playback of ...

Страница 20: ...a Player This free open source player is available across many platforms including Desktop Windows Mac OS and Linux Mobile Android and iOS 1 Access your USB device and open your backup MP4 footage video using one of the media players mentioned above 2 MP4 files cannot be viewed using Smart Player Lite They do not retain time date data like DAV files SmartPSS Windows Smart Player MacOS If you want ...

Страница 21: ... also be applied to Intrusion distinguishing vehicles and cars Abandoned A virtual area is drawn over the image If an object gets left in the area and event will be triggered Fast Moving A virtual area is drawn over the image If a fast moving object is detected an event will be triggered Best suited for outdoor environments such as driveways Crowd Gathering Estimation A virtual area is drawn over ...

Страница 22: ... electric gate or at a shopping center with a boom gate The camera needs to get a clear image of the number plate with the vehicle at a standstill At night light emitted from the infrared illumination LEDs on the camera must reflect from the number plate and return into the camera lens If the angle is too sharp the light will bounce away from the lens and the number plate will not be readable At t...

Страница 23: ...red 6 1 4 Mounting for Tripwire Intrusion Missing Abandoned Fast Moving and Loitering When installing a camera for use with any of the above functions the camera will need to positioned looking over the area When the trigger area is drawn it should not be around the edges of the image as this will cause inconsistent triggers Parameter Recommend Value Height H 3m People Counting Distance from Floor...

Страница 24: ...it to faces in the database and show comparison results with accuracy Fig 6 7 Live playback with Face Detection info on right panel Fig 6 6 AI Mode in Live View Menu Enabling AI Mode in Live View 1 While on the Live View screen right click to open the menu 2 Hover over Preview Mode 3 By default the General Preview Mode is enabled Select AI Mode 4 If AI IVS have been configured correctly live face ...

Страница 25: ...on Detection Screen 6 3 2 Smart Motion Detection Note Smart Motion Detection is only applicable to AI cameras with Perimeter Protection Smart Motion Detection allows the NVR to identify and differentiate vehicles and people from other moving objects To enable it follow the same steps for Motion Detection outlined above then do the following 1 Return to the Main Menu and select AI 2 Select Paramete...

Страница 26: ... are taken once the IVS event is triggered Refer to 7 4 AI Trigger Actions 10 Click the Enable box to turn on the IVS rule 11 Click Apply to save changes If done correctly you will see the Tripwire in live view 6 4 Tripwire IVS Setup 6 4 1 Tripwire Setup 1 From the Main Menu select AI Parameters Smart Plan 2 Select a channel with IVS functionality Click the icon then Apply to enable the IVS 3 Sele...

Страница 27: ...nel you want to set up face detection for 2 Select the Enable button 3 Select Rule to adjust the minimum and maximum face detection size The minimum and maximum value will depend on how far away the camera is from the faces that are getting captured In most cases this setting does not require adjustment 4 Select Apply 5 Refer to 7 4 AI Trigger Actions for further trigger settings Fig 7 1 Face Dete...

Страница 28: ...rom the Main Menu select AI Database Face Library 2 Select Add Give the Face Library a name and then select OK 7 2 Face Detection Recognition cont 3 Select Parameters Face Recognition 4 Select the channel you wish to setup Face Recognition on Select Enable 5 Select Target Face Database Setting and select the Face Library you created Select OK 6 Select Common Mode or Stranger Alarm Common Mode will...

Страница 29: ...then select Delete 7 3 2 Method 2 Manual Photo Upload via USB Flash Drive This method is useful if multiple faces are being added to the face database You can also choose to import the faces and data by naming the images files explained below Name SGender BBirthday NCountry TIDType MIDNo AAddress jpg Gender 1 Male 2 Female Identity 1 Identity Card 2 Passport 3 Military Office Passport Example John...

Страница 30: ...e network Unused for this system 5 Send Email Notifies a specified email address whenever the event is triggered Requires internet connection setup 6 Record Channel Sets which camera to record to when the event is triggered 7 Post Record Sets the amount of time recorded after the event is triggered 8 PTZ Activation Set PTZ behaviors in response to a event trigger such as selecting a Tour to perfor...

Страница 31: ...detection recording and that the period is filled in yellow Check motion sensitivity and adjust motion detection area see Main Menu Alarm Video Detect Motion Detect Region Settings Section 3 1 7 Cannot connect to NVR on smartphone or tablet Ensure that the NVR device are connected to the Internet and that the connection is strong enough to receive video min 3G speeds Check that P2P is Online in Ne...

Страница 32: ... designs and software may be subject to change without prior written notice Information layout and graphics presented in this guide are the property of their respective owners See www c5k info for more information ...

Отзывы: