background image

SOLAR LIGHT

EN

STRUCTURE AND SIZE

NOTES

1. This production is a solar energy product. When installing, the solar panels of the 

product must

be illuminated in the direction of the sun. If not placed in the direction of the sun the 

lamp will not function properly. Resulting in the lamp to no switch ON or the light is 

functions for a short period of time only. Solar panel should be placed in the direction of 

the sunlight. The performance of the light is the best if the illumination time of the 

sunlight is longer than 6 hours  resulting in the light to be turned on for its maximum 

time.

2. This product is mainly installed on the wall and is not allowed to be used in damp or 

immersed

places. Otherwise, it will have a breakdown and affect its service life.

3. The product can achieve the expected brightness and light-up time when the battery 

is full of

electricity. Such as overcast and rainy days, which will cause insufficient charging and 

shorten the

light-uptime. If the lighting time is not long on sunny days, please check whether the 

solar panels

are exposed to the sun for a long time. Or whether the solar panel is dirty and dusty, 

ensure to keep the solar panels clean.

4. LED Solar light is designed with a replaceable battery. It should be replaced after 3 

years of use.

After removing the wire connection from the original lithium battery, the battery will be 

removed and replaced with the new battery of the same specifications.

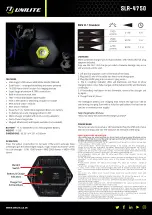
1. Solar Panel

14. Column

11. Fixing Side Base

15. Fixing Frame

13. Screw

12. Fixing 

Bracket

2. Fixing frame

9. Fixing base

4. Litihium battery

6. Control panel 

7. Switch button

8. LED

10. PC Cover

5. LED and battery

fixing box

3. Waterproof silicone

rubber ring 

Содержание VT-77

Страница 1: ...the QR code to access the manual in multiple languages INTRODUCTION WARRANTY Thank you for selecting and buying V TAC product V TAC will serve you the best Please read these instructions carefully bef...

Страница 2: ...ch Function Press and hold the button for 2 3 seconds to switch ON the solar light Once switched ON it will indicate a blue light When switching on the solar light by default it will be in Mode 1 To e...

Страница 3: ...service life 3 The product can achieve the expected brightness and light up time when the battery is full of electricity Such as overcast and rainy days which will cause insufficient charging and sho...

Страница 4: ...ant une troisi me fois sur le bouton la lampe solaire s teint et la lumi re bleue dispara t MODES DE FONCTIONNEMENT MODE 1 Mode capteur Au cr puscule la lampe passe automatiquement une luminosit de 10...

Страница 5: ...zu gelangen dr cken Sie die Taste erneut Wenn Sie die Taste zum dritten Mal dr cken wird das Solarlicht ausgeschaltet und das blaue Licht verschwindet BETRIEBSARTEN MODUS 1 Sensormodus In der Abendd...

Страница 6: ...BG V TAC V TAC 3 10 12 24 1 2 2 3 mm 3 1 4 2 3 1 2 1 10 5 100 30 10 2 100 4 1 6 2 3 4 LED 3...

Страница 7: ...rada 2 ponovo pritisnite gumb Nakon to tri puta pritisnete gumba solarna svjetiljka se isklju uje i plavo svjetlo se gasi NA INI RADA 1 NA IN RADA Senzorski na in rada U sumraku svjetiljka se automat...

Страница 8: ...mpada solar ligada ela entra no Modo 1 por padr o Para entrar no Modo 2 prima o bot o novamente Ao premir o bot o por terceira vez a l mpada solar apaga e a luz azul apaga MODO DE OPERA O MODO 1 Modo...

Страница 9: ...solar ella entra en el Modo 1 por defecto Para entrar en el Modo 2 presione nuevamente el bot n Al presionar el bot n por tercera vez se apaga la l mpara solar se apaga y tambi n la luz azul MODOS DE...

Страница 10: ...zemm dba l p shez nyomja meg ism t a gombot Ha a gombot harmadik alkalommal megnyomja a napl mpa kialszik s a k k f ny elt nik MUNKA ZEMM DOK 1 ZEMM D rz kel m d Alkonyatkor automatikusan 10 os f nyer...

Страница 11: ...ntra in Modalit 1 Per accedere alla Modalit 2 premere nuovamente il pulsante Premendo il pulsante per la terza volta la lampada solare viene disattivata e la luce blu scompare MODALIT OPERATIVE MODALI...

Страница 12: ...EL V TAC V TAC 3 10 12 24 1 2 2 3 mm 3 1 4 2 3 1 2 1 10 5 100 30 10 2 100 4 1 6 2 3 4 LED 3...

Страница 13: ...bu 2 naci nij przycisk ponownie Po trzecim naci ni ciu przycisku lampa solarna wy cz si a niebieskie wiat o ga nie TRYBY PRACY TRYB 1 Tryb czujnikowy O zmierzchu lampa w cza si automatycznie przy pozi...

Страница 14: ...in sub n elegere aceasta intr n Regimul 1 Ca s intra i n Regimul 2 ap sa i din nou acela i buton Dac ap sa i butonul a treia oar lampa se va deconecta i lumina albastr se va stinge REGIMURILE DE LUCRU...

Страница 15: ...ampa zapnut p ejde ve v choz m nastaven do re imu 1 Pro vstup do re imu 2 stiskn te znovu tla tko P i t et m stisknut tla tka se sol rn lampa vypne a modr sv tlo zhasne PROVOZN RE IMY RE IM 1 Dotykov...

Отзывы: