UVP biodoc-it 2 Скачать руководство пользователя страница 6

BioDoc-It

2

 Imaging System 


81-0358-01 Rev E


Fluorescent Focus Target 


UV/White Converter Plate  


Transilluminator 

The BioDoc-It

2

 Imaging System includes an integrated UVP Benchtop transilluminator. UVP offers a variety 

of transilluminator configurations, including models with multiple wavelengths and variable intensities.  
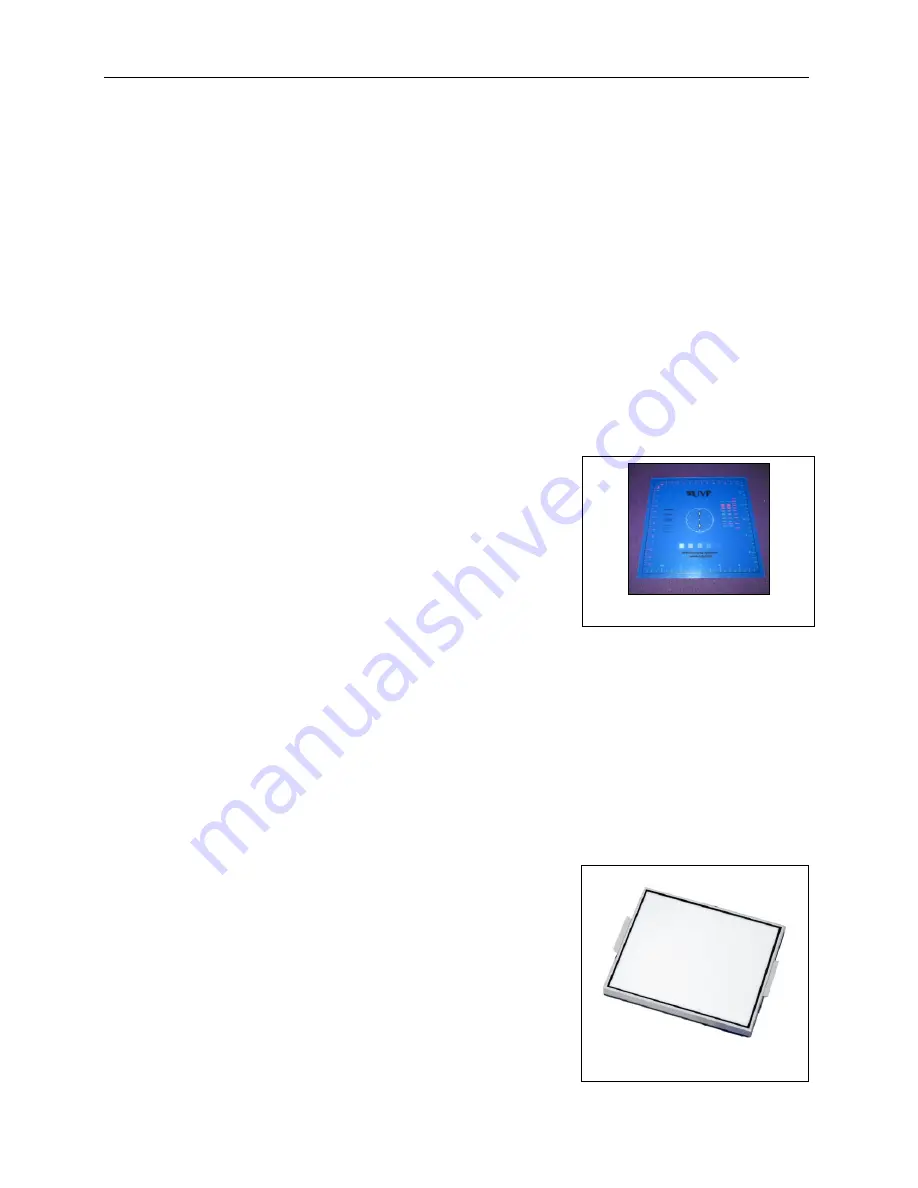
 

LCD Touch Screen 

The BioDoc-It

2

 Imaging System contains a fully integrated 10.1-inch color touchscreen computer. The touch 

screen allows the user to perform a variety of tasks, including previewing, capturing, saving and printing 
images, as well as selecting preference options, without the use of an external mouse or keyboard.  
 
For users who prefer not to use the touch screen interface, an external keyboard and mouse can be used 
via any available system USB ports. 


VisionWorks 

touch

 Software  

Image acquisition functions for the BioDoc-It

2

 are controlled using the VisionWorks 

touch

 software interface. 

Software features include image preview, capture and save functions. 
 
For more information, see the 

Touch Screen Interface 

section in this manual. 


Fluorescent Focus Target 

The UVP Fluorescent Focus Target fluoresces when placed on a 
UV transilluminator or when exposed to overhead UV. The Target 
provides sharp fluorescent images to aid in adjusting the lens and 
camera settings for ideal imaging results. 


USB Flash Drive 

The removable USB flash drive, included with the system, has 8GB memory (minimum) and connects to the 
system to allow for saving and transferring of images. 


Optional Equipment 

UVP offers a variety of optional equipment to support the needs of varying laboratory environments. Refer to 

Replacement Parts and Accessories

 at the end of this manual for optional equipment part numbers. 

 
Thermal Printer 

The thermal printer provides archive quality, 256 grayscale prints and five optional cost-effective print 
sizes. 
 

Converter Plates 

The 

UV/White Converter Plate

 allows imaging of non-

fluorescent stained media with an ultraviolet transilluminator. 
The converter plate is specially coated to convert 302nm UV 
to white light.  
 
The 

Visi-Blue

™ Converter Plate

 (not shown) converts UV 

to a safe 460-470nm wavelength designed for use with blue 
excitation samples and SYBR Green, SYPRO Orange and 
GFP stains.   


Содержание biodoc-it 2

Страница 1: ...nd User Instructions UVP LLC Ultra Violet Products Ltd 2066 W 11th Street Unit 1 Trinity Hall Farm Estate Upland CA 91786 Nuffield Road Cambridge CB4 1TG UK Phone 800 452 6788 Phone 44 0 1223 420022 F...

Страница 2: ...the UVP factory 7 Note The zoom lens shipped may appear different than pictured 7 Using the System 8 Powering Up the Tablet 9 Operating the VisionWorks touch Interface 9 Using the Transilluminator 9...

Страница 3: ...C or Mac programs The BioDoc It2 Imaging System is a cost effective solution for capturing quality images in a compact standalone package as no external computer is required The BioDoc It2 comes stand...

Страница 4: ...specific parts and components included with the system 10 Integrated Touch Screen White Light and UV Power Buttons Wide Access Door USB Port Not Shown Two Position Filter Tray Including EtBr Filter T...

Страница 5: ...315 uses a USB 2 0 connection All camera settings are factory pre set for optimum performance when viewing gels and films under low light level conditions Contact UVP Technical Support before making a...

Страница 6: ...e the Touch Screen Interface section in this manual Fluorescent Focus Target The UVP Fluorescent Focus Target fluoresces when placed on a UV transilluminator or when exposed to overhead UV The Target...

Страница 7: ...o a surge protected power outlet 2 Connect the jumper cable from the darkroom to the rear of the transilluminator Installing Emission Filters To install the 50mm2 ethidium bromide EtBr filter and any...

Страница 8: ...f the lens and the rubber gasket beneath the darkroom bracket 4 Plug the camera cable into the top of the camera and the other end into a USB port on back of the darkroom Camera and lens assembly Came...

Страница 9: ...interface press either the close X or minimize _ buttons at the top right corner of the software window Refer to Touch Screen Interface in this manual for further instructions on using the software U...

Страница 10: ...ive film from the Fluorescent Focus Target see the Fluorescent Focus Target section of this manual for more information 2 Turn on the transilluminator and place the Target on the transilluminator surf...

Страница 11: ...n in the upper right corner of the main TS screen and selecting from the following tabs General Settings Post Processing Saving The following pop up screen will appear General Settings Tab Language Us...

Страница 12: ...e TIFF file format is selected and Save Selected Original Formats is also selected both compressed and uncompressed TIFF files will be saved Save Images To Select the location where images are to be s...

Страница 13: ...interface language and image save format See the Setting User Preferences section of this manual for further information Templates Press the Templates button to access the list of templates Press aga...

Страница 14: ...s to select modes for image capture Use the vertical slider bars and or the and buttons to make adjustments to the desired portion of the exposure time sec ms or microseconds To adjust capture modes s...

Страница 15: ...exposed image decrease the aperture or exposure time until the yellow or red overlay disappears To activate saturation warning press the Saturation Warning slider until the check mark appears Action P...

Страница 16: ...e Minimize button to close full screen mode Close Press the Close button to the right of the image to close the active image If the image is unsaved the user will be prompted to save the image before...

Страница 17: ...l the check mark appears This will add mmm dd yyyy hh mm ss to the bottom right corner of the image NOTE The time stamp is not saved to the image unless Save Burned is selected as described earlier in...

Страница 18: ...ving 3 To access saved templates press the Templates button as shown 4 To select the quick access templates to be shown at the top of the TS screen press the Templates button until the list of saved t...

Страница 19: ...for network configuration To minimize the VisionWorks touch interface and access Microsoft Windows for network configuration press the Minimize _ button in the upper right corner of the software Inst...

Страница 20: ...de 50mm Square 38 0220 01 Filter SYBR Green 50mm Square 38 0219 01 Filter SYBR Gold 50mm Square 38 0221 01 Transillumination Accessories White Light Converter Plate 21x26cm 38 0191 01 White Light Conv...

Страница 21: ...the Screen 1 An error message that is related to the VisionWorks touch interface or Microsoft Windows may appear on the screen If the message is related to Microsoft Windows such as a reminder to acti...

Страница 22: ...ffices at the locations below or visit www uvp com If you are in North America South America East Asia or Australia If you are in Europe Africa the Middle East of Western Asia Call 800 452 6788 or 909...

Отзывы: