13
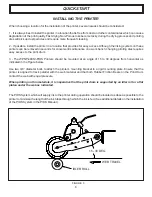
1-To install Printing Dies on the Print Drum, first mix a solution
of water with a small amount of liquid dishwashing detergent
to serve as a lubricant. This will make the installation of the
die much easier. Using a sponge saturated with this mixture,
moisten the ribs on the back of the Die.
2-Align the ribs on the back of the printing die with the grooves
in the Drum Cover. Starting with one end, firmly press the
die into the drum cover until fully engaged. Continue
pressing the ribs together, working from one end of the die
towards the other.
Do not use any other lubricants such as silicone or oil
on the Printing Dies.
INSTALLING THE PRINTING DIES
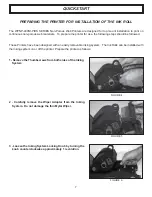
3- While rotating the Print Drum by hand or under power, slowly
rotate both the Ink Roller Eccentric Knobs from the “MIN”
towards the “MAX” position and observe the face of the
printing dies for ink. Proper adjustment should be reached
at a position between the “2” and “3” reference numbers.
The Ink Roller Eccentric Knobs move the Ink Roll into contact with
the Anilox Roll. The Eccentrics should not be turned any more
than necessary to apply a uniform coating of ink to the die face.
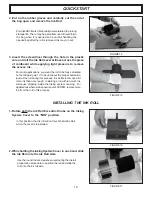
The Position Adjusting Knobs serve two functions. First, they provide adjustment for the contact pressure between
the Anilox Roll and the face of the Printing Dies. The Anilox Roll should contact the face of the printing dies with just
enough contact pressure to properly transfer ink. Secondly, the Adjusting Knobs allow for a small degree of
angular alignment between the Anilox Roll and the face of the dies. The surface of the Anilox Roll must be adjusted
exactly parallel with the face of the Printing Dies in order to ensure uniform transfer of ink across the full width of
the Print Drum. If adjustment is required, loosen the Inking System Locking Knob and make small adjustments to
the Position Adjusting Knobs. Retighten the Inking System Locking Knob and check the print quality. After the
correct adjustment has been made, the Position Adjusting Knobs should require no further adjustment.
INKING SYSTEM POSITION ADJUSTING KNOBS
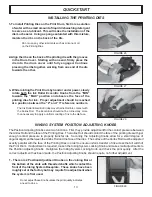
1 - There are 2 Position Adjustment Knobs on the Joining Bar at
the bottom of the slots with threaded shafts which contact the
front of the Inking System Baseplate. These knobs have been
roughly set at the factory but may require fine adjustment when
the system is first used.
Do not adjust these Knobs unless the print quality indicates
a need to do so.
QUICK START
FIGURE 26
FIGURE 27
FIGURE 29
FIGURE 28
Содержание WPNP-400NI-PIDS
Страница 26: ...26 ...


