Note:
when replacing the rail consider that if the rail
is damaged it is possible that the carriage is also
damaged. We recommend that you change rail and
carriage together as this is the only way to ensure
smooth operation.
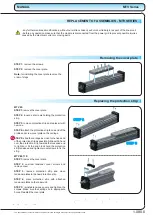
STEP 1:
remove the cover plate and protection
strip. Unscrew screws in the rear end block and
loosen set screw in the frontal end block. Slide the
carriage with the spindle and ball nut from the
module.
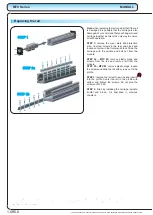
STEP 2a - MTV 65:
remove plastic plugs and
screws from the rail and remove rail from the
module.
STEP 2b - MTV 80:
remove plastic plugs, loosen
the screws and slide the rail with screws out of the
profile.
STEP 3:
replace the rail with new one and insert it
into the profile. Center the rail in the profile with
caliper and tighten the screws. Do not glue the
screws on MTV 80.
STEP 4:
finish by installing the carriage, spindle,
frontal end block... As described in previous
chapters.
Replacing the rail
1.095.0
MTV Series
MANUAL
Note:
all the screws (except set screws) must be glued (Loctite 243) and screwed
with the torque specified in the table on page 1.005.0 unless written otherwise at
the individual steps.
STEP 1
STEP 2a
STEP 2b
The specifications in order to improve the products in this catalogue are subject to change without notice.


