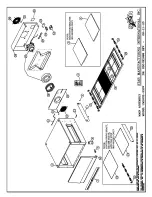
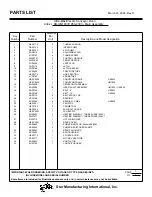
Ultra Max 8B-UM1833 Скачать руководство пользователя страница 19

PARTS LIST 


March 23, 2006, Rev D   


 IMPORTANT: WHEN ORDERING, SPECIFY VOLTAGE OR TYPE GAS DESIRED 


            PAGE


          INCLUDE MODEL AND SERIAL NUMBER 


OF


Some items are included for illustrative purposes only and in certain instances may not be available.


Number 

Per

Unit

Description and Model Designation


Star Manufacturing International, Inc.

MODEL

Part

Number

  Key

  Number


Ultra-Max Electric Conveyor Oven 

     8B-UM1833/1850-230V 

Main 

Assembly

 1 

G9-Z5716 

TUNNEL 

SHROUD

 2 

G9-Z5745 

INFEED 

SHELF

 3 

G9-Z5362 

EXIT 

SHELF

 4 

2A-Z0314 

ADJUSTABLE 

LEG

 5 

2C-Z5182 

THUMB 

SCREW

 6 

2M-Z5747 

CONTROL 

GRAPHIC

 7 

2M-Z5665 

FRONT 

GRAPHIC

 8 

2P-Z4996 

VENT 

PLUG

 9 

2R-Z5174 

LATCH

 10 

2R-Z5188 

LATCH 

KEEPER

 11 

2V-Z6696 

PRESSURE 

TUBE

 12 

G9-Z5574 

HOSE 

SECTION

 13 

2V-Z5789 

PROBE 

TUBE

 14 

G9-EC0025 

CONVEYOR 

FRAME 

UM1833


G9-EC0043 

CONVEYOR 

FRAME 

UM1850

 15 

2A-Z6538 

DRIVESHAFT 

ASSEMBLY


17 

2A-Z5586 

1/2 

IDLER SHAFT ASSEMBLY 

UM1833 / UM1850

 18 

2B-Z5709 

BELT 

6' 

UM1833


2B-Z5169 

BELT 

10' 

UM1850

 19 

2B-Z5170 

BELT 

SPLICE 

CLIP

 20 

2P-Z5168 

BEARING

 21 

2P-Z6368 

BEARING 

DRIVE 

UM1850

 22 

G9-Z5281 

PAN 

STOP

 23 

G9-Z6193 

CRUMB 

TRAY


24 

G9-Z5682 

FAN INLET GUARD

 25 

G9-EC0030 

FAN 

BAFFLE


26 

2N-Z6603 

HEATING ELEMENT - THREE PHASE (220V)


2N-Z7477 

HEATING ELEMENT - THREE PHASE (240V)

 27 

2U-Z5710 

HOT 

AIR 

BLOWER

 28 

G9-EC0063 

REAR 

COVER

 29 

2E-Z6630 

POWER 

RESISTOR, 

50ohm 

208/230V


2E-Z5663 

POWER 

RESISTOR 

BRACKETS

 30 

2B-Z5607 

REAR 

FAN 

GUARD

 31 

2K-Z2895 

SPLIT 

BUSHING

 32 

G9-Z5772 

ACCESS 

DOOR

 33 

2E-Z5711 

MOTOR 

CAPACITOR

 34 

2E-Z6650 

CONTACTOR

 35 

2C-Z5195 

CONDUIT 

HANGER


1


1


Содержание 8B-UM1833

Страница 1: ...ELECTRIC CONVEYOR OVEN 230V MODELS 8B UM1833 8B UM1850 8B UM1850 Installation and Operation Instructions 2M Z6701 Rev D 3 23 06...

Страница 2: ...ges in designs methods procedures policies and regulations the speci cations contained in this sheet are subject to change without notice While Star Manufacturing exercises good faith efforts to provi...

Страница 3: ...Oven with Shelves Depth 30 4 77 2 cm Height 20 0 50 8 cm Single Oven with Legs 36 0 91 4 cm Double Oven with Legs 8B UM1850 230V Rating Connection 6 600 Watts 3 x 2 000W element assembly Terminal blo...

Страница 4: ...al from the unit prior to heating CAUTION FORYOURSAFETYDONOTSTOREORUSEGASOLINEOROTHERFLAMMABLE VAPORS AND LIQUIDS IN THE VICINITY OF THIS OR ANY OTHER APPLIANCE IMPORTANT THISAPPLIANCEMUSTBEINSTALLEDB...

Страница 5: ...Star Service Representative CAUTION IMPROPER INSTALLATION ADJUSTMENT ALTERATION SERVICE OR MAINTENANCE CAN CAUSE PROPERTY DAMAGE INJURY OR DEATH READ ALL INSTRUCTIONS THOROUGHLY BEFORE INSTALLING OR...

Страница 6: ...erature at the back of the oven This condition must be corrected to avoid permanent damage to the oven This appliance must be installed on a sturdy counter or stand using the feet provided for cleanin...

Страница 7: ...rough the cooking tunnel Air must NOT be directed onto the oven s front or rear or to the sides of the cooking area This can cause incomplete or uneven baking and increased energy consumption ELECTRIC...

Страница 8: ...properly installed and in working order The warranty becomes effective upon veri cation of proper installation CAUTION DO NOT WORK AROUND THE CONVEYOR BELT WITHLONGHAIR LOOSECLOTHING ORDANGLING JEWEL...

Страница 9: ...ON To Start 2 Appuyez sur le bouton de entr e pour commuter entre le TEMPS et la TEMP RATURE 1 Tenez vers le haut et vers le bas boutonne en m me temps Tenez les boutons pendant quatre secondes jusqu...

Страница 10: ...r an additional 4 seconds The TEMP display shows LOC as the TIME display shows nO which indicates that the TIME TEMP parameters can be changed after reaching the STORE level yES indicates thattheparam...

Страница 11: ...r it will result in a very light color but over baked product 4 Once a good bake has been established the ne adjustments should be made by holding either the bake time or bake temperature constant the...

Страница 12: ...ll ruin the aluminized nish of the oven interior 3 When using cleaning solutions be sure they meet local and national health standards Follow this recommended cleaning schedule for proper oven perform...

Страница 13: ...sembly can be removed complete or the small handle left can be used to slide nozzle and columnating plate out before removing the main body 7 Thelower ngerassemblycan be removed complete or the nozzle...

Страница 14: ...hes after continuous use Following are the necessary steps for removing links 1 Move the splice clips to either end of the oven for easy access 2 Unhook the splice clips using long nose pliers 3 Unhoo...

Страница 15: ...cleaners This warranty does not apply to the non stick properties of such materials This warranty is not valid on Conveyor Ovens unless a start up check out has been performed by a Factory Authorized...

Страница 16: ...7 6 DS 2 S1 8 30 15 2 5 1 4 8 15 32 46 3 33 25 L3 L2 14 39 38 34 23 PLUG ON BACK OF MOTOR IS SHOWN ROTATED 180 CONTACTOR 2 0 8 V 230V FUSE BLOCK 2 5A 18 1 3x2000W COILS J1 J1 14 38 39 40 16 L1 40 16...

Страница 17: ...2 EXTRA J1 JUMPERS FOR SINGLE PHASE USE TIE L1 L2 L3 TOGETHER WRAP THESE WITH OTHER LOOSE SHIP PARTS 4 C 3 MOTOR COM ENABLE DIR SPEED COM TACH 5 TO ALL MOTOR SPEED GRD SPEED SIGNAL SPEED 5V REF NOT U...

Страница 18: ......

Страница 19: ...2V Z6696 1 PRESSURE TUBE 12 G9 Z5574 1 HOSE SECTION 13 2V Z5789 1 PROBE TUBE 14 G9 EC0025 1 CONVEYOR FRAME UM1833 G9 EC0043 1 CONVEYOR FRAME UM1850 15 2A Z6538 1 DRIVESHAFT ASSEMBLY 17 2A Z5586 1 2 ID...

Страница 20: ......

Страница 21: ...2T Z5175 1 THERMOSTAT 120F 6 2T Z5176 1 THERMOSTAT 140F 7 2T Z5177 1 HIGH TEMPERATURE LIMIT THERMOSTAT 8 2E Z1858 1 SWITCH LIGHTED 9 2J Z5189 1 THERMOCOUPLE ASSEMBLY 10 G9 Z6610 1 POWER SUPPLY 24VDC 1...

Страница 22: ......

Страница 23: ...not be available Number Per Unit Description Star Manufacturing International Inc MODEL Part Number Key Number 1 G9 GC0037 1 LOWER FINGER BAFFLE 2 G9 EC0048 1 LOWER FINGER WELDMENT 3 G9 Z6407 1 LOWER...

Страница 24: ...1 D placezles pissureattaches n importequelle extr mit du four pour l acc s facile 2 D crochez les pissure attaches en utilisant de longues nez pinces 3 D crochez le plein lien enlever et glissez le d...

Страница 25: ...eur peut tre complet enlev ou la petite poign e gauche peut tre utilis e pour glisser le bec et le plat columnating dehors avant d enlever le corps principal 7 Le doigt inf rieur peut tre enlev comple...

Страница 26: ...En utilisant des solutions de nettoyage soyez s r qu elles r pondent des normes locales et nationales de sant Suivez ces recommandations pour nettoyer et maintenir de four CHAQUE JOUR 1 Nettoyez la ba...

Страница 27: ...un produit br l 4 Une fois un bon cuisinier a t tabli les ajustements nsdevrait trefaitenjugeantletemps de cuisinier ou la constante de la temp rature de cuisinier changeant alors l autre VITESSE DE C...

Страница 28: ...la TEMP RATURE montre LOC pendant que l affichage de TEMPS montre nO ce qui indique que les param tresdeTEMPS TEMPERATUREpeuvent tre chang s apr satteinte du Stockez de Niveau yES indique que les par...

Страница 29: ...de puissance MARCHE 2 Apr s que le ventilateur commence tablir la pression lemano contactfourniralapuissanceau tableau de commande d engager le conjoncteur l ment de chauffe Vous devriez entendre un c...

Страница 30: ...serviced toilea nd assurer le four est correctement install et dans l ordre d entretien La garantie devient ef cace lors de la v ri cation de l installation appropri e ATTENTION NETRAVAILLEZPASAUTOURD...

Страница 31: ...li Une fois install cet appareil doit tre lectriquement fondu et son installation doit tre conforme au Code de Electric de National au ANSI NFPA 70 la derni re version aux instructions d installation...

Страница 32: ...STALLATION CONTENUES CI dessus SONT POUR L USAGE DU PERSONNEL QUALIFI D INSTALLATION ET DE SERVICE SEULEMENT L INSTALLATION OU LE SERVICE PR S AUTRE QUE LE PERSONNEL QUALIFI PEUT AVOIR COMME CONS QUEN...

Страница 33: ...AYS DE DESTINATION INSTALLATION Les fours sont quip s pour la tension de puissance indiqu e sur la plaque signal tique mont e sur l arri re de la bo te de commande Ils fonctionneront sur le courant al...

Страница 34: ...tag res Profondeur 30 4 77 2 cm Hauteur 20 0 50 8 cm Un four avec des jambes 36 0 91 4 cm Deux fours avec des jambes 8B UM1850 230V Evaluer Raccordement 6 600W 3 x 2 000W l ment assembl e Le TB a fou...

Страница 35: ...communication pr alable De telles r visions ne ont pas droit l acheteur aux changements aux am liorations aux additions ou aux remplacements correspondants pour l quipement pr c demment achet ENTRETI...

Страница 36: ...FOUR de CONVOYEUR LECTRIQUE 230V MOD LES 8B UM1833 8B UM1850 8B UM1850 Instructions d installation et d op ration 2M Z6701 Rev D 3 23 06...

Отзывы: