background image

ULEAD DVD MOVIEFACTORY USER GUIDE  13

DVD Movi

eF

ac

to

ry

SVCD 

Abbreviation for Super Video CD, commonly described as an enhanced 

version of a VCD. It is based on MPEG-2 technology with either Variable Bit 
Rate (VBR) or Constant Bit Rate (CBR).

Opening an existing project

To open an existing project from the 

Launcher

, select 

Open Existing Project

 and 

browse for the project file. 

You can also open an existing project within the host program. In the 

Start 

window, click 

Start Project

 and select 

Existing project

.

Adding media

Whether your are using the 

Launcher

 or the host program, creating a new project 

or opening an existing one, takes you to 

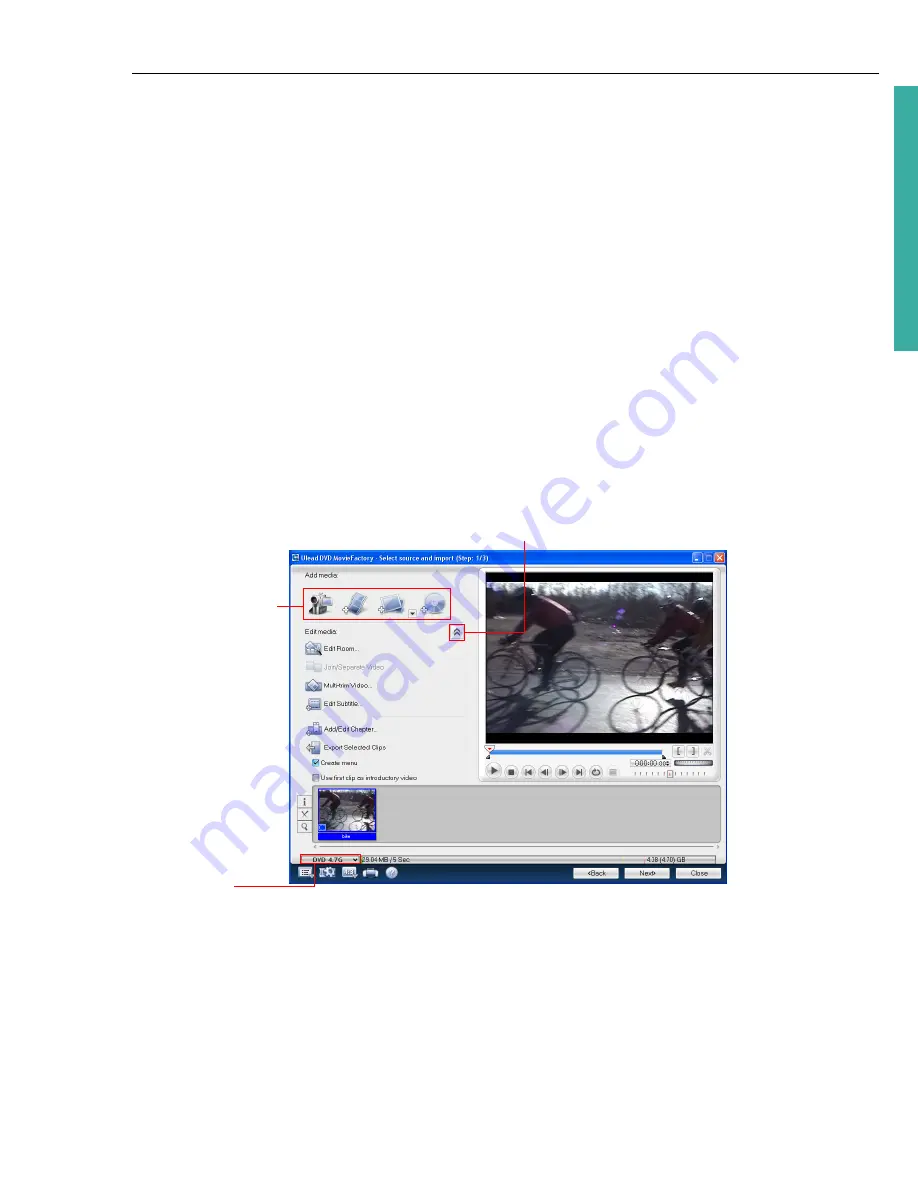
Select source and import (Step: 1/3)

Here, you can select options under 

Add Media

 to add content to your movie.

You can add content to your movie by capturing videos, adding video files, creating 
and adding slideshows, and importing DVD videos.

Options for 
adding media

Current 
project type

Toggle between showing and hiding advanced options

Содержание MOVIEFACTORY 6 PLUS

Страница 1: ...DVD MovieFactory User Guide InterVideo Digital Technology Corporation January 2007 ...

Страница 2: ...Acrobat the Acrobat logo are Trademarks of Adobe Systems Incorporated Macromedia Flash and Macromedia Flash are trademarks or registered trademarks of Macromedia Inc in the United States and internationally Avery is a trademark of Avery Dennison Corporation Manufactured under license from Dolby Laboratories Dolby and Double D symbol are trademarks of Dolby Laboratories Blu ray Disc and Blu ray Dis...

Страница 3: ...isc Tools 9 Preferences 9 Disc information 10 Drive information 10 Label Once 10 The DVD MovieFactory host program 11 Start Project 11 Edit Disc 11 Straight Capture to Disc 11 Video Slideshow Disc 12 Starting a new project 12 Output disc types 12 Opening an existing project 13 Adding media 13 Capture video 14 Add video files 18 Add photo slideshow 19 Import DVD video or DVD VR files from a disc or...

Страница 4: ...ting objects 37 Editing menu thumbnail and text style 38 Preview 38 Burning your disc 39 The Burning Options dialog box 41 Straight Capture to Disc 43 Settings and tools 44 16 9 DVD 45 Audio Disc 46 Data Disc 46 Import Capture 46 Edit Append Disc 47 Copy Disc 47 Disc Tools 48 Format Disc 48 Erase Disc 48 Close Disc 48 Tools 49 Settings and options 49 Open 49 Save 49 Save As 49 Preferences 49 Disc ...

Страница 5: ...ng a disc label 58 Saving a disc label 58 Printing a disc label 58 Appendix Important information 59 Installing a capture card 59 Connecting a video camera to the computer 59 DV or Digital 8 camcorder 59 Connecting the camcorder to the IEEE 1394 interface 59 Checking the hardware setup 59 HDV camcorder 60 Analog video sources 60 Connecting the video device to the analog capture card 60 Connecting ...

Страница 6: ...6 ULEAD DVD MOVIEFACTORY USER GUIDE ...

Страница 7: ...S3 or home Blu ray player You can burn your BDMV discs using a Blu ray disc burner and output compliant BDMV folders in your hard drive Authoring AVCHD video You can author AVCHD video and burn them onto a DVD disc using a standard DVD burner You can burn AVCHD video onto the following DVD disc media DVD R DVD RW DVD R and DVD RW You can use both 8cm or 12cm DVD discs You can play your AVCHD video...

Страница 8: ...her 1 Select a task by clicking the Video Slideshow Disc Audio Data Disc Import Capture Edit Append Disc Copy Disc or Disc Tools icon 2 Select an associated task option at the right hand side Notes You can also click any tool icon located at the lower part to set project preferences view disc and burner information or create disc labels Opening previously created project files from outside the DVD...

Страница 9: ...e Data Disc for more details Import Capture Click to capture content from your camcorder and other devices or import content from a DVD See Import Capture for more details Edit Append Disc Click to append data or edit video MP3 files on a disc See Edit Append Disc for more details Copy Disc Click to create a copy of a disc or convert DVD and video formats for use on your projects See Copy Disc for...

Страница 10: ...s of the disc in your CD DVD HD DVD or Blu ray disc burner Drive information Click to view the properties of your CD DVD HD DVD or Blu ray disc burner Label Once Click to open Ulead Label Once and create a label for your CD DVD HD DVD or Blu ray disc See Label Once for more details ...

Страница 11: ...VD MovieFactory host program Click Start All Programs Ulead DVD MovieFactory 6 Ulead DVD MovieFactory 6 The Start window opens for you to select task options Start Project Click to create a new project or open an existing one Edit Disc Click to edit content on a rewritable disc Straight Capture to Disc Click to capture content from your camcorder and other devices ...

Страница 12: ... can store 50 GB AVCHD Advanced Video Codec High Definition AVCHD uses the MPEG 4 AVC H 264 video codec The superior compression technology allows quality video to be produced at a lesser file size The audio and video data come in an MPEG 2 Transport stream format HD DVD Standard High Density DVD Developed as a standard for high definition DVD HD DVD is similar to the Blu ray Disc which uses a 120...

Страница 13: ... open an existing project within the host program In the Start window click Start Project and select Existing project Adding media Whether your are using the Launcher or the host program creating a new project or opening an existing one takes you to Select source and import Step 1 3 Here you can select options under Add Media to add content to your movie You can add content to your movie by captur...

Страница 14: ...then Capture from Devices in the Launcher You can also click Capture video in the Select source and import Step 1 3 page Capturing DV video DVD MovieFactory allows you to capture digital video and automatically store it in your selected format To capture DV video 1 Connect your camcorder to the IEEE 1394 interface card Turn it on and set it to Play or VTR VCR mode 2 In the Select source and import...

Страница 15: ...er is detected as a DV device or AV C tape device If the camcorder is detected as a DV device you can capture DV footage If your camcorder is detected as an AV C tape device you can capture HDV footage To capture video from an HDV camcorder 1 Connect your HDV camcorder to the IEEE 1394 interface card Turn it on and set it to Play Edit mode 2 If you have a Sony HDV camcorder make sure it is switche...

Страница 16: ...ure a segment of your favorite television show on regular TV or cable then save it in your hard drive in AVI or MPEG format To capture TV footage 1 Check if your computer has an analog video capture card with a TV input jack This jack usually uses a TV coaxial cable to input TV signals from either an antenna or a dedicated cable from your CATV supplier 2 Connect your video source device to your ca...

Страница 17: ...nt to capture click Capture Image Capturing video directly to MPEG format DVD MovieFactory allows you to capture video from a DV camcorder or analog source straight to MPEG To capture video in MPEG format 1 Connect your camcorder or VCR to your capture card Switch it on and set it to Play Edit or VTR VCR mode 2 Select a DVD VCD SVCD or MPEG format in Format 3 Click Start Capture to start capturing...

Страница 18: ... MovieFactory will start to record the day after 3 Click Start Auto Capture to start the task If you need to reset the start time and duration click Stop Capture and reset the values before restarting the task Add video files DVD MovieFactory allows you to add video files of different formats such as AVI MPEG and WMV into your video project You can also add a VideoStudio project VSP You can also d...

Страница 19: ...le images 4 Click Add Photo Repeat step 3 to add more images 5 Add a slideshow title background music transition effect and other enhancements as needed 6 Click Preview to see the result 7 Click OK after you have finished There are a number of features to improve your slideshow project Click ExpressFix to fix common digital photo problems You can adjust quality Click Record a sound annotation to t...

Страница 20: ... VR files from a disc or hard drive Import video from your DVD discs or hard drive and add them to your video projects You can import all the DVD files or simply select specific titles and chapters Program imports track 1 audio in default DVD MovieFactory also allows you to import AVCHD video a format developed by Sony and Panasonic parent Matsushita This format supports various resolution frame r...

Страница 21: ... opens 5 In the left pane select the video clips to import 6 Click Import The imported video files are displayed in the Media Clip list Note Click Import DVD Folder to search your hard drive for the video files Browse for the DVD folder and click OK Notes Use the playback controls in the Preview Window to view each video clip or chapter Black video thumbnails that appear in the Media Clip list ind...

Страница 22: ...clip You can use the navigation control buttons or go to a specific timecode You can also use the Jog Wheel which works the same way as the one found in most VCRs to browse through the video more quickly Or you can use the Fast Forward Fast Rewind to view the video clip at a constant playback speed Tip When using the Jog Wheel you can browse through a video by moving the scroll wheel on the mouse ...

Страница 23: ...operties of the selected media clip Export Video Allows you to save your video into a specific format Delete Video Removes the selected clip from the Media Clip list Trimming a video You can trim a video using the Jog Slider mark in out buttons navigation controls Shuttle Slider and Jog Wheel Trimming allows you to modify the length of the video according to your needs To trim video 1 Select a vid...

Страница 24: ...ou can use the Preview Window and the Storyboard Timeline to view and fine tune your edits You can also add chapter points insert remove clips apply fade in out effects and perform other basic editing functions The Theme tab The Theme tab allows you to apply preset themes The Theme Panel lists theme templates that are applicable to the currently selected video clip Double click a theme to apply it...

Страница 25: ... the Jog Slider or use the playback controls to move between frames in the video Stop when you reach the point where the text will be added 2 Double click the Preview Window to enter the text Specify the duration font type size color and other properties 3 Repeat steps 1 to 2 to add more text You can use the playback controls to preview the result The text will not overlap each other 4 Click OK Op...

Страница 26: ...l audio files in your project is displayed in Audio Duration 3 To remove a previously added music select it on the list then click Delete Audio 4 Adjust the volume for the original audio track additional audio file and recorded voice annotations respectively Click Play to preview the result 5 Click OK Options for the Music tab Add Audio Click to locate an audio file to be used as background music ...

Страница 27: ...d Voice and test your microphone adjust the volume as needed then click Record to start Options for the Voice tab Record Voice Click Record Voice to start recording This changes into Stop Recording Voice during the recording process Click this to end recording A new clip in the Voice Track on the Timeline is created Voice Clip List Displays the list of recorded voice files Delete Voice Clip Remove...

Страница 28: ... Name Displays the names of currently applied effects Editing a slideshow To edit your slideshow select the slideshow thumbnail from the Media Clip list and click Edit Slideshow Modify the selected slideshow in the Edit Slideshow dialog box Join Separate videos Join Separate Video lets you combine two or more video clips or separate previously combined video clips To combine separate video clips 1...

Страница 29: ... or press F4 The extracted segment will be added to the Media Clip list 5 To select more segments repeat steps 3 and 4 6 Click OK Note Multi trim Video cannot be applied to video clips previously edited using Edit Room Tip To move the Jog Slider at a fixed interval use or Set the quick search interval in Duration Tips Quick search interval allows you to set a fixed interval between frames and brow...

Страница 30: ...ovieFactory automatically adds DV file information and DCS exif data as subtitles in your video You can also import SRT and TXT files You can show hide subtitles on the Preview Window by clicking Edit Subtitle lets you modify the format and duration of these subtitle texts To edit a subtitle 1 Select a video with subtitles in the Media Clip list 2 Click Edit Subtitle 3 The Edit Subtitle dialog box...

Страница 31: ...d you will be guided to the Preview step immediately without creating any menus after clicking Next To create or edit chapters linked to a video clip 1 Select a video in the Media Clip list 2 Click Add Edit Chapter The Add Edit Chapter dialog box opens 3 Click Auto Add Chapters You can also drag the Jog Slider to move to a scene to use as the first frame of a chapter and click Add Chapter Repeat t...

Страница 32: ...eo in 1440 X 1080 resolution or select HD 1920 to output in 1920 x 1080 resolution format Select Fast Export DVD Compliant Video to save a DVD VCD or SVCD video Fast Export Video lets you export a non MPEG video file to the same format without having to convert it Select Customize to save to other formats 3 Locate the folder where you want to save these files and then enter a new file name 4 Click...

Страница 33: ... instantly access specific portions of your video DVD MovieFactory offers a set of menu templates to best fit the purpose of each menu Custom made menus are also easily created See the illustration below to better understand the menu structure In this example Clip 1 has three chapters When you click the Clip 1 video thumbnail it will jump to submenu 1 If you look at Clip 2 it has no chapters assig...

Страница 34: ...at uses texts to represent chapter points Selecting a text title plays back the movie from the corresponding chapter point When creating a an HD DVD disc additional menu categories are available HD DVD Standard provides standard DVD menu features but designed for high definition pictures and sounds Pop up menus are available when creating HD DVD Advanced content To create pop up menus select Pop u...

Страница 35: ... menus When you choose a video as menu background for your VCD or SVCD project however only the first frame of the video will be set as the menu background Font Settings Opens a menu of options for font properties used in the menu template Layout Settings Opens a menu of options for applying changes to menu pages or resetting them to their previous state Advanced Settings Opens a menu of options f...

Страница 36: ...ie projects To create your own menu template 1 Click Customize in the Edit tab of the Select a template to create menu Step 2 3 page to open the Customize Menu dialog box 2 Select Frame Navigation Button or Layout in the drop down menu to display the associated preset thumbnails 3 Double click a thumbnail to apply it 4 To choose a new background music image or video click Background music or Backg...

Страница 37: ...dragging the handles You can also move and align menu objects anywhere in the Preview Window To easily align objects in your menu right click the Preview Window and select Show Grid Line You can use these grid lines as reference when dragging the menu objects to the desired position Make sure that the objects are within the TV safe area defined by a border with dotted lines You can also restore th...

Страница 38: ...y it You can also right click on these objects and select various options Layout settings You can then choose to apply the same settings to other menu pages in your project To do this click Layout Settings in the Options Panel and select Apply to All Pages of this Menu Preview Now it s time to view your video project and do a final check before you burn it onto a disc You can distort menu thumbnai...

Страница 39: ... Step 3 3 and setup the output settings for your project and burn it onto a disc Burning your disc This is the final step in the disc authoring process In Press Burn button to create a DVD Step 3 3 specify the settings for burning your videos or creating disc image files To burn your project onto a DVD 1 Specify the settings of your burning device in Disc burner Label Enter a volume name of up to ...

Страница 40: ... whole project to assure a balance audio level throughout the video Archive images of slideshows Select to include images used in your slideshows on the disc Power off the PC when completed Select to automatically turn off your computer after the burning process 3 Click Burn to start the burning process 4 After successfully burning your disc a dialog box appears from which you can select the next ...

Страница 41: ...ms that you want to include on the disc Copyright information Includes copyright text or information about the author Project file Select to include the DVD MovieFactory project file that you created on the disc for later use Personal folder Select to include any other folders on the disc Advanced settings Lets you adjust more disc burning settings Test before burning Select to simulate first it d...

Страница 42: ...ner you are using Restart DVD RW background format Select to format the DVD RW before recording Enabling this option will prolong the recording process but will ensure a successful burn This is recommended when you are using the DVD RW disc for the first time Do not close disc Select this function to create a multi session disc for CD R CD RW DVD R DVD RW DVD R Note By default this option is not s...

Страница 43: ...source is switched on and properly connected to your computer 2 Insert a disc into the disc burner where the video will be recorded and then click Video Slideshow Disc and select Straight Capture to Disc in the Launcher 3 Select a recording format The options vary depending on the selected output disc format 4 Select the Source device to capture from 5 Set the video length to record in Duration 6 ...

Страница 44: ...references save projects view the online Help and access product specific information on the Ulead Web site Project Settings Opens a dialog box where you can configure project specific settings Display Aspect Ratio Toggles between standard 4 3 and widescreen 16 9 display aspect ratios for videos and menus Label Once Launches the Label Once dialog box where you can create and print labels and cover...

Страница 45: ...the Display aspect ratio list in the Project Settings dialog box The video clips and menus are then adjusted automatically You can also switch between standard 4 3 and widescreen 16 9 by clicking Display Aspect Ratio and selecting the desired setting See Display aspect ratio for more details You can change the output format of your current project anytime by selecting the desired output format in ...

Страница 46: ...d data disc If you are using the ISO 9660 or ISO 9660 Joliet file system you can select Bootable Disc to create a disc that allows your computer to automatically boot or start up without having to access the hard disk Data Disc also allows you to create a DivX disc DivX is a popular video codec You to store data both ISO and UDF file systems Please refer to the Burn Now User Manual for details Imp...

Страница 47: ...nd then click Next 4 Click Burn Copy Disc Copy Disc lets you copy contents from one disc to another You can also burn a disc image file or the contents of a DVD folder directly to disc To copy contents directly from a disc 1 Click Copy Disc in the Launcher and select Burn DVD Folders to Disc This opens Copy Utility 2 Specify the file to copy in Source Select Browse for a Movie Folder if the source...

Страница 48: ... allows disc space to be used more efficiently when burning data onto the disc It allows data to be written onto the disc in the same way as the hard disk freeing disc space as data are deleted and reusing freed space A disc can be formatted with UDF 1 5 or above Erase Disc Select Erase Disc to open the Erase Disc dialog box This allows you to erase the contents of your rewritable disc Close Disc ...

Страница 49: ...rough the Preferences dialog box To open the Preferences dialog box click Settings and options and select Preferences or press F6 General VCD player compliant Select to make sure that the VCD created will play in stand alone VCD players Anti flicker filter Select to apply the anti flicker filter to the menu pages The anti flicker filter reduces the flickering that happens when using a television t...

Страница 50: ...roject The duration is measured in seconds Video transition effect duration Specify how long a video transition effect is displayed on screen Audio fade in out duration Specify the amount of time it will take for the volume to reach normal levels when fading in or the lowest level when fading out Working folder Enter or locate a folder for temporary files Advanced Create index file for MPEG seekin...

Страница 51: ...mplate Manager dialog box Here you can add disc templates according to the disc format selected You can also edit or delete existing disc templates Ulead DVD MovieFactory Help Opens the Ulead DVD MovieFactory online Help Product Updates on the Web Opens the Ulead Web site to inform you about new updates patches or product releases This also gives you access to the latest offerings or promotions re...

Страница 52: ...ion Improves the quality of the output video by analyzing the video data first before encoding Treat MPEG audio as non DVD compliant Select to treat all video files that has MPEG audio as non HD DVD compliant The MPEG audio track will not be rendered to LPCM during output Auto fade out first play to menu Select to automatically crossfade from the first play clip to the menu Play all clips first be...

Страница 53: ...el disc cover insert or booklet The actual dimensions of your media or label in relation to the selected paper size is displayed to serve as your guide Printer Select a printer to use Media type Select the type of label to print Choose from a variety of media types such as front and back CD covers DVD case inserts and booklets as well as mini disc labels Paper size Select a paper template to work ...

Страница 54: ...image Transparency Adjust the transparency of the shadow by entering a value or using the slider The Text tab allows you to add and format text Shadow Select to apply a shadow to the text Shadow color Click to choose the text color Wrap text Select to wrap the text into a circle Auto fill Click to fit the text to the disc label or cover layout The text will be stretched proportionally and centered...

Страница 55: ...ls and covers for your discs It also lets you create your own paper template To create a paper template 1 Click to open the Label Once dialog box 2 In the General tab click to open the Customize Paper Template dialog box 3 Click Add to open the Edit Paper Template dialog box 4 Enter a name for the template then set the unit of measurement in Unit and paper dimensions in Paper size 5 To insert a di...

Страница 56: ...ted image on the label 2 Select the image in the Preview Window and use the handles to resize the image To move an image drag it to the desired position on the label 3 To add more images repeat steps 1 and 2 To adjust the background 1 Click the General tab 2 To adjust the transparency of the background use the Transparency slider to set the appropriate value To edit an image 1 Select the image to ...

Страница 57: ...an existing project 1 Open an existing MovieFactory project and click 2 Initially the background image used for the menu will also serve as background for your disc label The menu title serves as the disc title and the menu thumbnail descriptions are used as track names 3 Click Playlist as needed to open the Add Edit Playlist Information dialog box In Global Information specify which information y...

Страница 58: ...en click Open Importing a disc label Open your previous disc label projects for re editing or re printing To open a previously saved disc label project 1 Click Files Load Disc Label 2 Browse for the disc label file UPL to open in the Open dialog box 3 Click Open to open the project Saving a disc label After working on your disc label design you can save it for use at a later time To save your disc...

Страница 59: ...re purchasing one check first the pin connectors used on your camcorder and your computer Most DV and Digital 8 camcorders have a 4 pin connector whereas desktop computers that come with IEEE 1394 ports or installed with IEEE 1394 cards usually have 6 pin connectors The IEEE 1394 cable that is required for desktop computers is a 4 pin to 6 pin cable Most notebook computers have 4 pin connectors wh...

Страница 60: ...g sources you will need to install an analog capture card in your computer Conventional broadcast television is also an analog source To capture TV footage you need to have a TV tuner card installed in your computer Connecting the video device to the analog capture card To connect your video device to the analog capture card use either an S Video or RCA Composite cable depending on your device s v...

Страница 61: ...ecking the hardware setup After connecting your analog source to the capture or tuner card check if the card is detected by your Windows system To check if the capture or tuner card is detected 1 If you are using a video device such as a camcorder as your source insert your videotape into the video device and switch it on Make sure it is in the playback mode usually named VTR or VCR 2 Open the Con...

Страница 62: ...on Buttons are commonly used to play an assigned chapter or move to the next or previous one Compression The process of making a file smaller Nearly all digital video is compressed in some way or another through a codec Device Control A software driver that allows your computer to control video sources like the camcorder DV Abbreviation for Digital Video which is a very specific format of video DV...

Страница 63: ...d if LPCM audio is used Menu A group of objects set against a background that allows navigation through the scenes or immediately proceed to a specific portion of the title Motion Menu A menu that features animated backgrounds and or buttons MPEG audio A family of standards for low bit rate coding of audio Normalize audio This function evaluates and adjusts the audio waveform of video used in a mo...

Страница 64: ... Menus 33 D Detection sensitivity 30 Direct to MPEG capture 17 Disc Template Manager 51 E Edit Chapters 31 Edit Room 24 Editing a slideshow 28 Editing menu thumbnail 38 Enhancing your video 24 export selected clips 32 H HD DVD 12 HD DVD Advanced 12 I Image quality 51 J Joining Separating videos 28 L Label Once 53 launcher 8 Layout settings 38 M Manipulating objects 37 Media Clip Properties 23 Menu...

Страница 65: ...gs and options 49 Slideshow image duration 50 Straight Capture to Disc 43 Straight to Disc For DVD VCD or SVCD 43 T The right click menu 23 Transition effect duration 50 TV safe area 50 TV system 50 Two pass conversion 52 V VCD player compliant 49 ...

Отзывы: