MD40
PRODUCT INSTRUCTION MANUAL
MD40
Page 32 of 56
Author: N.Carapiet | Revision: 1.1
2.4.2 Installation instructions
STAGE 1
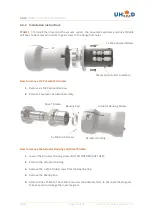
| To install the drive onto the vacuum system, the pneumatic actuator and drive thimble
will have to be removed in order to gain access to the flange bolt holes.
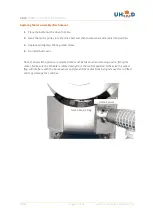
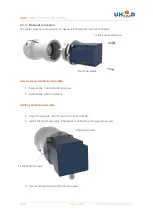
How to remove the Pneumatic Actuator
1.
Remove 2 x M4 Cap Head Screws
2.
Remove Pneumatic Actuator Assembly
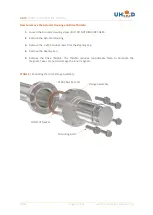
How to remove the Actuator Housing and Drive Thimble:
1.
Loosen the Actuator Housing screws BUT DO NOT REMOVE THEM
2.
Remove the Actuator Housing
3.
Remove the 3 x M3 Grub Screws from the Bearing Cap
4.
Remove the Bearing Cap
5.
Remove Drive Thimble. The thimble requires considerable force to decouple the magnets.
Take care not to damage the inner magnets.
2 x M4 Cap Head Screws
Pneumatic Actuator Assembly
Actuator Housing Screws
Actuator Housing
3 x M3 Grub Screws
Bearing Cap
Drive Thimble
Содержание MD40 Series
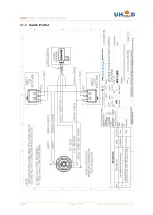
Страница 41: ...MD40 PRODUCT INSTRUCTION MANUAL MD40 Page 41 of 56 Author N Carapiet Revision 1 1 3 1 3 Switch Pin Out...
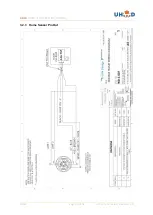
Страница 43: ...MD40 PRODUCT INSTRUCTION MANUAL MD40 Page 43 of 56 Author N Carapiet Revision 1 1 3 2 3 Home Sensor Pin Out...
Страница 47: ...MD40 PRODUCT INSTRUCTION MANUAL MD40 Page 47 of 56 Author N Carapiet Revision 1 1 Drawings Base Drive...
Страница 48: ...MD40 PRODUCT INSTRUCTION MANUAL MD40 Page 48 of 56 Author N Carapiet Revision 1 1 Dual Shaft...
Страница 49: ...MD40 PRODUCT INSTRUCTION MANUAL MD40 Page 49 of 56 Author N Carapiet Revision 1 1 Pneumatic Drive...
Страница 51: ...MD40 PRODUCT INSTRUCTION MANUAL MD40 Page 51 of 56 Author N Carapiet Revision 1 1 Side Mounted DC Motor Options...
Страница 55: ...MD40 PRODUCT INSTRUCTION MANUAL MD40 Page 55 of 56 Author N Carapiet Revision 1 1 NOTES...


