background image

4.2.6   Gateway - Time

Ubee Interactive

34

DDW2600 Wireless & DDC2700 Commercial Cable Modem/Router Subscriber User Guide • May, 2010

4.2.6

Gateway - Time

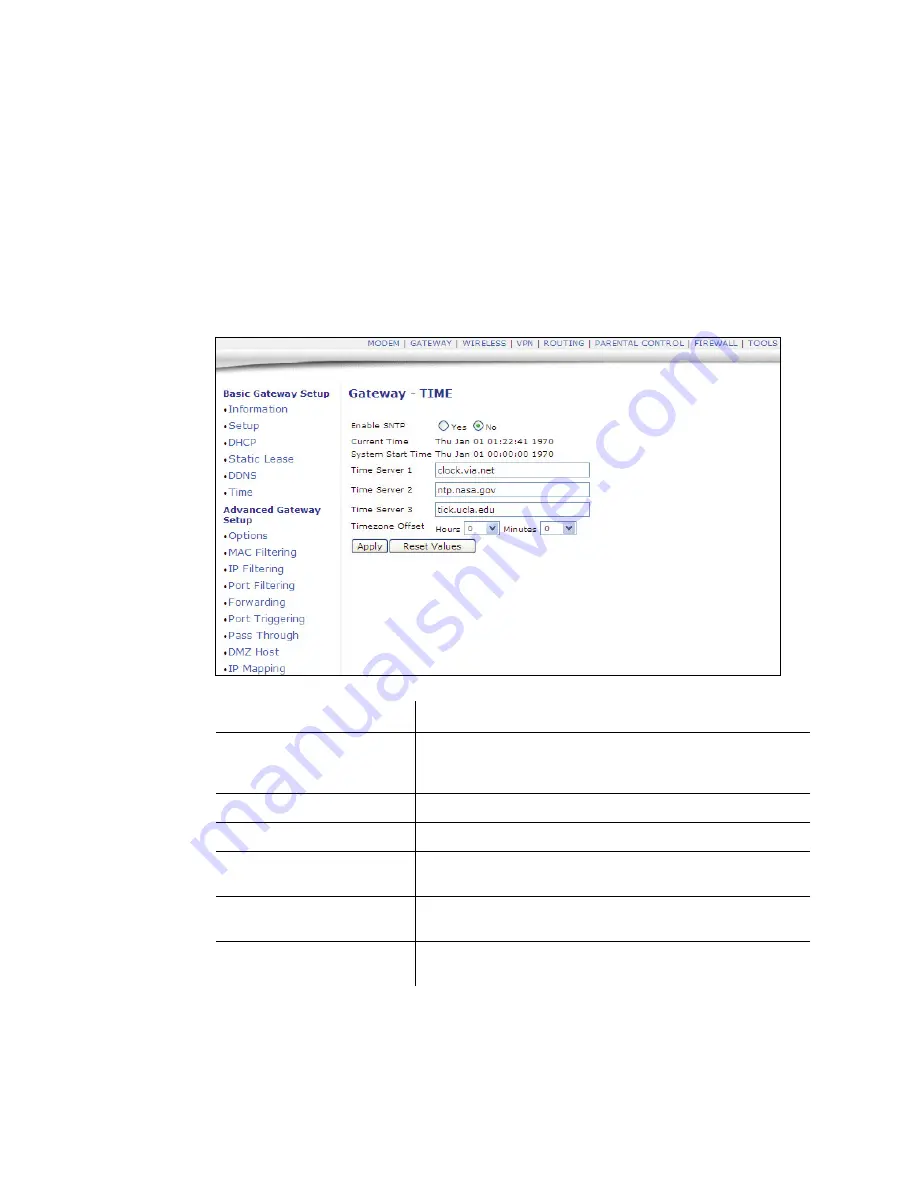
The 

Time 

option allows you to configure the system time obtained from network 

servers via Simple Network Time Protocol (SNTP). The device must be reset for any 
changes to take effect.

1. Access the web interface. Refer to 

page 14

, if needed.

2. Click the 

Gateway 

link from the top of the screen.

3. Click 

Time 

from the left side of the screen. The 

Time 

fields are explained following 

this screen example.

Label Description

Enable SNTP

Click Yes to enable SNTP (Network Time Protocol). Click No 
to disable the feature. SNTP is a protocol for synchronizing 
the clocks of computing devices over networks.

Current Time

Displays the current system time.

System Start Time

Displays the accumulated time since system was started.

Time Server 1

Defines the Time server IP address or Domain name. Use the 
one provided, or enter an alternative choice.

Time Server 2

Defines the Time server IP address or Domain name. Use the 
one provided, or enter an alternative choice.

Time Server 3

Defines the Time server IP address or Domain name. Use the 
one provided, or enter an alternative choice.

Содержание DDW2600

Страница 1: ...glewood CO 80112 1 888 390 8233 Sales email amsales ubeeinteractive com Support email amsupport ubeeinteractive com DDW2600 Wireless Router U10CC037 and DDC2700 Commercial Router U10C038 Subscriber Us...

Страница 2: ...cable agreements This material is protected by the copyright laws of the United States and other countries It may not be reproduced distributed or altered in any fashion by any entity either internal...

Страница 3: ...e Back Panel Description 9 2 6 1 DDW2600 and DDC2700 Back Panel Images 9 2 7 Device Front Panel LED Behavior 10 2 7 1 DDW2600 and DDC2700 Front Panel Images 10 2 7 2 LED Behavior Table 11 3 Install th...

Страница 4: ...ost 48 4 3 Wireless Menu 49 4 3 1 Wireless Basic 49 4 3 2 Wireless Security 51 4 3 3 Wireless Access Control 55 4 3 4 Wireless Guest Network 57 4 4 VPN Menu 61 4 4 1 VPN Enable 61 4 4 2 VPN Summary 62...

Страница 5: ...form of liquid on or into this product Do not use liquid cleaners or aerosol cleaners on or close to the product Use a soft dry cloth for cleaning Do not insert any sharp object into the product s mod...

Страница 6: ...tions contact Ubee Interactive at www ubeeinteractive com 1 3 Regulatory Statements The following regulatory statements applies to the DDW2600 or DDM2700 router 1 3 1 Industry North America Statement...

Страница 7: ...ice installation user level instructions and basic troubleshooting Important This document can be used for two different Ubee products the DDW2600 wireless cable modem router and the DDC2700 commercia...

Страница 8: ...ort may be available at http www ubeeinteractive com Wi Fi Telephone Laptops Other Wireless Devices Ethernet Enabled Devices PCs Gaming Consoles etc Customer Premises Network Residential or Small Offi...

Страница 9: ...802 11b g DSSS Downstream Frequency Range 88 MHz 860MHZ Modulation 64 256 QAM Maximum Data Rate 30Mbits sec 64QAM 42 8Mbits sec 256QAM Symbol Rate 5 057 5 361 Msymbols sec RF Input Output Power 17 to...

Страница 10: ...HCP Client Server Static IP Network Assignment Multiple Subnet Support Dynamic DNS VPN Pass Through and VPN End Point Support IPSec L2TP PPTP Port Forwarding Port Filtering Port Triggering RIP v1 v2 E...

Страница 11: ...nnecting a wireless client to the wireless device for example a PC the following default values are used SSID System Set Identifier The SSID is what the wireless device uses to advertise itself The SS...

Страница 12: ...dress in the opening screen the Cable Modem Information screen To access the web interface refer to page 13 2 5 Device Package Components The package for the DDW2600 wireless cable modem router or the...

Страница 13: ...res the default settings of the device including wireless DDW2600 only and custom gateway settings Use a pointed object to push down on the reset button for 5 seconds until power LED turns off After t...

Страница 14: ...y 2010 2 7 Device Front Panel LED Behavior This section describes what the device LEDs indicate on the front panel of the DDW2600 wireless cable modem router or the DDM2700 commercial cable modem rout...

Страница 15: ...Depends on Ethernet Status On if Connected Depends on Ethernet Status On if Connected DS Locked On Slow Flash Off On US Ranging On On Slow Flash On US Ranged On On Slow Flash On IP Init and Registrati...

Страница 16: ...2 7 2 LED Behavior Table Ubee Interactive 12 DDW2600 Wireless DDC2700 Commercial Cable Modem Router Subscriber User Guide May 2010...

Страница 17: ...reless Cable Modem Only Keep the wireless cable modem and wireless clients in open areas or far away from transformers heavy duty motors microwave ovens refrigerators fluorescent lights and other manu...

Страница 18: ...access the web interface 1 From the computer launch an internet browser for example Internet Explorer Netscape Safari Firefox Note The computer must be connected to an Ethernet port on the cable mode...

Страница 19: ...erface is an initial way to validate the installation No extra steps are required at this point for a basic LAN and or wireless network DDW2600 only 6 Proceed to page 16 to test network connectivity a...

Страница 20: ...Wireless Cable Modem Router Only To confirm operations or to connect wireless devices to the network for example a laptop computer do the following 1 Use the device LEDs to confirm operations The WLAN...

Страница 21: ...ght click on the My Computer icon on your desktop and choose Properties 2 Click the Device Manager tab and look for a yellow exclamation point or red X over the NIC in the Network Adapters field If yo...

Страница 22: ...3 2 2 Additional Troubleshooting Information Ubee Interactive 18 DDW2600 Wireless DDC2700 Commercial Cable Modem Router Subscriber User Guide May 2010...

Страница 23: ...the Modem menu of the device web user interface 4 1 1 Modem Cable Modem Information This section explains how to use the Cable Modem Information screen This is a read only screen and it displays the d...

Страница 24: ...nal version number that identifies the hardware design CA Key The device installs a Certificate Authority CA key that is transferred from the service provider s server after the cable modem is authent...

Страница 25: ...in locking to a downstream channel Locked Not Locked Downstream Channel ID Displays the downstream channel ID Downstream Frequency Displays the downstream channel frequency on which the cable modem i...

Страница 26: ...are listed below the following screen example Label Description Upstream Lock Current cable modem upstream lock status Locked Not Locked Upstream Channel ID Displays the current cable modem upstream c...

Страница 27: ...menu and then the Upstream Burst link from the left side of the screen Field explanations are listed below the following screen example Label Description Modulation Type QPSK 16QAM Differential Encod...

Страница 28: ...ent Log screen displays log information that may be useful to diagnose operational issues with the device 1 Access the web interface Refer to page 14 if needed 2 Click the Event Log link from the left...

Страница 29: ...below the following screen example Label Description First Time Displays the time of the event Last Time Displays the last time of the event Priority Displays the event log severity Description Displ...

Страница 30: ...ation 1 Access the web interface Refer to page 14 if needed 2 Click the Gateway link from the top of the screen Then select Information 3 The Information fields are defined following this screen examp...

Страница 31: ...sabled Wireless Status Displays the status of the wireless feature Enabled Disabled Operating Mode Displays what mode the router is working in Bridge NAT Router or NAT Router Note Firewall menu option...

Страница 32: ...local IP address which will be the default gateway address for all wired LAN hosts that connect to the cable modem MAC Address Displays the LAN interface s hardware address WAN IP Address Displays the...

Страница 33: ...neling Protocol PPTP you must enter a username password and the PPTP server s hostname or IP address 4 PPTP Static For Point to Point Tunneling Protocol Static PPTP you must enter the static IP addres...

Страница 34: ...this screen are ignored Private Starting Address Define the starting private IP address for the pool of IP addresses that may be used by connecting clients Private addresses are translated to public...

Страница 35: ...DDW2600 only Each client is also listed with the following information MAC Address IP Address Subnet Mask Duration Expires Duration displays the accumulated time since the client acquired the IP addre...

Страница 36: ...ed 2 Click the Gateway link from the top of the screen 3 Click Static Lease from the left side of the screen The Static Lease fields are explained following this screen example Label Description Index...

Страница 37: ...eft side of the screen The DDNS fields are explained following this screen example Label Description DDNS Service Select the service provider used for your DDNS Service or Disabled www DyDNS org www n...

Страница 38: ...xplained following this screen example Label Description Enable SNTP Click Yes to enable SNTP Network Time Protocol Click No to disable the feature SNTP is a protocol for synchronizing the clocks of c...

Страница 39: ...dem Router Subscriber User Guide May 2010 35 Time Zone Offset If needed define the time zone offset in Hours and Minutes For example 8 means GMT 08 1 means GMT 01 Apply Click Apply to save all screen...

Страница 40: ...4 2 6 Gateway Time Ubee Interactive 36 DDW2600 Wireless DDC2700 Commercial Cable Modem Router Subscriber User Guide May 2010...

Страница 41: ...PN request to a host located behind the router NAT makes this attempt fail Select Enable to force the router to redirect the IPSec request to the local host PPTP PassThrough Enabled by default If Inte...

Страница 42: ...MAC Filtering from the left side of the screen The MAC Filtering fields are explained following this screen example 4 2 9 Advanced Gateway Setup IP Filtering The IP Filtering option allows you to fil...

Страница 43: ...ort Filtering option allows you to configure port filters in order to block specific internet services on specific ports to all devices on the LAN 1 Access the web interface Refer to page 14 if needed...

Страница 44: ...Guide May 2010 explained following this screen example Label Description Start Port Enter the start port End Port Enter the end port Protocol Select the protocol type or select Both for UDP and TCP En...

Страница 45: ...recommended to support the setup of forwarding rules Tools Client List on page 82 Use this option to obtain the MAC and IP address of the internal host for which you are setting up a forwarding rule...

Страница 46: ...lic Interface IP Normally this field is not modified unless you wish to designate another router on the network to forward data through Ext Start Port Define the port number to start the range of port...

Страница 47: ...internet user initializes a Telnet connection request to this router s public IP address the router recognizes that this is a Telnet connection request to a station According to existing forwarding ru...

Страница 48: ...ck the Gateway link from the top of the screen 3 Click Port Triggering from the left side of the screen The Port Triggering fields are explained following this screen example Label Description Trigger...

Страница 49: ...ess DDC2700 Commercial Cable Modem Router Subscriber User Guide May 2010 45 End Port Enter a port number or the ending port number in a range of port numbers Protocol Define the protocol type for this...

Страница 50: ...t and Target Port Trigger port is defined as the service request with a specific destination port number sent from a LAN side host Target Port is defined as the ports this specific application require...

Страница 51: ...h table are treated as bridge devices storing and forwarding data between LAN interconnections 1 Access the web interface Refer to page 14 if needed 2 Click the Gateway link from the top of the screen...

Страница 52: ...be exposed or visible to the WAN public internet This may be used when applications do not work with port triggers or for other networking strategies 1 Access the web interface Refer to page 14 if nee...

Страница 53: ...oadcast SSID 1 Access the web interface Refer to page 14 if needed 2 Click the Wireless link from the top of the screen 3 Click Basic from the left side of the screen The Basic fields are explained fo...

Страница 54: ...loy the wireless network This allows you to set the operating frequency channel depending on your particular region Interface Select Enabled Disabled to turn on or off the wireless radio interface Off...

Страница 55: ...t can have different SSIDs and security settings Refer to page 57 for more information on guest networks 1 Access the web interface Refer to page 14 if needed 2 Click the Wireless link from the top of...

Страница 56: ...SK is enabled enter a preshared key Refer to page 7 for the default value of the shared key Connecting clients will need to enter this shared key to access the network RADIUS Server Input the IP addre...

Страница 57: ...matically Apply Click to save all values changes in this screen WiFi Protected Setup Use this feature to setup WPS Wifi Protected Setup for devices connecting to the wireless network Wifi protected se...

Страница 58: ...PIN If PIN is selected clients are required to enter the PIN in order to access the wireless network For Push Button a client pushes a button either on the device or in software on the device Within...

Страница 59: ...to turn off MAC Restrictions and allow any wireless client to connect to this wireless router Note however if you use other security mechanisms for access to the wireless network clients must still ad...

Страница 60: ...ected Clients List of current connected Wireless client listed by MAC address Fields definitions are Age s The duration since the wireless client connected to wireless router RSSI dBm Received signal...

Страница 61: ...se separate networks can have varying levels of security and be used to segregate traffic A maximum of four SSIDs are allowed on one AP simultaneously 1 for Admin access 3 for Guest Networks Note You...

Страница 62: ...nt will be granted access to the wireless LAN WPA2 Advanced protocol certified through Wi Fi Alliance s WPA2 program implements the mandatory elements of 802 11i In particular it introduces a new AES...

Страница 63: ...ion Shared Key is an authentication method used by wireless LANs which follow the IEEE 802 11 standard Wireless devices authenticate each other by using a secret key that is kept by both devices 802 1...

Страница 64: ...criber User Guide May 2010 Lease Time Define the lease time for DHCP client Before expiration DHCP client will resend DHCP request Max value is 86400 seconds Apply Click Apply to save all DHCP setting...

Страница 65: ...en trusted nodes using the public Internet VPNs for example can be used to separate the traffic of different user communities over an underlying network with strong security features For an overview o...

Страница 66: ...tion PPTP Server Select Disabled or Enabled to enable a Point to Point Tunneling Protocol PPTP VPN Refer to page 68 for more information Configure Click Configure to activate the VPN Refer to page 68...

Страница 67: ...e VPN link from the top of the screen 3 Click Configure from the left side of the screen The Configure fields are explained following this screen example 4 For an overview of how VPNs are structured a...

Страница 68: ...multiple rules for SAs that connect from remote IPSec routers that have dynamic WAN IP addresses In Main mode the ID type and content are encrypted to provide identity protection In this case VPN conc...

Страница 69: ...cations DES a 56 bit key with the DES encryption algorithm 3DES a 168 bit key with the DES encryption algorithm The DDW2600 Wireless DDC2700 Commercial Cable Modem Router and the remote IPSec router m...

Страница 70: ...me Define the length of time before an IPSec SA automatically renegotiates keys It may range from 120 to 86400 seconds Show Advanced Settings Click this button to specify advanced parameters for the V...

Страница 71: ...led or Disabled for sending NetBIOS packets through the VPN connection NetBIOS Network Basic Input Output System are TCP or UDP packets that enable a computer to find other computers It may sometimes...

Страница 72: ...14 if needed 2 Click the VPN link from the top of the screen 3 Click L2TP PPTP from the left side of the screen The L2TP PPTP fields are explained following this screen example Label Description PPP A...

Страница 73: ...te a Security Association SA the foundation of an IPSec VPN An SA is built from the authentication provided by the AH and ESP protocols The primary function of key management is to establish and maint...

Страница 74: ...nterface Refer to page 14 if needed 2 Click the VPN link from the top of the screen 3 Click Event Log from the left side of the screen The Event Log fields are explained following this screen example...

Страница 75: ...certain web sites and blocking certain sites by keywords 1 Access the web interface Refer to page 14 if needed 2 Click the Parental Control link from the top of the screen 4 5 1 Parental Control User...

Страница 76: ...ields Content Rule Select from the pop up menu an existing content rule that defines what kind of websites the user can visit or not White List Access Only If you have created a content rule which def...

Страница 77: ...14 if needed 2 Click the Parental Control link from the top of the screen 3 Click Basic from the left side of the screen The Basic fields are explained following this screen example Label Description...

Страница 78: ...s containing those words Enter a keyword and click the Add Keyword button To remove a keyword select it from the list and click Remove Keyword Blocked Domain List Add Domain Remove Domain Enter web do...

Страница 79: ...and click the Remove button Days to Block Select the days to block Internet access The internet access times for the days selected to block are defined in the following fields Time to Block All Day Se...

Страница 80: ...access to specific sites Note Firewall menu options are not available when the device is in Bridge mode Firewall options are available only when the device is in NAT NATRoute or Route modes 1 Access t...

Страница 81: ...nents or Internet and intranet business applications Filter ActiveX Enable this filter to stop ActiveX applications from being launched on connected computers ActiveX is a tool for building dynamic an...

Страница 82: ...de of the screen The Event Log fields are explained following this screen example 4 Enter the appropriate email address and password information enter the SMTP server then click the Enable button Clic...

Страница 83: ...by firewall Blocked Connections Select to log all access attempts that are blocked by firewall Known Internet Attacks Select to log all known attacks from Internet Product Configuration Events Select...

Страница 84: ...to test connectivity to a specific device by its IP address 1 Access the web interface Refer to page 14 if needed 2 Click the Tools link from the top of the screen 3 Click Ping from the left side of t...

Страница 85: ...en The Trace Route fields are explained following this screen example Ping Interval Define the interval between ping operations in milliseconds Start Test Abort Test Clear Results Click Start to start...

Страница 86: ...e trace route test Click Abort Test to cancel the test Click Clear Results to clear the displayed trace route results Results Refresh This Results area of the screen displays the trace route results C...

Страница 87: ...canning Plan fields are explained following this screen example Label Description Lowest Center Frequency Lowest and Highest Center Frequency are used to define a scope for the frequencies used by the...

Страница 88: ...this web interface For information on default logins refer to page 7 1 Access the web interface Refer to page 14 if needed 2 Click the Tools link from the top of the screen 3 Click Password from the...

Страница 89: ...efer to page 14 if needed 2 Click the Tools link from the top of the screen 3 Click User Default from the left side of the screen The User Default options are explained following this screen example L...

Отзывы: